Jack Skellington Sewing Project (with Video)
Welcome to Sugar, Spice & Glitter! Please note, this post may contain affiliate links. For more details, see our Full Disclosure.
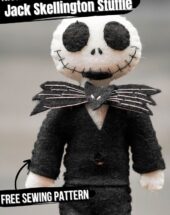
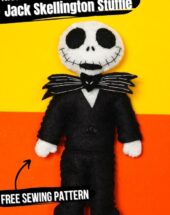


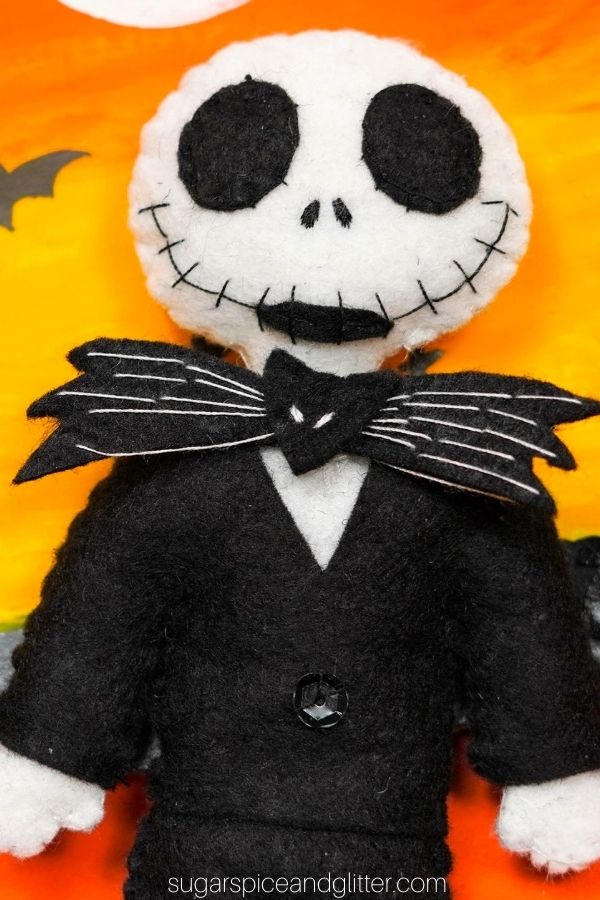
Finishing up our trio of Nightmare Before Christmas Stuffies with the most iconic of them all, a Felt Jack Skellington Stuffie! This Jack Skellington craft is a super easy sewing project for kids to make using our free printable sewing pattern.
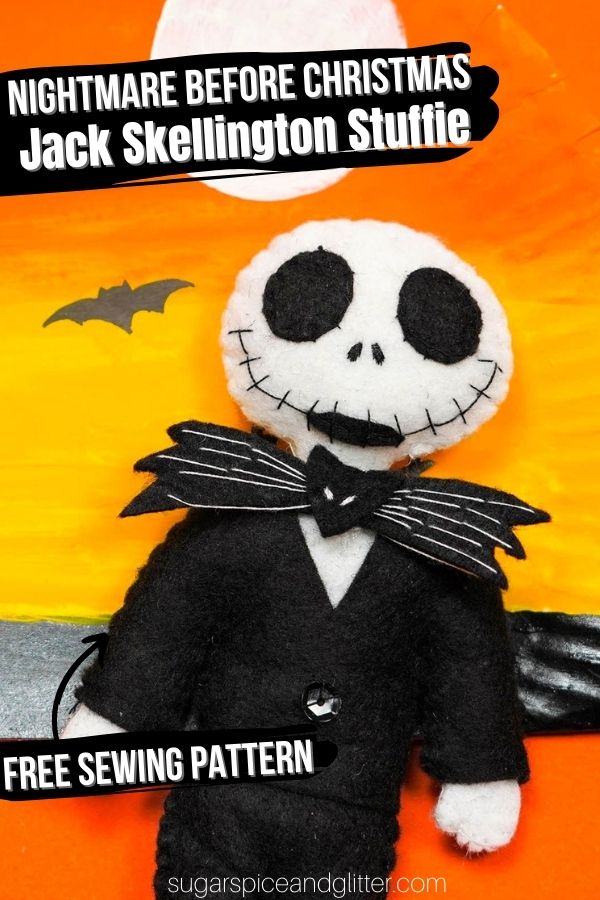
Felt Jack Skellington Sewing Project for Kids
We’ve had so much fun making and sharing our Nightmare Before Christmas sewing crafts for kids, it’s kind of a shame to see it come to an end. (I guess I’ll just have to come up with another sewing series soon!)
Ella and one of my best friend’s kids are both on a mini stuffie sewing kick so we just started a penpal system where they can mail their latest creations to each other and our trio of NBC stuffies is our first shipment. I’m so excited to see the look on her face when she sees what Ella made for her!
We designed our stuffies to be pocket-sized, but if desired, you can increase the size of the pattern in your printer settings and make a giant Jack Skellington pillow. You can also turn the stuffies into ornaments by sewing a loop of ribbon to the top, or make them into flat clothing patches by excluding the batting and bottom felt pieces.
Sewing Tips
Whenever we need to cut out intricate shapes from felt, I always grab some freezer paper and use the freezer paper trick to cut out our felt shapes, but good-quality felt and a sharp pair of scissors also makes all the difference.
Normally, I only publish sewing crafts that kids can make independently, but the stitching on Jack’s smile may be a bit too tricky for some beginners. You might want to help out with this step, or opt for a good-quality, fine-tip fabric pen to draw on the stitches.
To make this Nightmare Before Christmas stuffie craft, you just need to know how to do a basic whip stitch and a blanket stitch. (However, you can just use a whip stitch on the sides if the blanket stitch proves to be too tricky. The links above are to my friend Maggie’s channel and they are perfect for kids learning how to sew.)
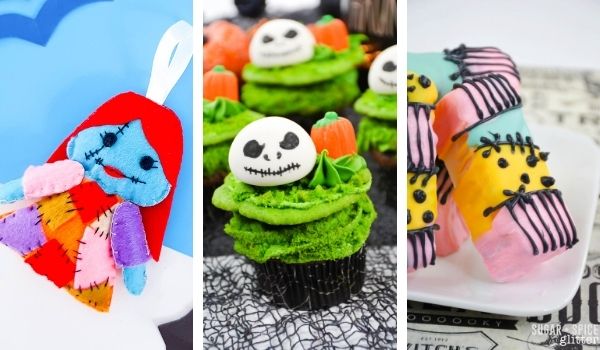
More Nightmare Before Christmas Crafts and Recipes:
- Sally Dawn Stuffie Sewing Project
- Zero Stuffie Sewing Project
- Jack Skellington Paper Ornaments
- Cricut Nightmare Before Christmas Coffee Cup
- Jack Skellington Sugar Cookies
- Nightmare Before Christmas Kitchen Gifts
- Jack Skellington Cupcakes
- Sally Dawn Candy Bars
- Jack Skellington Pull-Apart Cupcake Cake from my friend Stacey over at the Soccer Mom Blog
- NBC Sally Sugar Cookies from my friend Jana over at Whiskey and Sunshine
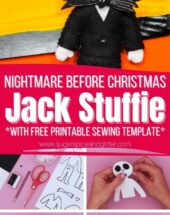
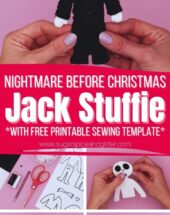
Be sure to check out our quick video on how to make your own Jack Skellington Felt Stuffie, and then don’t forget to scroll down to grab your free printable sewing pattern and instructions:
Materials to Make a Jack Skellington Stuffie
- Felt: Black and White
- Pencil or fabric marker
- Black and White Thread
- Cotton Batting/Stuffing
- Small Button or Sequin, optional
- Scissors
- Freezer paper and iron (if using the freezer paper trick)
- Needle
- Hot Glue Gun, optional
- Jack Skellington Felt Pattern
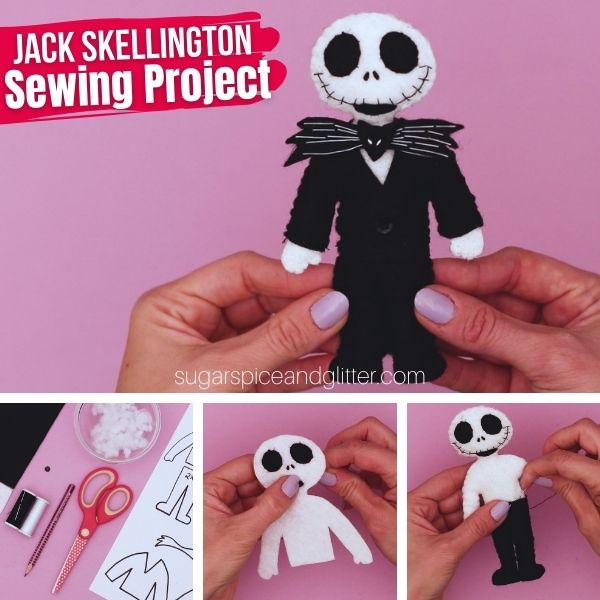
How to Make a Jack Skellington Stuffie
Print out the pattern and cut out individual shapes.
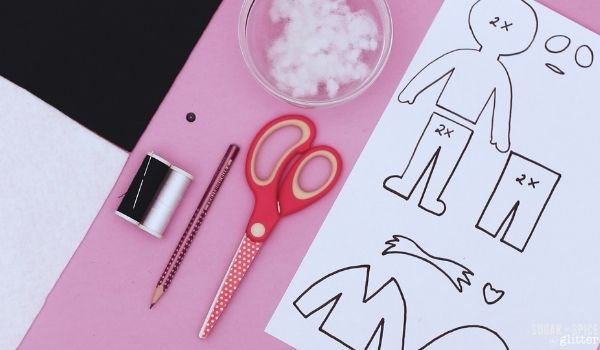
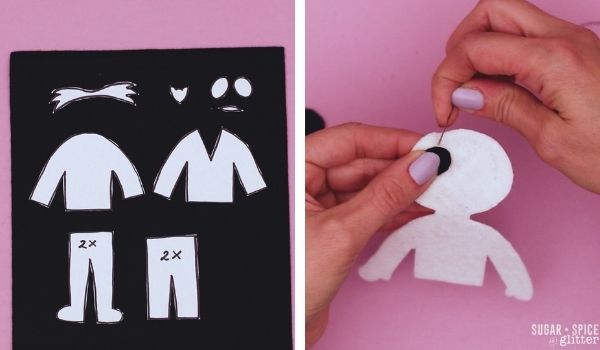
Trace the pattern pieces onto the indicated pieces of felt and cut out the felt shapes.
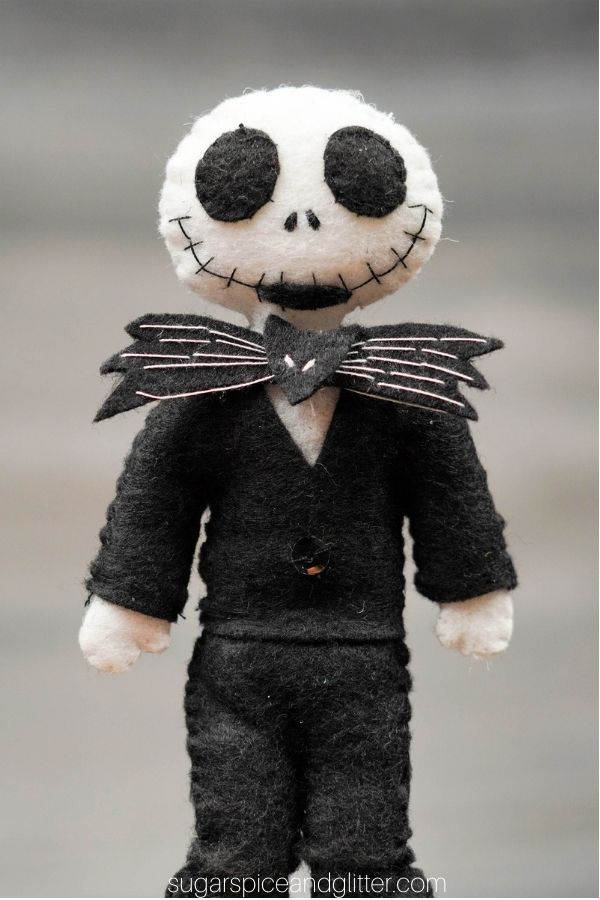
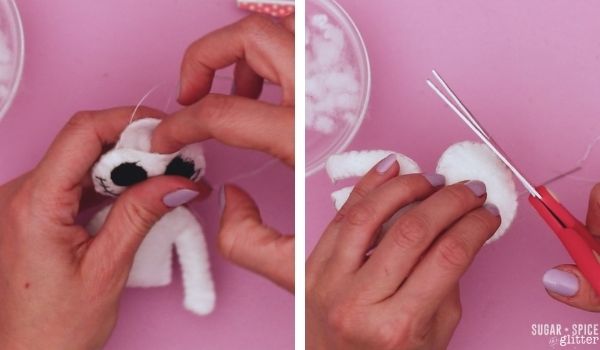
First, start with Jack’s facial features. Sew on his big black circle eyes using a cross stitch and then tie off.
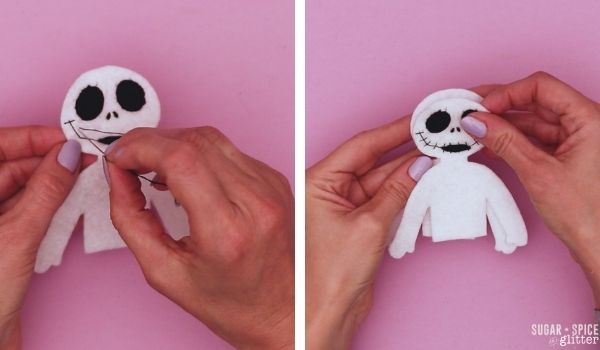
Using a cross stitch, make two vertical stitchess in the center of Jack’s face to suggest nostrils. You will need to go over these stitches several times (in the same direction) to achieve the thickness needed.
Sew the small crescent shape for the center of Jack’s mouth and then make a large stitches extended from the crescent shape to make the line of Jack’s smile. Go back over this line with perpendicular stitches across to create his famous stitched mouth. Repeat this on the opposite side so that the smile extends across his face.
Place the white felt body piece with the facial features over the plain white felt body piece and use a whip stitch to connect the two, leaving a small opening to stuff with cotton batting.
Fill Jack’s body with cotton batting to your personal preference, then close up the opening and tie off. Set aside.
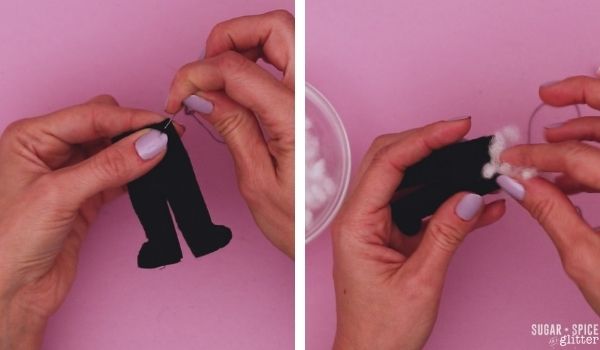
Next, use a whip stitch to connect the top and bottom leg pieces together. Leave the top of the pants open to stuff with batting and connect the pants to the rest of Jack’s body.
Insert Jack’s body (white body piece) into the opening, then use a whip stitch to secure the two pieces together.
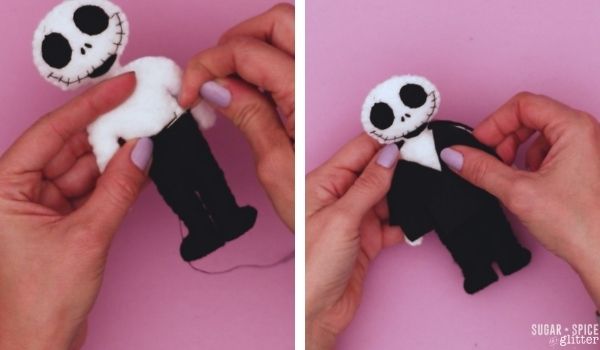
Place Jack’s pants around his legs and sew in place, using a whip stitch. You can do this so that the pants are removable or permanently connected based on your preference.
Place Jack’s jacket around the white body piece and sew in place, using a whip stitch. Set aside.
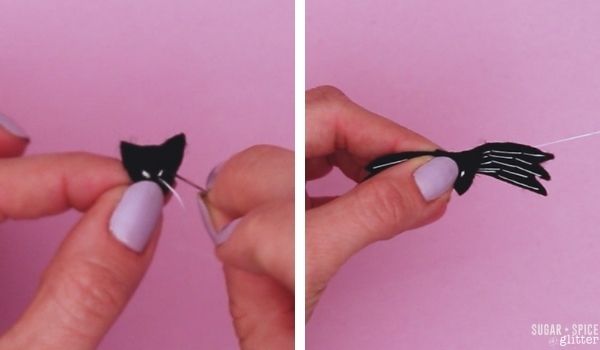
Next, take the bat head piece and make two eyes by using a single cross stitch and then going over the stitch several times to make it as thick as you think it should look.
Take the bat wings and use a cross stitch to make long, horizontal lines from the center of the wings outwards, almost like a pinstripe pattern.
Connect the bat head to the center of the bat wings.
Sew the bat neck piece in place just under Jack’s head.
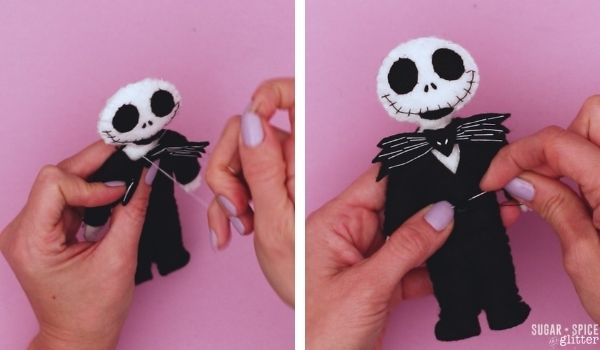
If desired, sew a small button or sequin to the front of Jack’s jacket.
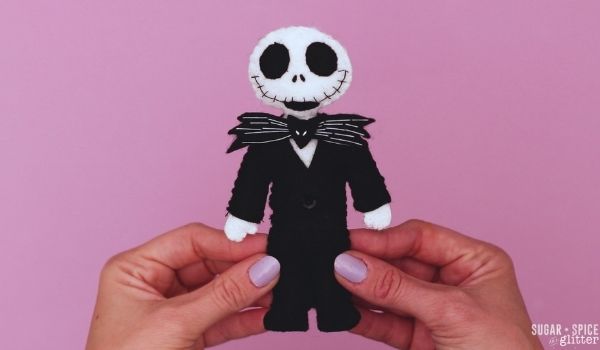
And you’re done – your Jack Skellington stuffie is ready for playing or gifting!
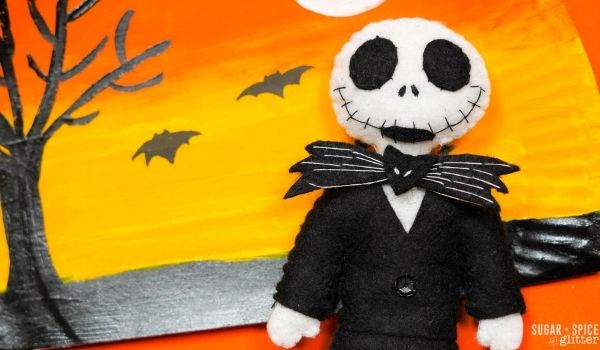
Pin this Jack Skellington Sewing Project for your next crafting session:

Grab your free printable instructions for our Felt Jack Skellington craft – and don’t forget to grab your Jack Skellington Felt Pattern:
Want to Save This Recipe?
Enter your email & I'll send it to your inbox. Plus, get great new recipes from me every week!
By submitting this form, you consent to receive emails from Sugar, Spice and Glitter.
Jack Skellington Sewing Project
A step-by-step tutorial to make your own Jack Skellington felt stuffie, a fun DIY sewing project for kids who love Nightmare Before Christmas. It also makes a great homemade gift for the Nightmare Before Christmas fan in your life.
Materials
- Felt: Black and White
- Pencil or fabric marker
- Black and White Thread
- Cotton Batting/Stuffing
- Small Button or Sequin, optional
- Jack Skellington Felt Pattern
Tools
- Scissors
- Freezer paper and iron (if using the freezer paper trick)
- Needle
- Hot Glue Gun, optional
Instructions
- Print out the pattern and cut out individual shapes.
- Trace the pattern pieces onto the indicated pieces of felt and cut out the felt shapes.
- First, start with Jack's facial features. Sew on his big black circle eyes using a cross stitch and then tie off.
- Using a cross stitch, make two vertical stitchess in the center of Jack's face to suggest nostrils. You will need to go over these stitches several times (in the same direction) to achieve the thickness needed.
- Sew the small crescent shape for the center of Jack's mouth and then make a large stitches extended from the crescent shape to make the line of Jack's smile. Go back over this line with perpendicular stitches across to create his famous stitched mouth. Repeat this on the opposite side so that the smile extends across his face.
- Place the white felt body piece with the facial features over the plain white felt body piece and use a whip stitch to connect the two, leaving a small opening to stuff with cotton batting.
- Fill Jack's body with cotton batting to your personal preference, then close up the opening and tie off. Set aside.
- Next, use a whip stitch to connect the top and bottom leg pieces together. Leave the top of the pants open to stuff with batting and connect the pants to the rest of Jack's body.
- Insert Jack's body (white body piece) into the opening, then use a whip stitch to secure the two pieces together.
- Place Jack's pants around his legs and sew in place, using a whip stitch. You can do this so that the pants are removable or permanently connected based on your preference.
- Place Jack's jacket around the white body piece and sew in place, using a whip stitch. Set aside.
- Next, take the bat head piece and make two eyes by using a single cross stitch and then going over the stitch several times to make it as thick as you think it should look.
- Take the bat wings and use a cross stitch to make long, horizontal lines from the center of the wings outwards, almost like a pinstripe pattern.
- Connect the bat head to the center of the bat wings.
- Sew the bat neck piece in place just under Jack's head.
- If desired, sew a small button or sequin to the front of Jack's jacket.
Recommended Products
As an Amazon Associate and member of other affiliate programs, I earn from qualifying purchases.


I hope your kids love getting to make their own DIY Jack Skellington Stuffie as much as mine did!
For more Disney craft ideas, check out our full Disney craft collection here:

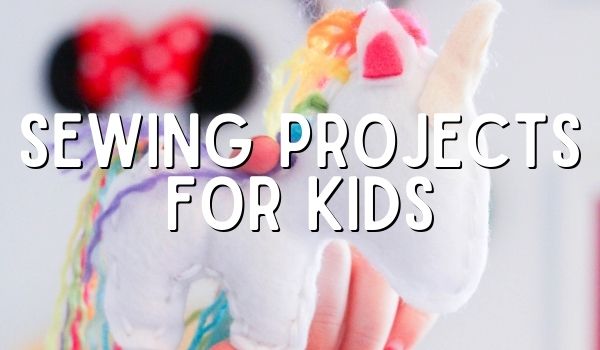
For more free sewing patterns, check out our full Sewing Projects for Kids collection here:
For more craft ideas, check out our full kids’ craft collection here:
Or, for more Christmas craft ideas, check out our full Christmas craft collection here: