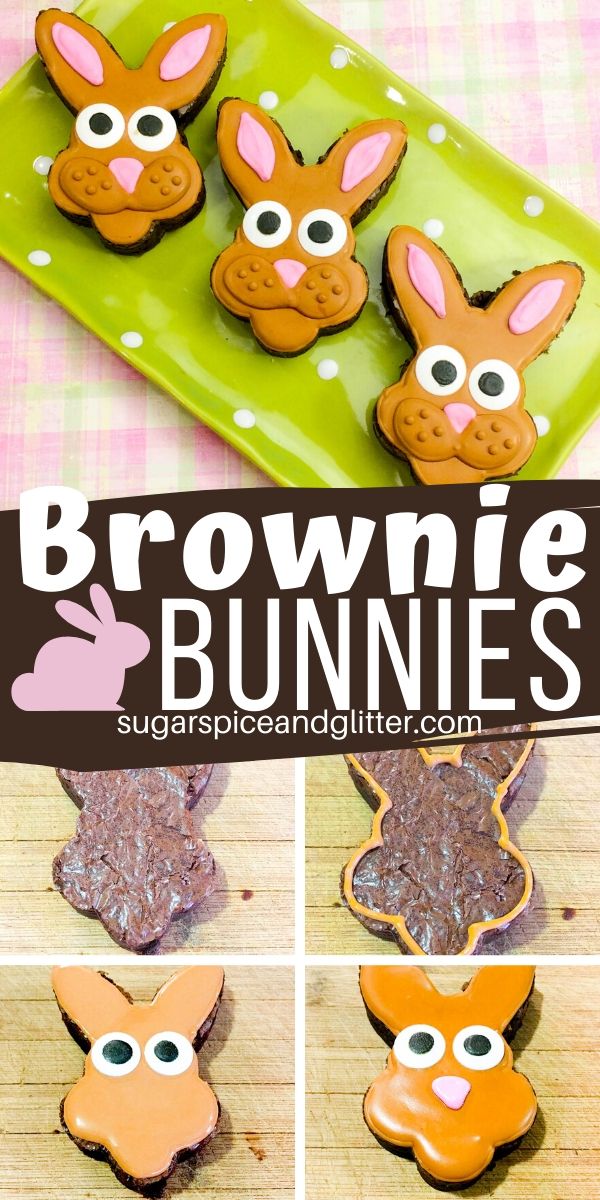
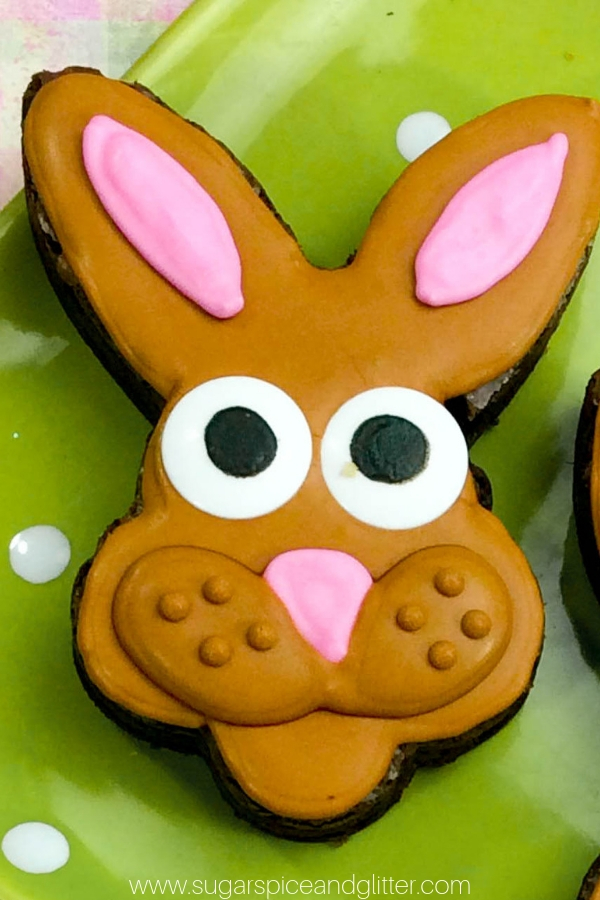
Easter Bunny Brownies
Welcome to Sugar, Spice & Glitter! Please note, this post may contain affiliate links. For more details, see our Full Disclosure.
A fun Easter Brownie recipe, these Easter Bunny Brownies look like they came from a professional bakery but are simple enough for beginners to make! This cute Easter dessert for kids would also be perfect for an Easter lunchbox treat!

Easter Brownie Recipe
I love getting carried away with a theme – whether it’s planning an over the top Mermaid Party or a fun family movie night. However, I also try to be reasonable when it comes to costs and time investment. (Key word: try)
Buying a half dozen bunny brownies from a bakery as a special treat for the kids would easily run you $18 or more, but making them yourself can be done for just the cost of a box of brownie mix and a package of edible eyes! (If you don’t have time to order edible eyes online, you can also make them at home with this tutorial from My Name is Snickerdoodle.)
While I love to play around in the kitchen, I definitely consider myself still a beginner when it comes to dessert decorating. Luckily, this brownie bunny recipe requires no advanced skills. As long as you make the icing thick enough to pipe on, and give the layers enough time to try, these brownie bunnies end up being super simple to make.
(If you have less time, you can skip doing the second layer of frosting to build up the cheeks, eyes and nose and just use mini Nilla wafers for the cheeks and candies or sprinkles for the nose and ears.)

These brownies would work for any bunny theme – I think they look like PJ Funnybunny’s brothers and sisters in the Very Bad Bunny (one of my childhood favorites), but they could easily be Peter Rabbit or you can change their frosting color to be Thumber from Bambi (gray) or The White Rabbit from Alice in Wonderland. How cute would these be as a treat for a Disney movie night?
The size of your bunny cookie cutter is going to determine how many bunnies you get out of your brownie batch, so you may need to double or triple this recipe as needed.
There will be some brownie scraps leftover after cutting out the bunny shapes, which you can use in a variety of ways:
- Use to make a No-Bake Cheesecake base
- Make Brownie Bread Pudding (recipe from Sugarhero)
- Crumble on top of ice cream sundaes or into a milkshake
- Make Brownie Pops (recipe from Barbara Bakes)
For even more fun Easter Ideas, check out our Easter Planning eBook, featuring 32 of our favorite Easter crafts, recipes and decor ideas – it’s free for e-mail subscribers:

Ingredients for Brownie Bunnies
- Brownie mix
- Plus Eggs, oil and water called for on the box
- Large edible eyes
- Egg whites
- Cream of tarter
- Vanilla extract
- Powdered icing sugar
- Brown gel food coloring
- Pink gel food coloring
Scroll down to the printable recipe card for full measurements.
Tip: If you have less time, you can skip doing the second layer of frosting to build up the cheeks, eyes and nose. Just use Nilla wafers for the cheeks and candies or sprinkles for the nose and ears.
Kitchen Tools You May Find Helpful
- 2 piping bags
- Two number 2 piping tips – highly recommend a basic piping set to avoid buying individual tips
- 1 squeeze bottle
- Cookie sheet
- Parchment paper
- 9″ x 13″ baking dish – I love these Pyrex dishes with fitted lids
- 1 bunny cookie cutter, about 4 inches in height
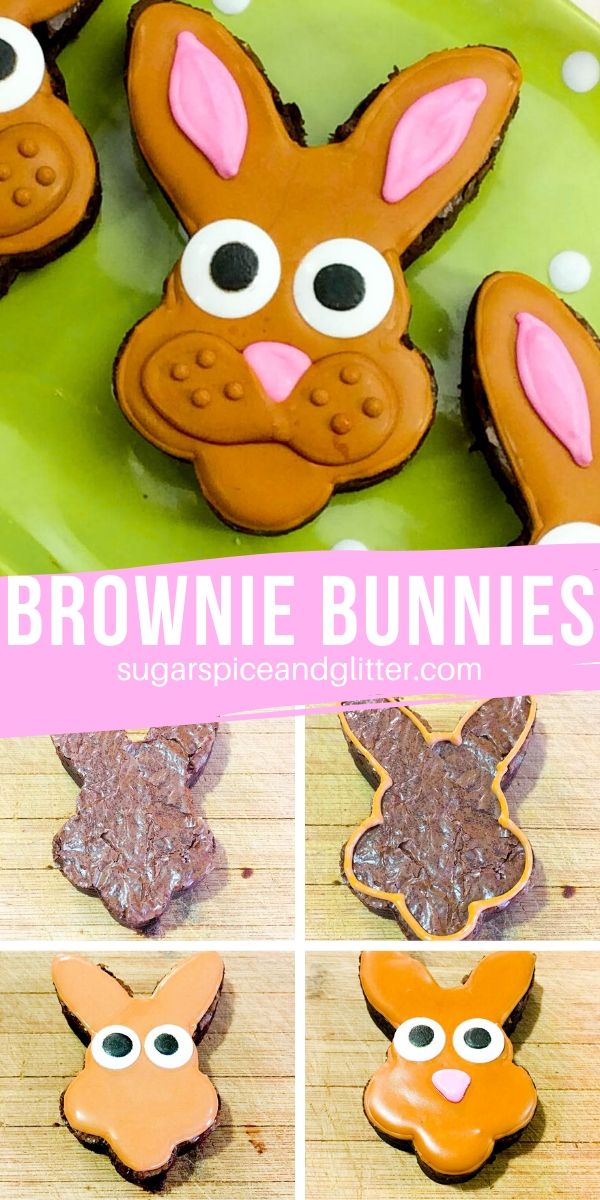
How to Make Easter Bunny Brownies
Preheat oven to 350ºF
Follow the directions on the back of the brownie box in order to bake the brownies
Tear off a large sheet of parchment paper so that the sides come up over the 9×13 baking dish
Pour brownie batter into the baking dish and bake in the preheated oven for 25-30 minutes or until a tooth pick comes out clean
Let brownies completely cool as you prepare the icing.
Using a standing mixer, mix together the egg whites, cream of tartar, vanilla, and powdered icing sugar. Beat until stiff peaks form, about 4 minutes.
Once the royal icing is made, split into 2 bowls
Add a few drops of brown food coloring into 1 bowl and mix. Add in a few more drops to get the shade you want
Repeat step with the pink coloring in the second bowl.
Scoop the pink royal icing into one piping bag, and about 1/3 cup of the brown icing into the second piping bag.
Add 2 teaspoons of water into the brown royal icing and mix until combined
Pour into the squeeze bottle
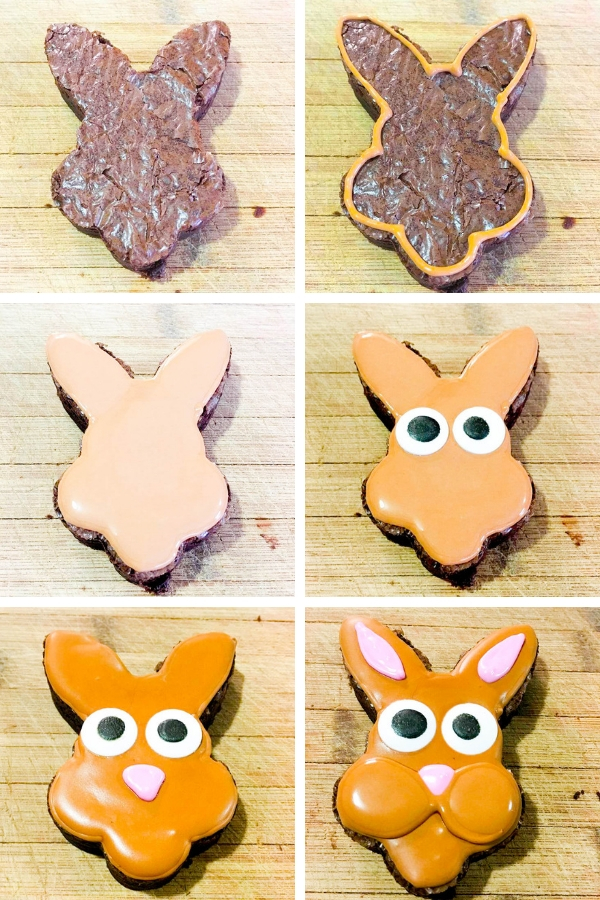
Carefully lift the parchment paper out of the baking dish with the brownies and place onto the counter
Using the bunny cookie cutter, cut out 6 bunnies.
Place cut out bunnies onto a cookie sheet
Using the piping bag with the brown icing, outline the shape of the bunnies head.
Fill in with the brown thinned icing in the squeeze bottle.
Add 2 large candy eyes into the center of the bunny
Let icing dry for 2 hours before moving on to add the final details.
Once the base layer is dry, using the pink piping bag, pipe a upside down triangle under the eyes for the bunny’s nose.
Pipe the pink ovals for the ears.
Using the brown icing, pipe cheeks on the bunny
Let the cheeks dry for an hour before adding on the small dots for the “whiskers”
Let bunny completely dry for an hour before enjoying!
Pin this Easy Bunny Dessert recipe:

Grab your free printable for our Easter Bunny Brownie recipe:
Want to Save This Recipe?
Enter your email & I'll send it to your inbox. Plus, get great new recipes from me every week!
By submitting this form, you consent to receive emails from Sugar, Spice and Glitter.
Easter Bunny Brownies
A super simple tutorial for Bunny Brownies - an easy Easter dessert for kids or a fun addition to a family movie night.
Ingredients
- Brownie mix
- Plus Eggs, oil and water called for on the box
- 1 package of large edible eyes
- 3 egg whites
- 1/4 teaspoon cream of tartar
- 1/2 teaspoon vanilla extract
- 3 - 4 cups powdered icing sugar
- Brown gel food coloring
- Pink gel food coloring
Instructions
- Preheat oven to 350 degrees
- Follow the directions on the back of the brownie box in order to bake the brownies
- Tear off a large sheet of parchment paper so that the sides come up over the 9x13 baking dish
- Pour brownie batter into the baking dish and bake in the preheated oven for 25-30 minutes or until a tooth pick comes out clean
- Let brownies completely cool as you prepare the icing.
- Using a standing mixer, mix together the egg whites, cream of tartar, vanilla, and powdered icing sugar. Beat until stiff peaks form, about 4 minutes.
- Once the royal icing is made, split into 2 bowls
- Add a few drops of brown food coloring into 1 bowl and mix. Add in a few more drops to get the shade you want
- Repeat step with the pink coloring in the second bowl.
- Scoop the pink royal icing into one piping bag, and about 1/3 cup of the brown icing into the second piping bag.
- Add 2 teaspoons of water into the brown royal icing and mix until combined
- Pour into the squeeze bottle
- Carefully lift the parchment paper out of the baking dish with the brownies and place onto the counter
- Using the bunny cookie cutter, cut out 6 bunnies.
- Place cut out bunnies onto a cookie sheet
- Using the piping bag with the brown icing, outline the shape of the bunnies head.
- Fill in with the brown thinned icing in the squeeze bottle.
- Add 2 large candy eyes into the center of the bunny
- Let icing dry for 2 hours before moving on to add the final details.
- Once the base layer is dry, using the pink piping bag, pipe a upside down triangle under the eyes for the bunny's nose.
- Pipe the pink ovals for the ears.
- Using the brown icing, pipe cheeks on the bunny
- Let the cheeks dry for an hour before adding on the small dots for the "whiskers"
- Let bunny completely dry for an hour before enjoying!
Notes
If you have less time, you can skip doing the second layer of frosting to build up the cheeks, eyes and nose. Just use Nilla wafers for the cheeks and candies or sprinkles for the nose and ears.
This recipe yields approximately 6 bunny brownies (depending on the size of your cookie cutter). You can double or triple this recipe as needed to make more bunnies.
Recommended Products
As an Amazon Associate and member of other affiliate programs, I earn from qualifying purchases.
-
 Reynolds Kitchens Non-Stick Parchment Paper - Amazon Exclusive 12 inch - 60 Square Feet
 -
Ann Clark Cookie Cutters Easter Bunny / Rabbit Cookie Cutter, 4.5"
-
Wilton Icing Colors, 12-Count Gel-Based Food Color
-
Wilton Assorted Candy Eyeballs Set, 3-Packs
-
Ghirardelli Chocolate Supreme Brownie Mix, 18.75 Oz


These Easter Bunny brownies would be so cute for a classroom treat or for serving the kids at a family Easter celebration. They would also be cute for a Peter Rabbit birthday party or movie night!
For more fun bunny themed desserts, check out our Bunny Bum Pretzels or our Rice Krispie PEEPS Pops.