
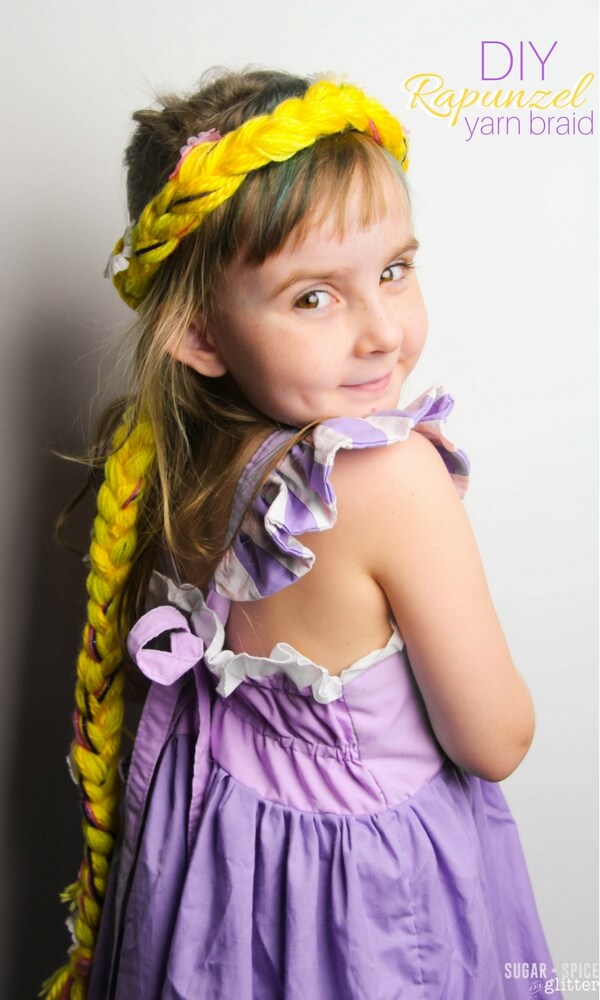
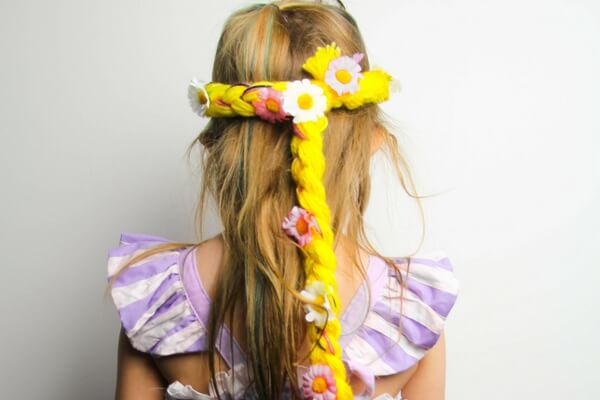
DIY Rapunzel Braid
Welcome to Sugar, Spice & Glitter! Please note, this post may contain affiliate links. For more details, see our Full Disclosure.
I’ve made a really concentrated effort this year to encourage my daughter to attempt to DIY things that she wants to buy and our newest project is this cute DIY Rapunzel Yarn Braid that saved her about $15 and gave her a great confidence boost making it herself!
DIY Yarn Braid Craft
Ella recently saw two Rapunzel braids that she wanted to buy – one was a clip-on to go in her hair and the other was attached to a puffy princess hat. The clip-on braid was $18 while the hat was $25. Not a ton of money but encouraging my daughter to DIY simple projects like this is about so much more than money!
- It teaches her the value of craftsmanship
- It teaches her to value her possessions – and to limit her possessions to those which hold special value
- It gives her confidence in her abilities
- It practices creative thinking
- It replaces the consumer mentality/response with a creative response (instead of strengthening the inclination to buy and accumulate, we strengthen the desire to create and be inspired)
I think my favorite thing is the confidence and pride she has whenever she wears one of her creations – it’s something that doesn’t happen when you just buy and wear something. To truly love and enjoy wearing something that you created is an amazing feeling that not many people experience – it’s easy to instil when kids are younger and their standards for what they wear are a bit freer. (DIY No-sew tutu, anyone?)
I’ve also started pointing out how handmade or well-made things last longer than some of the cheap toys or accessories she has impulse purchased and she’s been getting a lot better about not spending her allowance on those things and she often asks me to take a picture of something so she can try to make her own later on.
This DIY Rapunzel braid can be customized in so many different ways and you can use this same process to make braids for any princess costume. A double set of braids for Princess Ana? A white braid for Elsa? Red with mini seashells for Ariel?
This easy Disney craft is also a great way to use up leftover scraps of yarn – why can’t Rapunzel have some pink or purple highlights? Or some brown or tan lowlights woven in? Don’t feel like you have to go out and buy new yarn to make this craft, just be creative with what you already have on hand.
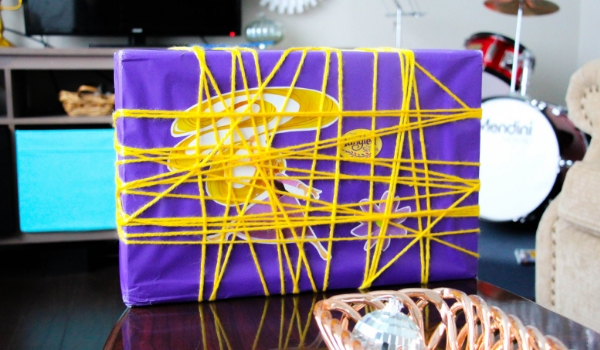
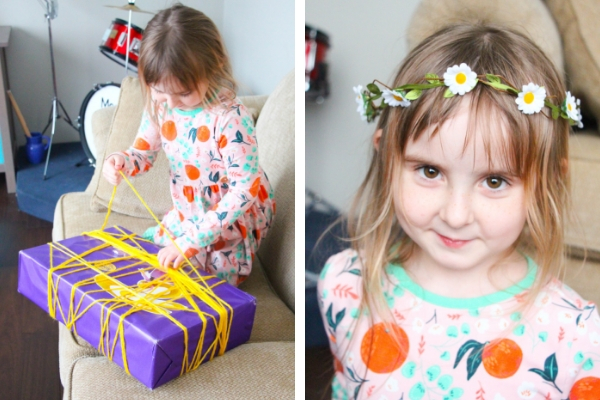
For our braid, we used up the yarn that came wrapped all around that super cute gift which we hilariously unboxed on Facebook LIVE. Inside was this pretty Rapunzel doll and some hair accessories to celebrate the new Tangled TV series which is premiering on Disney Channel. Ella loved the movie so we’re excited for it!

Materials to Make a DIY Rapunzel Braid
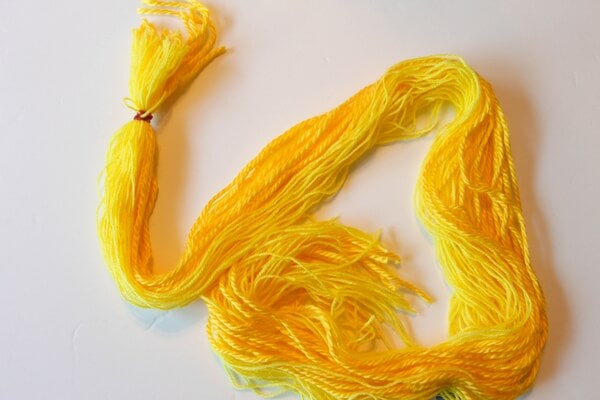
- Yellow Yarn
- Scissors
- Fabric flowers
- Glue of choice
- 2 elastics
- Ribbon or colored yarn, optional
- Large poster board (the kind used for presentations)
Tip: feel free to use different colors of yarn or different embellishments to suggest a different princess or just make your own unique braid.

PS – you can find the Rapunzel doll that Ella is cuddling here.
How to Make a Yarn Braid for Dress-up
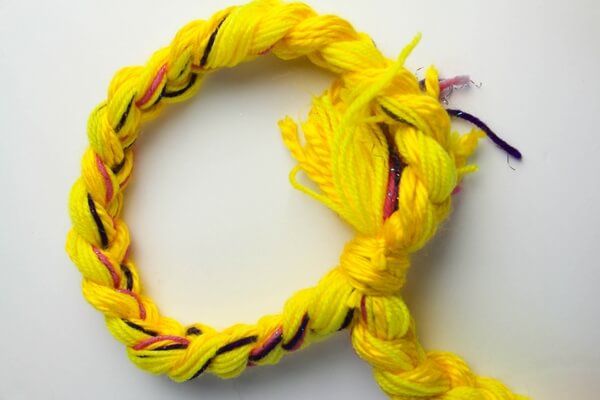
Take your yarn and poster board and wrap the yarn lengthwise along the board until the layers of yarn are as thick as you want your braid to be.
Cut the yarn along either one or both edges of the poster board depending on the length of the braid you want. (You can either cut one side for a very long braid or cut along both edges for a shorter, thicker braid.)

Gather the yarn and secure one end with an elastic. Don’t worry about the color as it will be covered up later.
Braid the yarn, adding in some fun “colored yarn highlights” or ribbon, as desired. Secure with the second elastic.

Wrap one end around the top of your child’s head to measure out how big to make the “head loop.” Secure the loop by wrapping yarn around until firmly secure and then tying it off. Trim off excess yarn.
Wrap the yarn around the second elastic as well to make everything uniform and pretty.
Attach flowers and embellishments along the braid, glueing in place. (If you don’t want your child handling a hot glue gun or strong craft glue, just have them place the embellishments where they want and then you can go back over it right afterwards, securing them in place.)

Pin this easy Disney Rapunzel braid craft for kids:

PS – this amazing Rapunzel dress was made for Ella by Stacey’s Sewing Room. It’s amazing quality and the way she designed it, I can adjust the sizing for Ella for at least 3-4 years. It’s completely washable and we’ve already had so much use out of it but it still looks amazing and we always get compliments when she wears it.
It’s fun for Ella to wear to school and it’s a better option than hot polyester costumes when we go to Disney (you only make that mistake once). It is just so incredibly well-made with beautiful details, I cannot recommend her enough.
Grab your free printable for our easy DIY yarn braid for kids:
Want to Save This Recipe?
Enter your email & I'll send it to your inbox. Plus, get great new recipes from me every week!
By submitting this form, you consent to receive emails from Sugar, Spice and Glitter.
DIY Yarn Rapunzel Braid
DIY Rapunzel Braid - perfect for the dress-up trunk or a homemade costume, this Disney-inspired craft is easy for kids to make independently and looks storebought!
Materials
- Yellow Yarn
- Fabric flowers
- Glue of choice
- 2 elastics
Tools
- Scissors
Instructions
- Take your yarn and poster board and wrap the yarn lengthwise along the board until the layers of yarn are as thick as you want your braid to be.
- Cut the yarn along either one or both edges of the poster board depending on the length of the braid you want. (You can either cut one side for a very long braid or cut along both edges for a shorter, thicker braid.)
- Gather the yarn and secure one end with an elastic. Don't worry about the color as it will be covered up later.
- Braid the yarn, adding in some fun "colored yarn highlights" or ribbon, as desired. Secure with the second elastic.
- Wrap one end around the top of your child's head to measure out how big to make the "head loop." Secure the loop by wrapping yarn around until firmly secure and then tying it off. Trim off excess yarn.
- Wrap the yarn around the second elastic as well to make everything uniform and pretty.
- Attach flowers and embellishments along the braid, glueing in place. (If you don't want your child handling a hot glue gun or strong craft glue, just have them place the embellishments where they want and then you can go back over it right afterwards, securing them in place.)
I’d love to hear from you – have you encouraged your kids to skip shopping and try their hand at DIY?
For more fun Disney-inspired crafts, check out our Kid-made Jasmine Bangles or our DIY Tiana Flower Crown.


@snow rider 3d : Potato chips, cut into small cubes, will keep the chips soft and not dry when fried but still crispy. I have used this method and they actually taste better when cut into small strips.