Sprinkle Birthday Cake
Welcome to Sugar, Spice & Glitter! Please note, this post may contain affiliate links. For more details, see our Full Disclosure.
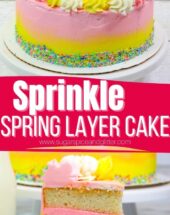
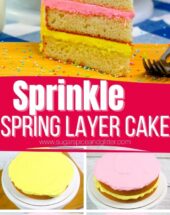
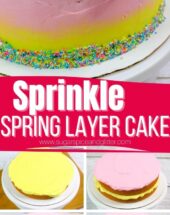
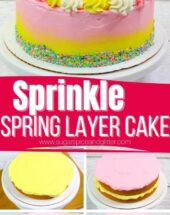
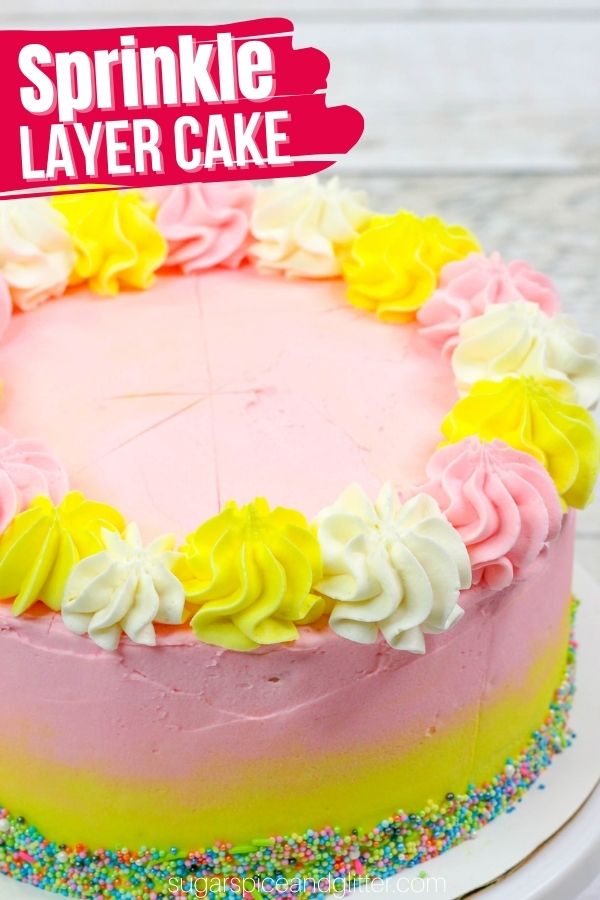
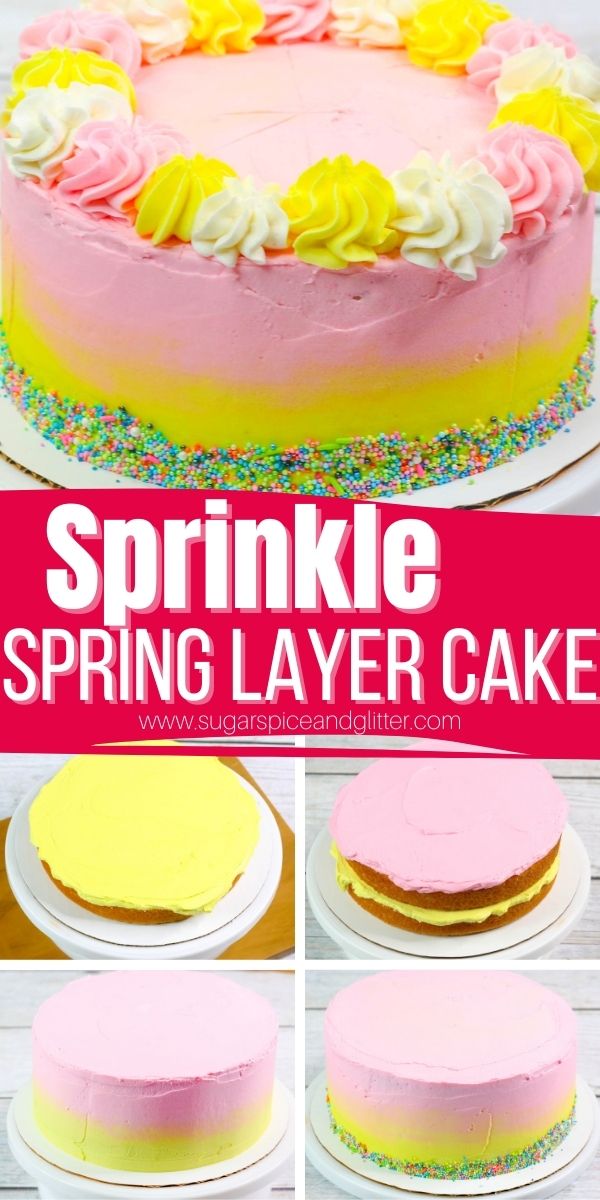
A fun birthday layer cake with bright Spring colors and a sprinkle edge, this Sprinkle Birthday Cake is super simple to make at home and looks like it came straight from the bakery – even if you’re a cake decorating beginner.
Sprinkle Birthday Cake Recipe
I love spoiling people on their birthdays and one of the simplest, best ways that I’ve found to make people feel truly special on their day is to whip up a unique birthday cake just for them.
I usually try it somewhat custom to the person – their favorite flavors, colors, or a design that speaks to an interest of theirs. This sprinkle birthday cake with it’s cheerful colors and playful sprinkles is perfect for that friend who brings happiness to others and is always fun to be around.
This tutorial just uses a boxed cake mix but you can use whatever cake flavor or recipe you’d like. Today, we’re focusing on just the decorating elements.
There is a little bit of piping work that goes into this cake – all of the techniques are simple, with the piping tips doing most of the work for you. If you even make two cakes or cupcakes a year, I highly recommend purchasing a basic piping set like this one – you won’t believe how easy it is to pipe gorgeous decorations yourself using the right equipment!
(For just a bit more, this starter cake decorating set is a crazy good deal – basically everything you will ever need for cake or cupcake decorating is in here!)
You’ll notice that I don’t give exact measurements for the vanilla buttercream frosting’s ingredients. That’s because different brands of butter and powdered sugar can vary and depending on how well sifted your powdered sugar is, it will change the texture of the frosting.
What you are looking for is a light, fluffy frosting that holds it’s shape when picked up by a spoon or whisk but can be smoothed onto your cake effortlessly. If the frosting sticks to itself or rips the cake, it is too stiff and needs additional liquid (the milk or heavy cream). If the frosting is too soft (seems melted, gloopy or too drippy) it needs more powdered icing sugar.
Be sure to whip the frosting for the length of time indicated below – it will change texture considerably from the first 30 seconds to after the 2 minute mark. Do not add additional ingredients to change the texture until the frosting has been whipped for the full amount of time.
Can this cake be frozen? The individual cake layers can be frozen before being decorated. Store in airtight freezer bags or freezer containers for up to two months.(This set of freezer containers is a crazy bargain.) The cake layers can be frozen for up to two months. Let the cakes come to room temperature before frosting.
How to get perfectly flat cake layers? I tend to just bake and then use this dental floss hack to remove any domes that occasionally occur with baking. However, you can also make homemade cake strips to ensure perfectly flat cake layers. Check out this tutorial from Preppy Kitchen for how to do that.
This cake can also be made into a spring sheet cake if you want to skip all of the layering steps!
Sprinkle Layer Cake Ingredients
White Cake Ingredients:
- 2 Boxed Cake Mixes
- Plus ingredients called for on the boxes
Vanilla Buttercream Ingredients:
- Unsalted Butter, softened
- Powdered Icing Sugar
- Vanilla Extract
- Milk or Cream
- Pink and Yellow Food Coloring <–
- Pretty Sprinkles
Scroll down to the printable recipe card for full measurements.
Tip: swap out the boxed cake mix for your favorite cake recipe. Be sure to follow the specific times on the frosting preparation to ensure you get the desired texture.
Kitchen Tools You May Find Helpful
- Three 8″ to 9″ Round Cake Pans
- Measuring Cups and Spoons
- Electric mixer <– this is a great hand mixer if you don’t want to make the investment into a stand mixer
- Offset Spatula <– a basic piping set will have all you need
- 3 Piping Bags
- 3 Large Star Tips (or re-use same one)
- 10″ Round Cake Board, optional

How to Make a Sprinkle Birthday Cake
Cake Directions:
Prepare the cakes and cake pans according to package directions.
Divide the cake batter between the three pans and bake according to package directions until an inserted toothpick comes out clean.
Allow the cakes to cool completely before proceeding with decorating.
If the cakes aren’t flat, use a cake leveler or the floss trick to remove the domed tops from the cakes to make them all flat and even.
Vanilla Buttercream Directions:
Use an electric mixer to beat together the butter and 6 cups of the powdered sugar for 2 minutes.
Add the vanilla and 3 Tablespoons of the milk or heavy cream and beat for 1 minute.
Test the texture of the frosting – it should hold its shape when the beaters are lifted, not be too drippy or wet, but should also not be too stiff that it sticks to itself or rips the cake when spread along the top. Adjust the texture of the frosting by adding additional powdered sugar or cream, as needed.
Scoop 1 1/2 cups of the plain frosting into a small bowl and set aside.
Divide the remaining frosting between two bowls. Dye one bowl pink with a few drops of pink food dye, mixing well until combined. Dye the second bowl yellow.

Cake Assembly Directions:
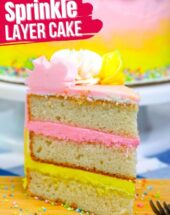
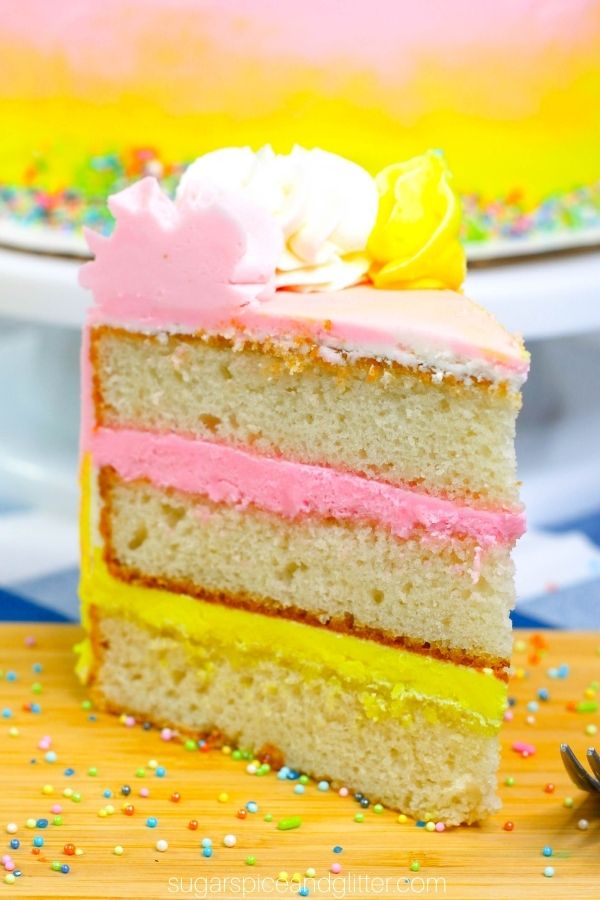
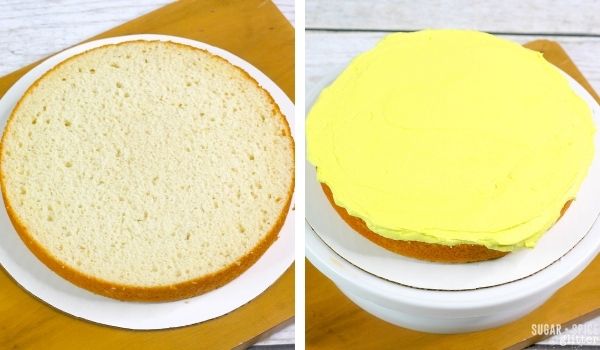
Place one cake layer on the cake board and scoop 1 cup of the yellow frosting on top.
Use an offset spatula to spread the frosting evenly just past the edges of the cake’s edge.
Place the second layer of cake ontop of the frosted first layer and scoop 1 cup of pink frosting on top, spreading evenly.
Place the last layer of the cake on top.
Frost the entire cake with 1 to 1 1/4 cup of the reserved white frosting. This is the crumb coat to seal the cake’s crumbs in place and prevent them from peeking through the final frosting layer. It should be smooth but does not have to be perfect – don’t worry if you can see crumbs mixed in to this layer of frosting as they will be covered.
Cake Decorating Directions:
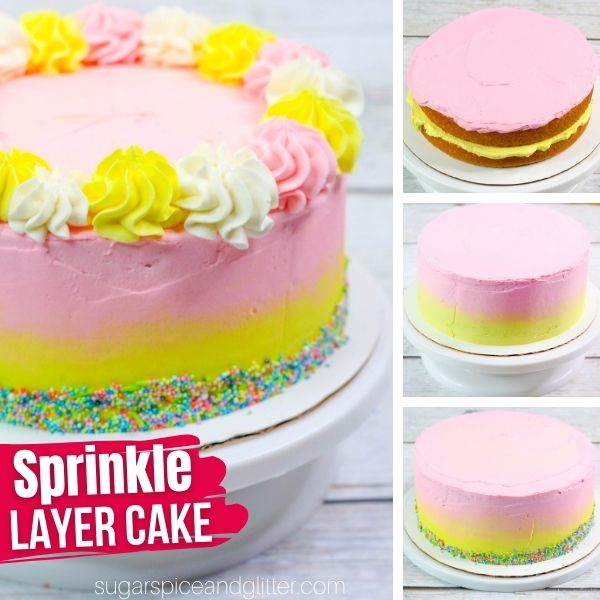
Use an offset spatula to roughly apply about 1 cup of the yellow frosting to the bottom half of the side of the cake. Don’t smooth it down yet.
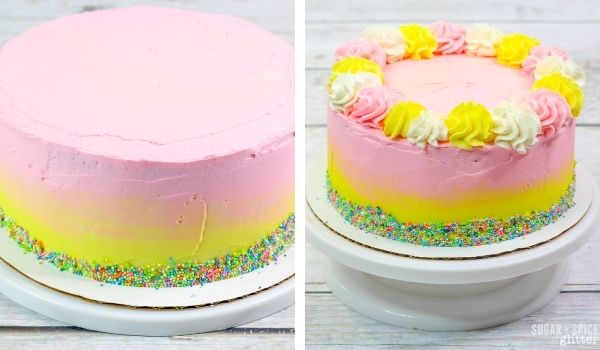
Clean the spatula and smoothly apply 1 cup of pink frosting to the top of the cake, and then gently start smoothing the pink frosting along the top half of the side, adding more frosting as needed. When the pink and yellow layers start to meet, clean the spatula and hold it straight up.
Gently turn the cake board as you smooth the entire side of the cake with the spatula. Try not to remove too much frosting, just focus on smoothing it out. Clean the offset spatula as needed.
Once the frosting along the sides of the cake has been smoothed down, you can go back in and add additional frosting as needed and use the offset spatula to smooth them together, creating the ombre effect.

Scoop the remaining pink, yellow and white frostings into piping bags fitted with a star tip.
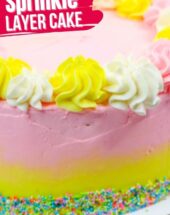
Pipe dollops of the frosting along the top of the cake edge by placing the tip of the star tip right against the the top of the cake and then gently squeezing as you move the tip away from the cake.
Gently flick your wrist away to stop the flow of the frosting to finish making the dollop.
Repeat this process around the whole outer edge of the cake, alternating the frosting dollop’s color.
Place the cake board on a cookie tray for the sprinkle application to trap stray sprinkles and avoid making a giant mess.
You can apply the sprinkles to the bottom half of the cake by hand, but I find it easiest to use a combination of using my hand to drop the sprinkles and holding my offset spatula at an angle to trap them and then press them against the side of the cake. Repeat this process all the way around the cake until you have a solid border of sprinkles.

Cover the cake until ready to serve.
The cake can be refrigerated or kept out at room temperature for up to two days. If kept in the refrigerator, place a couple pieces of power towel on top of the cake to collect moisture to prevent the sprinkles from melting.
Pin this Sprinkle Birthday Cake Tutorial:
Grab your free printable for our Sprinkle Birthday Cake Recipe:
Want to Save This Recipe?
Enter your email & I'll send it to your inbox. Plus, get great new recipes from me every week!
By submitting this form, you consent to receive emails from Sugar, Spice and Glitter.
Sprinkle Birthday Cake
A gorgeous birthday cake with a sprinkle trip and ombre frosting, this Sprinkle Layer Cake is super easy to make with our step-by-step instructions and makes a thoughtful gift for a birthday girl!
Ingredients
- 2 Boxed Cake Mixes
- Plus Ingredients Called for on Boxes
For the Vanilla Buttercream:
- 2 cups Butter, softened
- 6-8 cups Powdered Icing Sugar
- 2 teaspoons Vanilla Extract
- 3-5 Tablespoon Heavy Cream or Milk
Instructions
Cake Directions:
- Prepare the cakes and cake pans according to package directions.
- Divide the cake batter between the three pans and bake according to package directions until an inserted toothpick comes out clean.
- Allow the cakes to cool completely before proceeding with decorating.
- If the cakes aren't flat, use a cake leveler or the floss trick to remove the domed tops from the cakes to make them all flat and even.
Vanilla Buttercream Directions:
- Use an electric mixer to beat together the butter and 6 cups of the powdered sugar for 2 minutes.
- Add the vanilla and 3 Tablespoons of the milk or heavy cream and beat for 1 minute.
- Test the texture of the frosting - it should hold its shape when the beaters are lifted, not be too drippy or wet, but should also not be too stiff that it sticks to itself or rips the cake when spread along the top. Adjust the texture of the frosting by adding additional powdered sugar or cream, as needed.
- Scoop 1 1/2 cups of the plain frosting into a small bowl and set aside.
- Divide the remaining frosting between two bowls. Dye one bowl pink with a few drops of pink food dye, mixing well until combined. Dye the second bowl yellow.
Cake Assembly Directions:
- Place one cake layer on the cake board and scoop 1 cup of the yellow frosting on top.
- Use an offset spatula to spread the frosting evenly just past the edges of the cake's edge.
- Place the second layer of cake ontop of the frosted first layer and scoop 1 cup of pink frosting on top, spreading evenly.
- Place the last layer of the cake on top.
- Frost the entire cake with 1 to 1 1/4 cup of the reserved white frosting. This is the crumb coat to seal the cake's crumbs in place and prevent them from peeking through the final frosting layer. It should be smooth but does not have to be perfect - don't worry if you can see crumbs mixed in to this layer of frosting as they will be covered.
Cake Decorating Directions:
- Use an offset spatula to roughly apply about 1 cup of the yellow frosting to the bottom half of the side of the cake. Don't smooth it down yet.
- Clean the spatula and smoothly apply 1 cup of pink frosting to the top of the cake, and then gently start smoothing the pink frosting along the top half of the side, adding more frosting as needed. When the pink and yellow layers start to meet, clean the spatula and hold it straight up.
- Gently turn the cake board as you smooth the entire side of the cake with the spatula. Try not to remove too much frosting, just focus on smoothing it out. Clean the offset spatula as needed.
- Once the frosting along the sides of the cake has been smoothed down, you can go back in and add additional frosting as needed and use the offset spatula to smooth them together, creating the ombre effect.
- Scoop the remaining pink, yellow and white frostings into piping bags fitted with a star tip.
- Pipe dollops of the frosting along the top of the cake edge by placing the tip of the star tip right against the the top of the cake and then gently squeezing as you move the tip away from the cake.
- Gently flick your wrist away to stop the flow of the frosting to finish making the dollop.
- Repeat this process around the whole outer edge of the cake, alternating the frosting dollop's color.
- Place the cake board on a cookie tray for the sprinkle application to trap stray sprinkles and avoid making a giant mess.
- You can apply the sprinkles to the bottom half of the cake by hand, but I find it easiest to use a combination of using my hand to drop the sprinkles and holding my offset spatula at an angle to trap them and then press them against the side of the cake. Repeat this process all the way around the cake until you have a solid border of sprinkles.
- Cover the cake until ready to serve.
- The cake can be refrigerated or kept out at room temperature for up to two days. If kept in the refrigerator, place a couple pieces of power towel on top of the cake to collect moisture to prevent the sprinkles from melting.
Recommended Products
As an Amazon Associate and member of other affiliate programs, I earn from qualifying purchases.
-
 Edible Confetti Sprinkles Cake Cookie Cupcake Quins Pastel Sequin 8 Ounces
 -
Wilton Icing Colors, 12-Count Gel-Based Food Color
-
Cake Decorating Supplies Kit for Beginners, Set of 137, Baking Pastry Tools, 1 Turntable stand-55 Numbered Icing Tips with Pattern Chart, Angled Spatula, 8 Russian Piping nozzles-Baking Tools


I hope whoever is lucky enough to have you make this ombre sprinkle cake for them loves it!
For more amazing cakes, check out our full cake recipe collection here:
For more decadent desserts, check out our full dessert recipe collection here: