
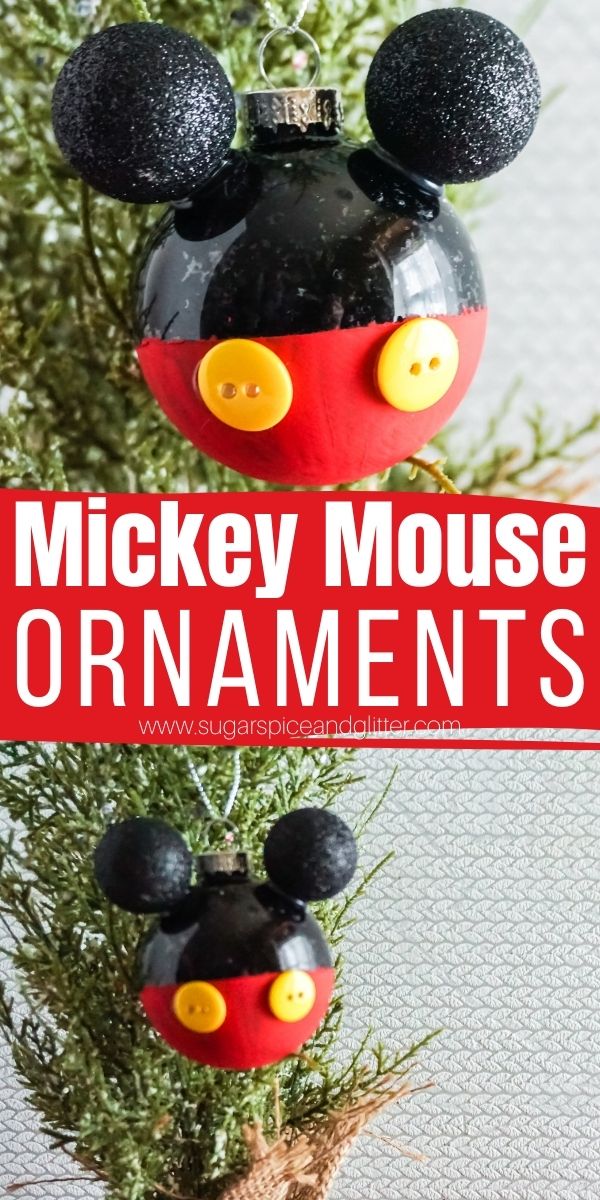
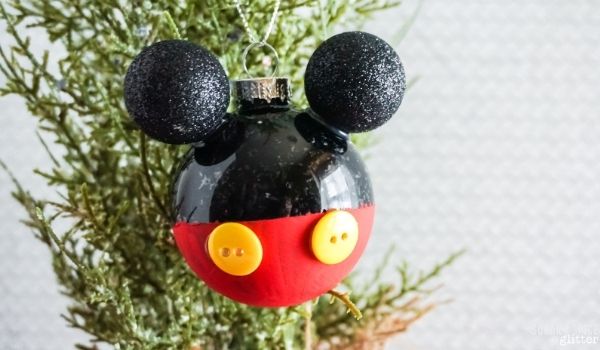
Mickey Mouse Ornaments
Welcome to Sugar, Spice & Glitter! Please note, this post may contain affiliate links. For more details, see our Full Disclosure.
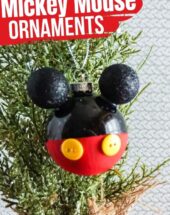
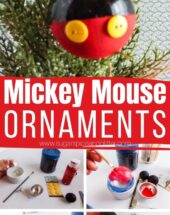
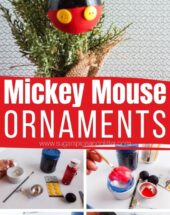
Another fun DIY Disney ornament to add some Disney magic to your Christmas decor, these DIY Mickey Mouse Christmas Ornaments are incredibly easy to make and customize in a variety of ways.

Mickey Mouse Christmas Ornament Craft
One of my favorite times to visit the Disney parks is during the Christmas season when the parks get decked out for the holidays, the cast members outfits change to old-timey carolling style outfits, and all of the fun Christmas snack options pop up on the menus.
There are also these little Christmas shops that pop up with incredibly cute and fun Christmas decor and gift ideas, all with creative Disney theming.
But, the ornaments all come with park price tags, maybe making it reasonable to buy one as a special family souvenir, but definitely not affordable enough to buy one for everyone in the family or attempt to decorate your whole Christmas tree with.
To make 12 of these Mickey Mouse ornaments yourself comes to about the same cost as buying just one at the park! Plus, you can customize your own ornaments in so many different ways.
Ideas to Customize these Mickey Mouse Ornaments
- add family member’s names, using paint or Cricut vinyl
- customize Mickey’s colors to your Christmas decor
- use jingle bells instead of ornaments (like this one from Shop Disney)
- make nods to your other favorite Disney characters with different color schemes or designs (like adding roses for ears for a Belle ornament)
- make a few of these ornaments into a bunting banner
More Disney Christmas Craft Ideas
- Enchanted Rose Ornaments
- Nutcracker Coloring Sheets
- Toy Story Ornaments (we have printable templates for Buzz, Woody, Jesse and those cute little Aliens)
- 101 Dalmatians Ornaments (we have printable templates for both Cruella DeVille and a Dalmatian)
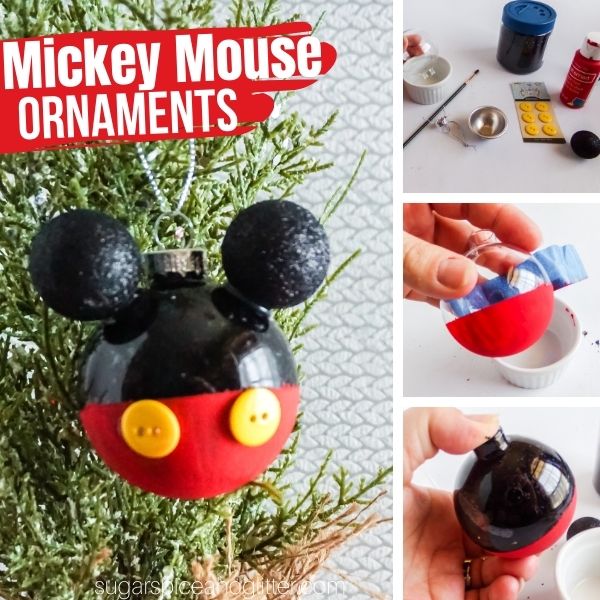
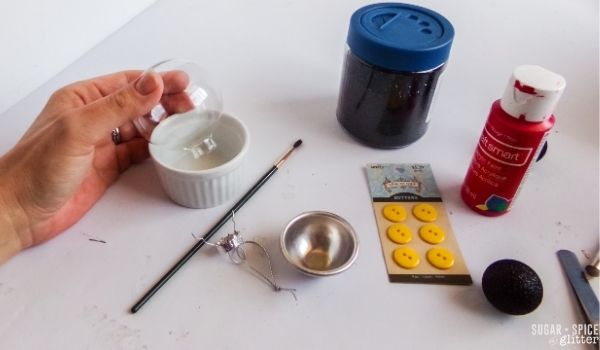
Materials for Mickey Mouse Ornaments
- Clear Glass Fillable Ornament
- Black Glitter
- Mod Podge
- Red Acrylic Paint
- 2 Yellow Buttons
- 2 Mini Black Glitter Ornaments
Tools
- Painters Tape
- Paintbrush
- Hot Glue Gun & Glue
- Small Paper Cup
- Small Funnel
Tip: you can swap out the colors to make red and green Mickey ornaments, black and pink Minnie ornaments, etc.
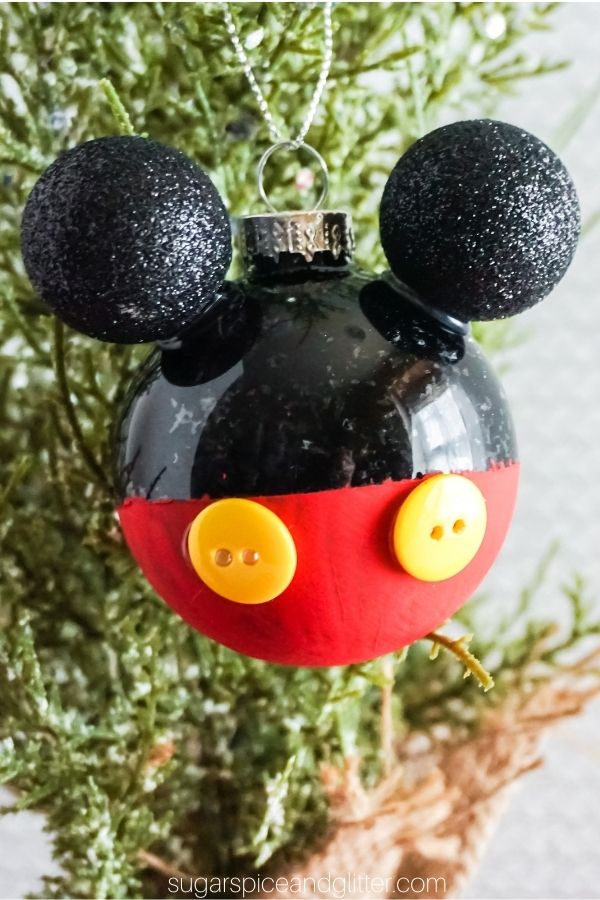
How to Make Mickey Mouse Ornaments
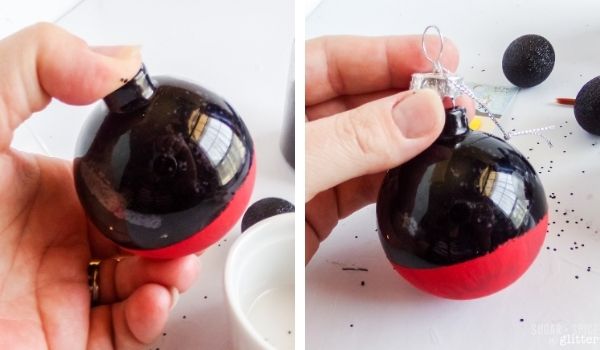
With the painters tape, make a line across the middle of the ornament, leaving the bottom half of the ornament un-taped.
Place the ornament upside down in the paper cup to hold it steady and paint the bottom of the ornament with the red acrylic paint. Allow the paint to dry completely.
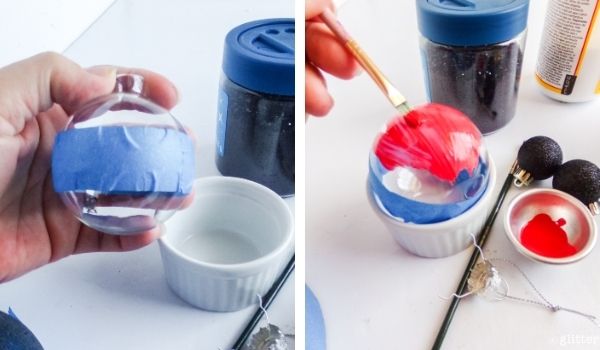
Once dry, coat the red acrylic paint in a thin layer of the mod podge. Allow the mod podge to dry completely.
Once dry, turn the ornament over in the paper cup and remove the tape.
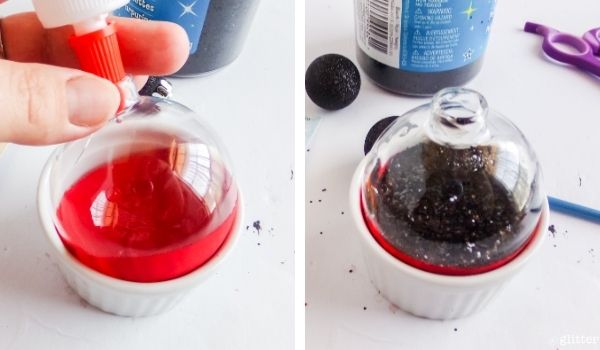
Place 1 tbsp of mod podge into the ornament using the funnel.
Add 1 tbsp of black glitter to the ornament then swirl it around, turning it and covering the entire interior of the ornament with the black glitter. Allow the paint to dry completely.
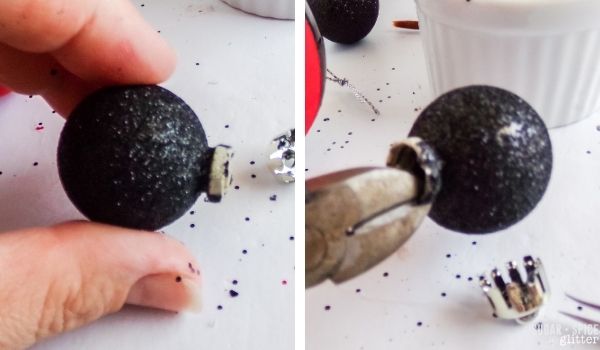
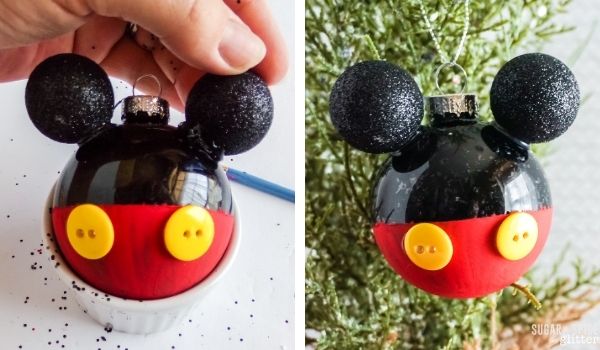
Remove the metal pieces from the mini black glitter ornaments and hot glue them in place on either side of the larger ornament, on the top.
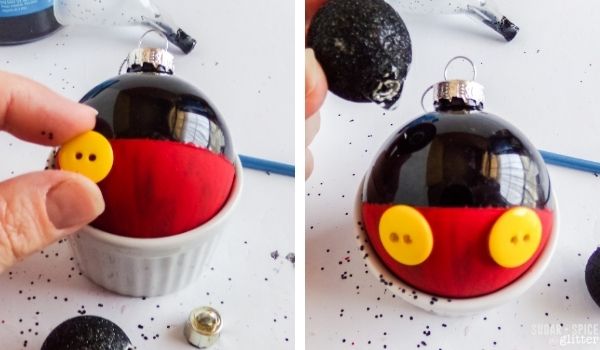
Hot glue the two yellow buttons to the front of the ornament and enjoy!
Pin this Mickey Mouse Ornament to add some Disney magic to your Christmas decorating:
Grab your free printable instructions for our DIY Mickey Mouse Christmas Ornaments:
Want to Save This Recipe?
Enter your email & I'll send it to your inbox. Plus, get great new recipes from me every week!
By submitting this form, you consent to receive emails from Sugar, Spice and Glitter.
Mickey Mouse Ornaments
These super simple Mickey Mouse Christmas Ornaments add some Disney magic to your Christmas tree and can be customized in so many fun ways!
Materials
- Clear Glass Fillable Ornament
- Black Glitter
- Mod Podge
- Red Acrylic Paint
- 2 Yellow Buttons
- 2 Mini Black Glitter Ornaments
Tools
- Painters Tape
- Paintbrush
- Hot Glue Gun & Glue
- Small Paper Cup
- Small Funnel
Instructions
- With the painters tape, make a line across the middle of the ornament, leaving the bottom half of the ornament un-taped.
- Place the ornament upside down in the paper cup to hold it steady and paint the bottom of the ornament with the red acrylic paint. Allow the paint to dry completely.
- Once dry, coat the red acrylic paint in a thin layer of the mod podge. Allow the mod podge to dry completely.
- Once dry, turn the ornament over in the paper cup and remove the tape.
- Place 1 tbsp of mod podge into the ornament using the funnel.
- Add 1 tbsp of black glitter to the ornament then swirl it around, turning it and covering the entire interior of the ornament with the black glitter. Allow the paint to dry completely.
- Remove the metal pieces from the mini black glitter ornaments and hot glue them in place on either side of the larger ornament, on the top.
- Hot glue the two yellow buttons to the front of the ornament and enjoy!
Recommended Products
As an Amazon Associate and member of other affiliate programs, I earn from qualifying purchases.
-
 E.Durable Mini Glue Gun Tool Kit Kids Friendly with Glue Sticks for School Projects, DIY Crafts, Delicate Items Like Foam, Thermocal, Floral, etc (30W)
 -
Christmas Ball Assorted Pendant Shatterproof Ball Ornament Set Seasonal Holiday Wedding Party Decorations(24 pcs, 4 cm) (Black)
-
20 Pcs DIY Hanging Clear Plastic Fillable Ornament Balls,With Removable Silver Metal Cap, Each Has A Silver Rope, for Christmas Holiday or Wedding Party,Perfect for Decorating on Christmas Trees(60mm)
-
Apple Barrel PROMOABI Matte Finish Acrylic Craft Paint Set Designed for Beginners and Artists, Non-Toxic Formula that works on All Surfaces, Assorted Colors 1, 18 Count
-
FROGTAPE 1358463 Multi-Surface Painter's Tape with PAINTBLOCK, Medium Adhesion, 0.94" Wide x 60 Yards Long, Green
-
Fine Slime Glitter, Set of 32 Colors, LEOBRO Multi Purpose Glitter Powder for Arts, Crafts, Epoxy Tumblers, Decoration Weddings Cards Flowers, Scrapbooking, Body, Face, Nail, Glitter Slime Making


I hope you love the Disney magic that these Mickey Mouse Ornaments bring to your Christmas decor – I’d love to see any creative twists that you come up with!
For more Disney craft ideas check out our full collection here.

How Hearing Loss Impacts Mental Health
Untreated hearing loss can lead to social isolation, anxiety, and even cognitive decline. Being proactive about hearing care is essential for mental well-being. Learn how to maintain your auditory and emotional health at https://nychearing.com