
Halloween Snack Tray for Kids
Welcome to Sugar, Spice & Glitter! Please note, this post may contain affiliate links. For more details, see our Full Disclosure.
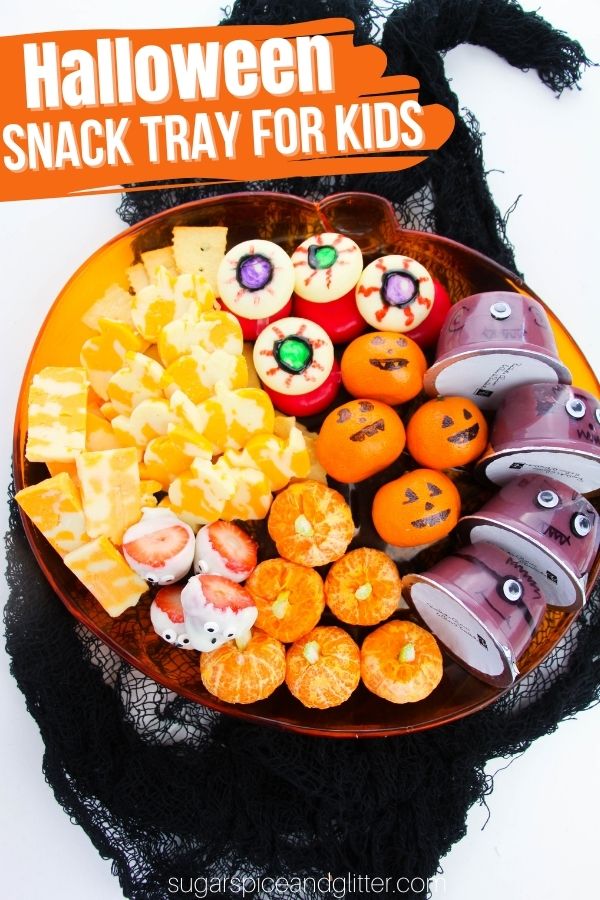
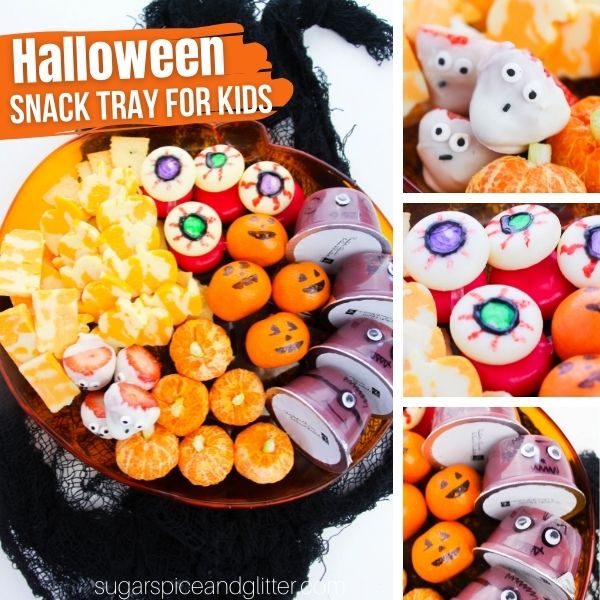
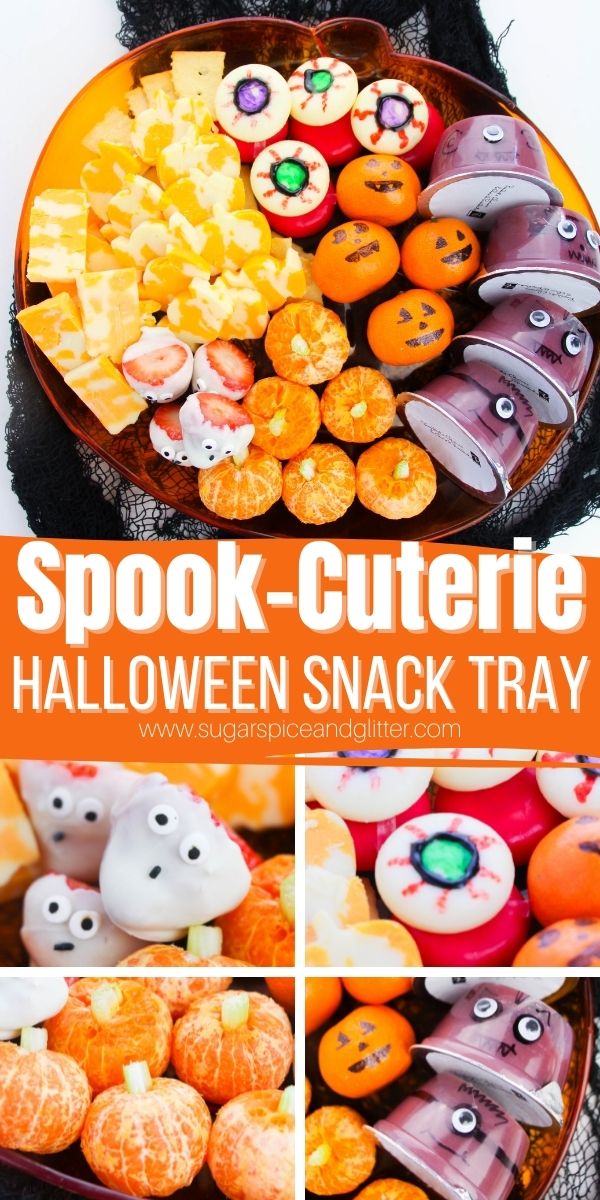
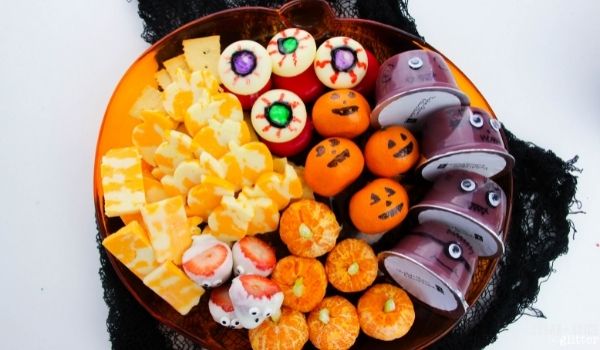
A fun Halloween “Spookcuterie” Tray for Kids made with healthy options like fruit and cheese. This Halloween Fruit Tray is perfect for setting out before a night of Trick or Treating or at a Halloween party or movie night to offset all of the sugary treats the kids will be indulging in.
Halloween Fruit & Cheese Tray for Kids: A Spook-cuterie Board
Last year, I put together this healthy, themed Halloween Snack Tray for my daughter and her friends.
We knew they would be consuming lots of junk food later on in the evening so we wanted to provide a few healthier options to snack on before we headed out for Trick or Treating. Who says junk food has to be the only fun food for Halloween?
This Halloween fruit tray is perfect for either a light snack before Trick or Treating, or a healthy but still fun offering at a Halloween party or playdate.
The amount of food was perfect for my daughter and 3 friends – there were a few “leftover” treats that were perfect for when we returned from Trick or Treating and the grown-ups were sorting through the kids’ candy bags. If you have a bigger or smaller group, you can adjust the number of each serving accordingly – just make sure you have at least one of each treat for each guest.
Providing a few treats that were wrapped (like the Jack O’Lantern clementines, wrapped Babybels and applesauce containers) was great for providing a few extras while reducing food waste.
You can prepare this Halloween fruit tray the night before and just place a couple pieces of paper towel over the tray before wrapping in plastic wrap (this prevents the strawberries and cheese from getting soggy).
The fruit tray took me about 45 minutes to make, with the biggest time-consuming treats being the dipped strawberries and the cheese cut-outs. The cheese cut-outs were the trickiest bit because I used a block of cheese rather than individual cheese slices. Deli slices of cheese would have been a lot easier, so use those if you have them, and avoid using intricately-shaped cookie cutters to avoid the cheese from breaking or crumbling after cutting.
More Halloween Snacks to Add to Your Halloween Spook-uterie Board
- Banana Ghost Pops
- 35+ Healthy Halloween Snack Ideas
- Eyeball Devilled Eggs
- PB&J Energy Bites
- Mummy Meatballs
- Easy Mummy Hot Dogs
Halloween Fruit Tray Ingredients
- Cheese
- BabyBel Cheeses
- Edible Food Markers
- Crackers
- Clementines
- Celery
- Applesauce Containers
- Strawberries
- White Candy Melts or White Chocolate
- Black Sprinkles
- Candy Eyes
Scroll down to the printable recipe card for full measurements.
Tip: swap out any of the snacks here for your kids’ favorites.
Kitchen Tools You May Find Helpful
- Halloween Cookie Cutters
- Sharpie Marker
- Sharp Kitchen Knife
How to Make a Halloween Snack Board for Kids
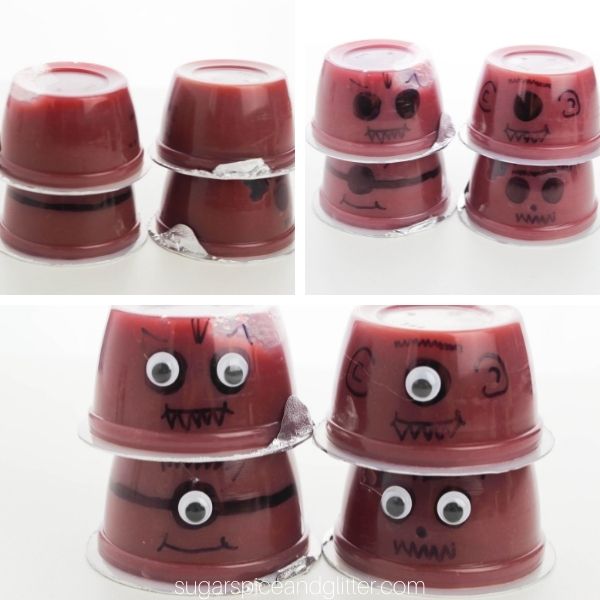
For the Monster Applesauce:
Use a Black Sharpie marker to draw facial features on the upside-down containers. The kids can help with this step.
Once you are done with your drawings, use a hot glue gun to attach Googley eyes to your monster faces. Allow to dry before placing in a row on the snack tray.
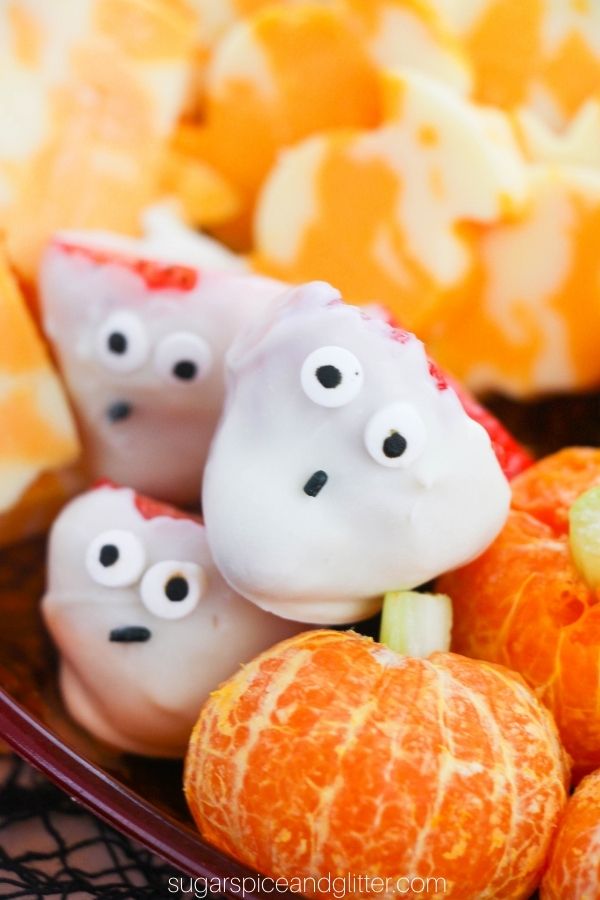
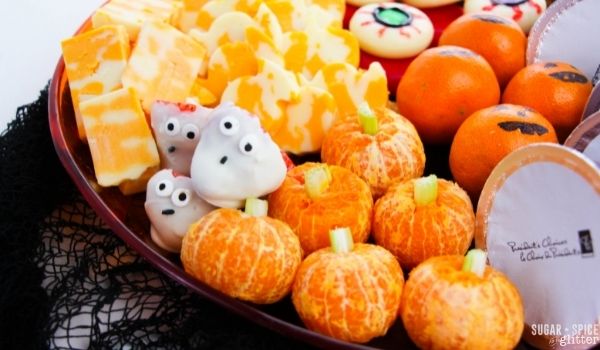
For the Candy-Coated Ghost Strawberries:
Place your candy melts in a small microwave-safe bowl and heat for 25 seconds. Stir and reheated as needed until candy melts are completely melted.
You can either hold onto the green tops of your strawberries to dip them, or if you prefer to remove them, insert a toothpick into the top of the strawberry to hold onto while dipping.
Dip each strawberry in the melted candy melts and rotate to coat completely. Allow excess candy melts to drip off back into the bowl, then set each strawberry on a piece of parchment paper to set.
While the candy melts are still wet, place two candy eyeballs and a single black sprinkle on the strawberries to form a ghost face. (If you don’t have black sprinkles, you can use the edible marker after the candy melts have dried.)
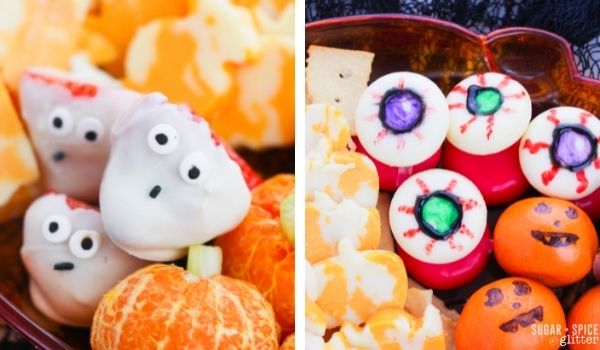
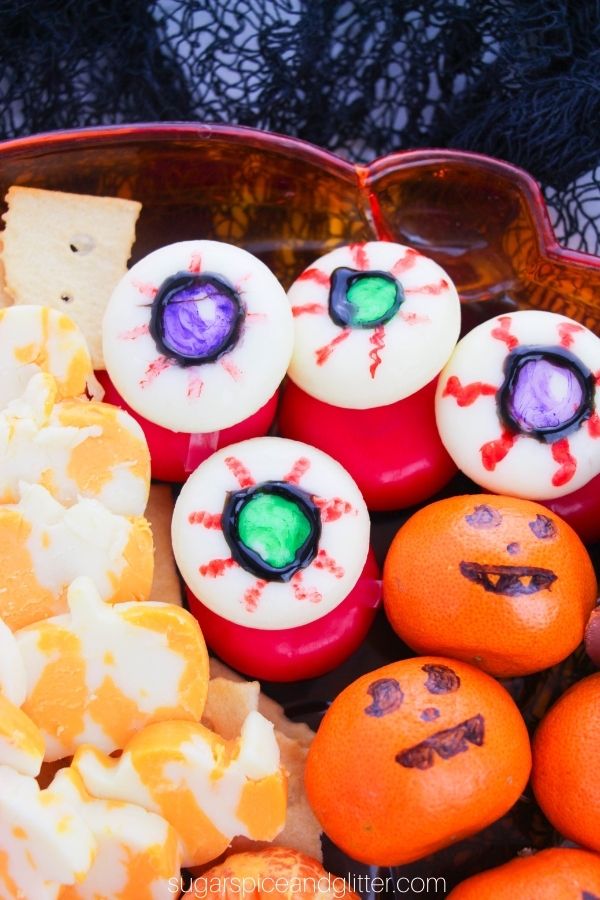
For the Babybel Cheese Eyeballs:
Unwrap half of your Babybel cheeses, placing the wrapped cheeses on the board.
Use edible markers to draw eyeball features onto each cheese. (A colored center, zigzag lines for the blood vessels and a black outline around the center to make it pop.)
Set the decorated cheeses overtop of the wrapped cheeses.
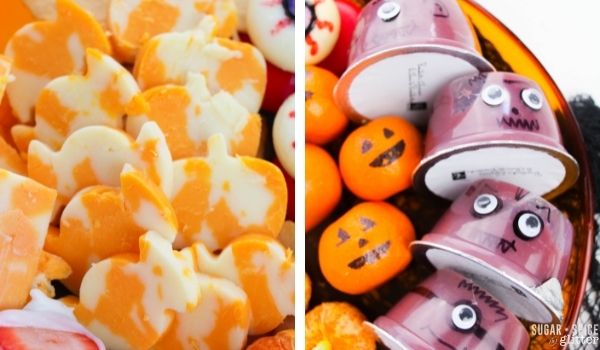
For the Halloween Cheese Shapes:
Slice your cheese to about 1/4″ thickness. Use cookie cutters to cut out Halloween-inspired shapes.
Save the excess cheese trimmings for a recipe, and set the cheese cut-outs on the board.
You may want to provide a mixture of shapes and just plain sliced cheese, as the cut-outs can be a bit time-consuming.
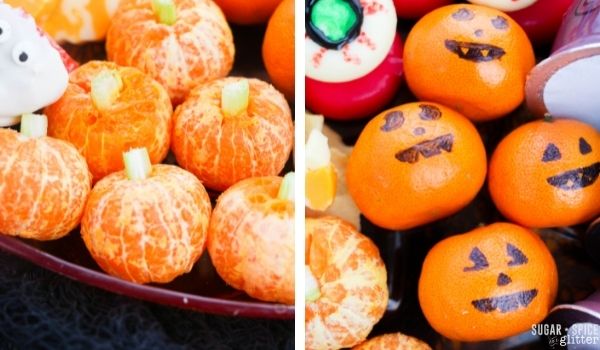
For the Clementine Pumpkins and Jack O’Lanterns:
Unwrap half of the clementines.
Slice one stalk of celery in half lengthwise, then again lengthwise so it is cut into four lengths. Cut 2″ pieces of celery and insert one piece each into a clementine to form a pumpkin shape. Set on the snack try.
For the wrapped clementines, use your edible food marker and draw on Jack O’Lantern features onto each. Set on the snack tray.
Once the candy-coated strawberries are done, add them to the snack tray to complete your Spook-cuterie board!
Grab your free printable instructions for how to make your own Halloween Spook-cuterie board:
Want to Save This Recipe?
Enter your email & I'll send it to your inbox. Plus, get great new recipes from me every week!
By submitting this form, you consent to receive emails from Sugar, Spice and Glitter.
Halloween Snack Tray for Kids
A healthy option to offset all of the sugary treats, this Halloween Snack Tray is perfect for Halloween parties, movie nights or setting out before Trick or Treating.
Ingredients
- Cheese
- BabyBel Cheeses
- Edible Food Markers
- Crackers
- Clementines
- Celery
- Applesauce Containers
- Strawberries
- White Candy Melts or White Chocolate
- Black Sprinkles
- Candy Eyes
Instructions
For the Monster Applesauce:
- Use a Black Sharpie marker to draw facial features on the upside-down containers. The kids can help with this step.
- Once you are done with your drawings, use a hot glue gun to attach Googley eyes to your monster faces. Allow to dry before placing in a row on the snack tray.
For the Candy-Coated Ghost Strawberries:
- Place your candy melts in a small microwave-safe bowl and heat for 25 seconds. Stir and reheated as needed until candy melts are completely melted.
- You can either hold onto the green tops of your strawberries to dip them, or if you prefer to remove them, insert a toothpick into the top of the strawberry to hold onto while dipping.
- Dip each strawberry in the melted candy melts and rotate to coat completely. Allow excess candy melts to drip off back into the bowl, then set each strawberry on a piece of parchment paper to set.
- While the candy melts are still wet, place two candy eyeballs and a single black sprinkle on the strawberries to form a ghost face. (If you don't have black sprinkles, you can use the edible marker after the candy melts have dried.)
For the Babybel Cheese Eyeballs:
- Unwrap half of your Babybel cheeses, placing the wrapped cheeses on the board.
- Use edible markers to draw eyeball features onto each cheese. (A colored center, zigzag lines for the blood vessels and a black outline around the center to make it pop.)
- Set the decorated cheeses overtop of the wrapped cheeses.
For the Halloween Cheese Shapes:
- Slice your cheese to about 1/4" thickness. Use cookie cutters to cut out Halloween-inspired shapes.
- Save the excess cheese trimmings for a recipe, and set the cheese cut-outs on the board.
- You may want to provide a mixture of shapes and just plain sliced cheese, as the cut-outs can be a bit time-consuming.
For the Clementine Pumpkins and Jack O'Lanterns:
- Unwrap half of the clementines.
- Slice one stalk of celery in half lengthwise, then again lengthwise so it is cut into four lengths. Cut 2" pieces of celery and insert one piece each into a clementine to form a pumpkin shape. Set on the snack try.
- For the wrapped clementines, use your edible food marker and draw on Jack O'Lantern features onto each. Set on the snack tray.
- Once the candy-coated strawberries are done, add them to the snack tray to complete your Spook-cuterie board!
Recommended Products
As an Amazon Associate and member of other affiliate programs, I earn from qualifying purchases.


I hope your kids love this Halloween fruit tray as much as my daughter and her friends did!
Check out some of our favorite No Bake Treats here:

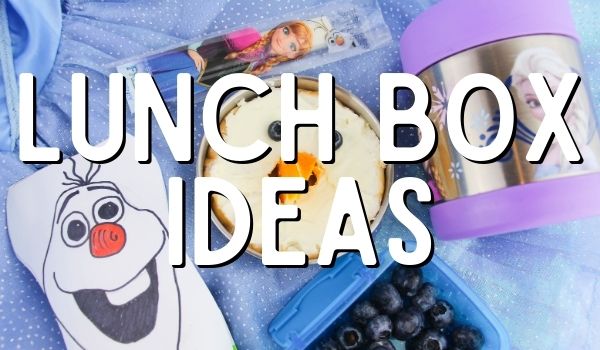
Or, check out other ideas perfect for Lunch Boxes here:


This is a great idea! I love the idea of giving kids healthy snacks that are still exciting and halloween themed just before heading out for trick or treating.