
Easy Easter Bunny Cake (with Video)
Welcome to Sugar, Spice & Glitter! Please note, this post may contain affiliate links. For more details, see our Full Disclosure.
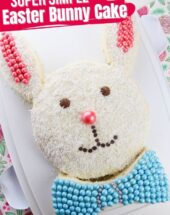
A classic Easter dessert that will bring a smile to everyone’s face, today’s tutorial for a Super Simple Easter Bunny Cake involves no fancy decorating skills, piping bags or cake pans. It’s even easy enough that the kids can help make it for a fun family Easter activity.
Easter Bunny Cake Recipe
Are there any desserts from your childhood that bring up some serious nostalgia?
While I love creating elaborate desserts and trying out new baking trends, I have a real soft spot for the simplicity of the themed holiday desserts I grew up with. Pumpkin patch pudding at my kindergarten Halloween party, a bowl full of red and green M&Ms at Christmas and a cute Bunny cut-up cake for Easter.
I actually don’t think we ever made our bunny cakes growing up – we always purchased them at the store. But as you’ll see in the video and pictures below, this cake is so incredibly easy to make yourself, there’s no need to try to hunt one down or pay ridiculous prices for it. Plus, the simplicity of it makes it perfect for letting the kids help, allowing you to create new Easter traditions and memories with your family.
You can use whichever cake recipe you’d like to make the base cake and while I give instructions for a delicious homemade vanilla frosting below, you can use cream cheese frosting, chocolate frosting (for a brown bunny), etc. I also provide some decorating variations below based on your family’s preferences or what you can find.
The only decorating tool you will need for this Easter Bunny Cake is an offset spatula for spreading the frosting, but the back of a spoon can also be used. Don’t worry about the frosting looking sloppy or uneven – it’s just going to be covered up anyways!
If you need to do a bit of cake prep ahead of time, the baked but undecorated cakes can be wrapped in plastic wrap or tinfoil then placed in airtight freezer bags or freezer containers for up to 1 month. Allow the cakes to come to room temperature before decorating.
If there will be sibling or cousin squabbles over the two chocolate rosettes or single gum ball used to decorate this cake, you can remove them before cutting and serving the cake or have extras on hand so that everyone gets one.
Variations for this Easter Bunny Cake:
- Sprinkles instead of sixlets. I chose to use sixlets because I had plenty on hand and I could control the placement of them a bit easier than sprinkles – especially when it came to the pink inner ears of the bunny. You could alternatively dye some shredded coconut and use that in it’s place.
- Skip the coconut or replace with white sprinkles or white chocolate shavings.
- If you’re having a hard time shaping the bow, or it makes your cake too big for a take-along tote, skip it or trim it down
- Black licorice lace for whiskers, or pipe on some black frosting or melted chocolate. We also tried out pipe cleaners and they worked perfectly.
- Use a piping bag or mini icing pens to decorate the cake completely with frosting and skip the candy decorations.
- Use jelly beans or large heart-shaped sprinkles for the eyes and nose.
- Use Hershey’s kisses or chocolate wafers for the eyes instead of rosettes/chocolate stars.

More Easter Desserts the Whole Family will Love:
- Bunny Bum Pretzels
- Resurrection Rolls (from scratch)
- Mini Egg Rice Krispie Nests
- Hidden Brownie Easter Eggs
- Bunny Bum Cupcakes
This Easter Bunny Cake is one of the 32 recipes, crafts and decor ideas included in our free Easter Planning Ebook available to our e-mail subscribers:
Check out my video to see how to make your own Easter Bunny cut-up cake (it’s my first cake decorating video so be kind) – and then don’t forget to scroll down to grab your free printable recipe card:
Easter Bunny Cake Ingredients
- 2 baked round/circle cakes <– we used two 9″ cake pans but any size will work
- Butter
- Powdered Icing Sugar
- Vanilla Extract
- Milk or Cream
- Sixlets: pink, blue and gray <– swap out the blue and gray for whichever color you prefer for the bunny’s bowtie
- Pink Gum Ball
- Chocolate Rosettes <– also called chocolate buds or chocolate stars
- Mini Chocolate Chips
- Shredded Coconut
Scroll down to the printable recipe card for full measurements.
Tip: use our list of variation options above if you can’t find any of the decorating ingredients listed.
Kitchen Tools You May Find Helpful
- 2 Circular Cake Pans
- Sharp Kitchen Knife
- Cutting Board
- Electric mixer <– this is a great hand mixer if you don’t want to make the investment into a stand mixer
- Measuring Cups and Spoons
- Offset Spatula
How to Make an Easter Bunny Cake
Bake your cakes according to the boxed directions or whichever recipe you are using.
Allow the cakes to cool completely as you prepare the vanilla frosting.
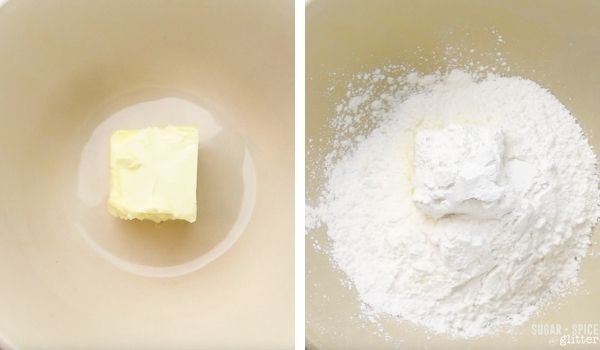
In a large bowl, combine the butter and powdered icing sugar.
Beat for 1 minute, then add in the vanilla extract and milk or cream.
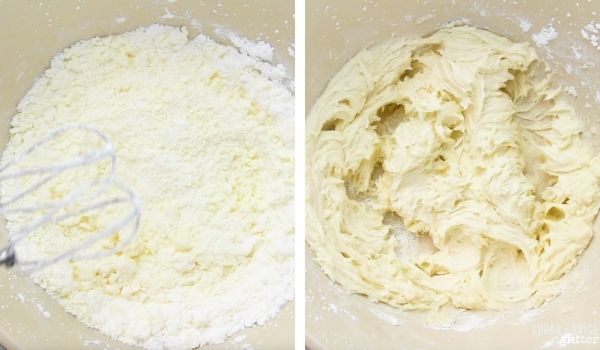
Beat the frosting for 2 minutes, then taste and adjust.
If the frosting seems too stiff, add a tablespoon more milk, if it seems too soft, add a half cup more of powdered icing sugar.
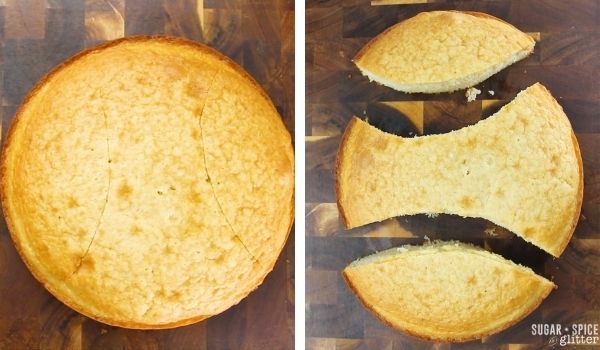
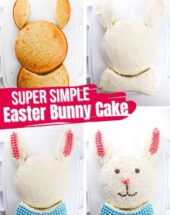
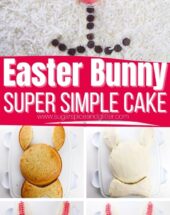
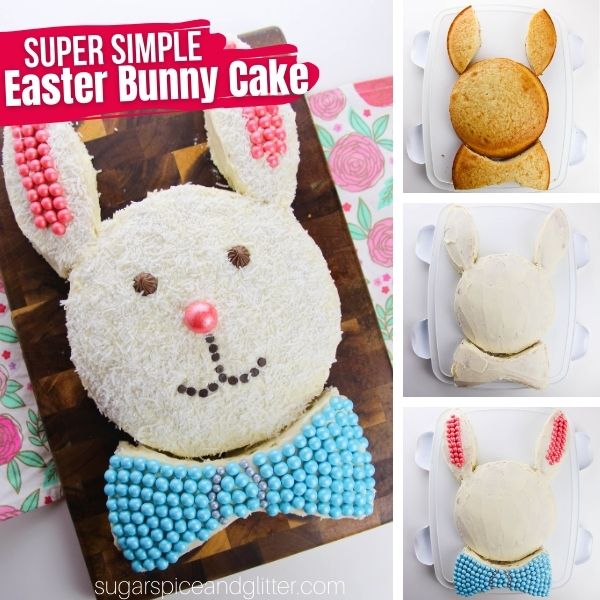
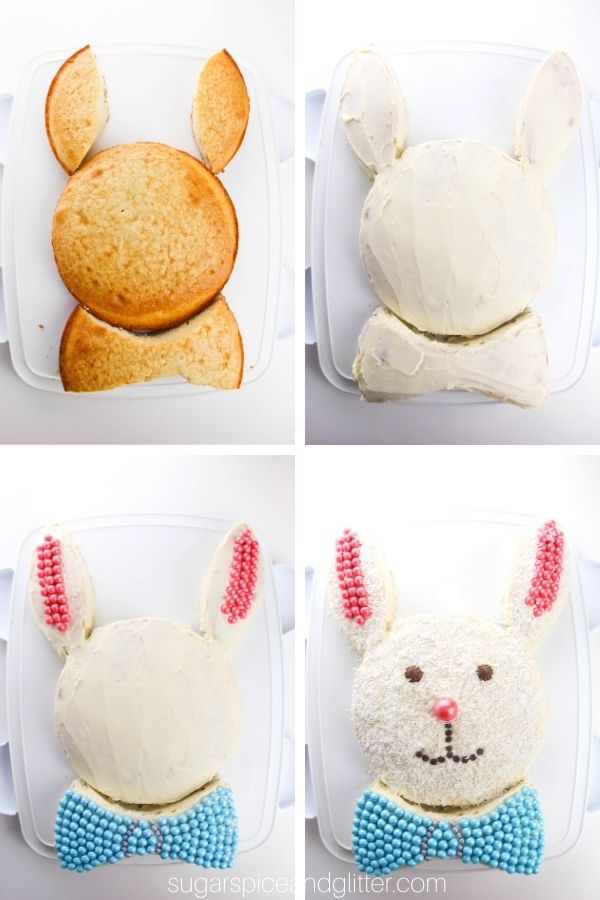
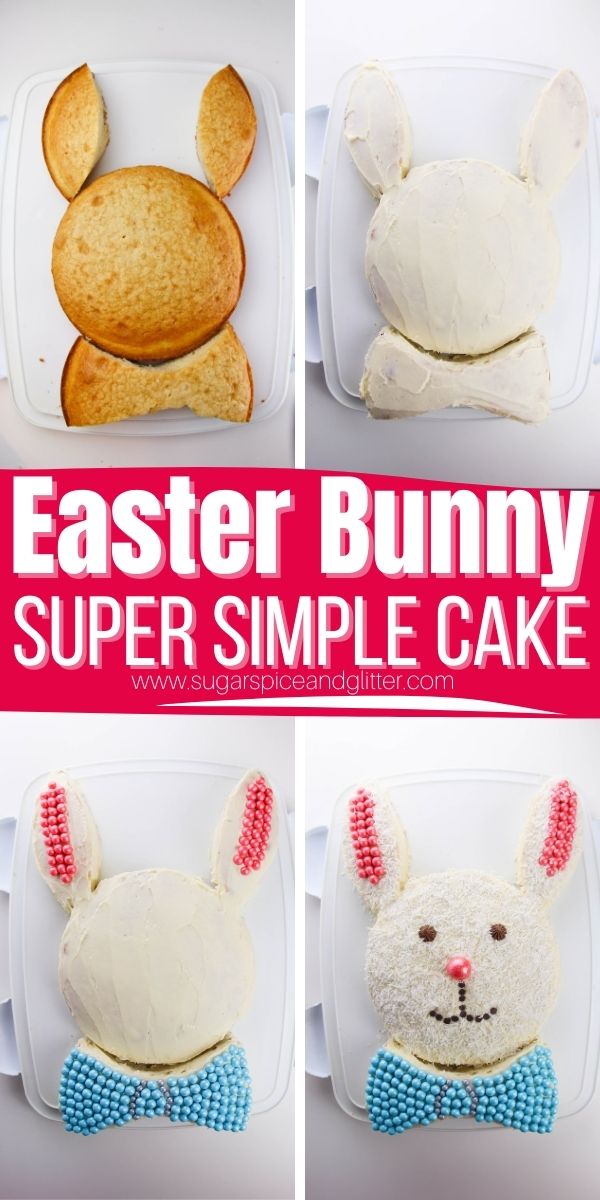
Place one circle cake on a cutting board and use a cake pan and sharp kitchen knife to carefully trace the shapes of the ears, as shown.
Don’t worry if the ears or bow shape seem uneven, you can trim them down a bit further but small differences won’t be noticeable in the finished cake.
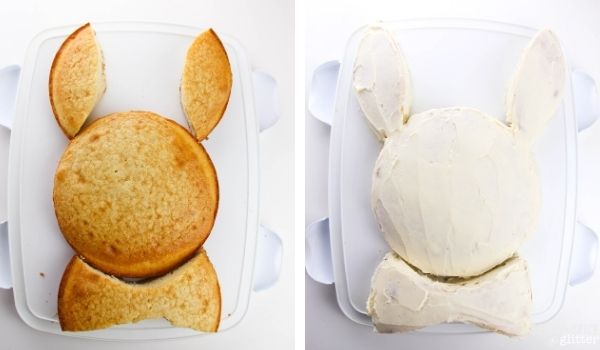
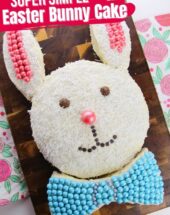
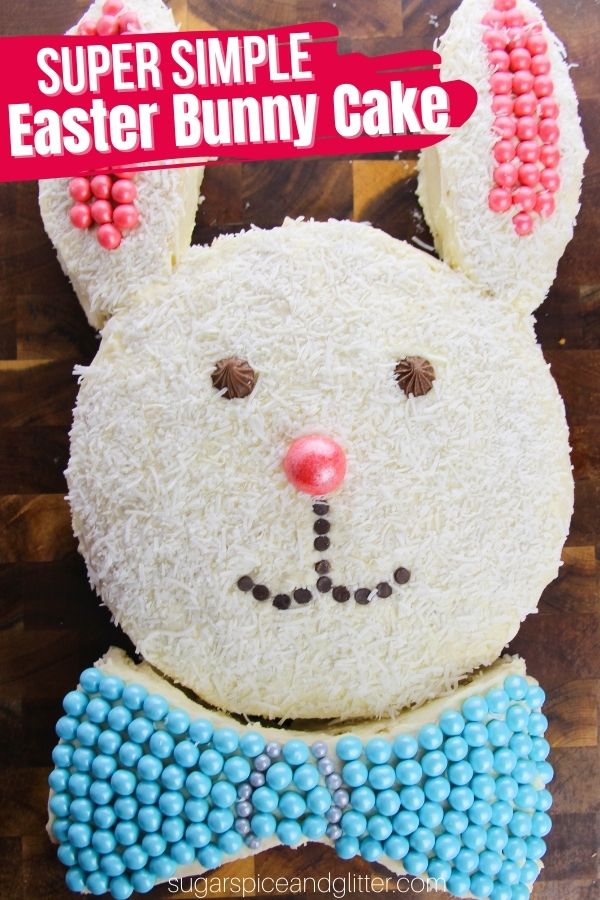
Arrange your cake shapes into a bunny head, as shown, with the two oblong ears placed at the top of the uncut circle cake and the bow tie shape at the bottom.
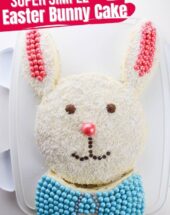
Use an offset spatula to apply a generous coating of the frosting all over the cake. Don’t worry about smoothing it out or imperfections, as they will be covered up by the decorating candy and sprinkles. Just ensure there are no bare spots without frosting.
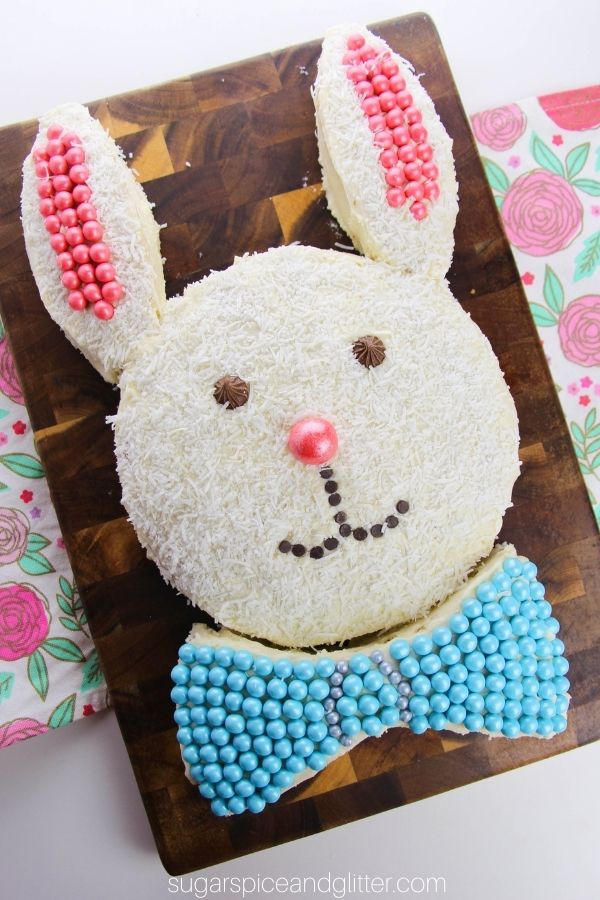
Decorate the bow tie with sixlets (or sprinkles). If the bow tie is uneven, you can create a visual trick by just ensuring that each corresponding row on either side of the bow tie has the same number of sixlet candies. Create the illusion of a knot by using the gray sixlets to create two rounded rows at the midway point of the bow, as shown.
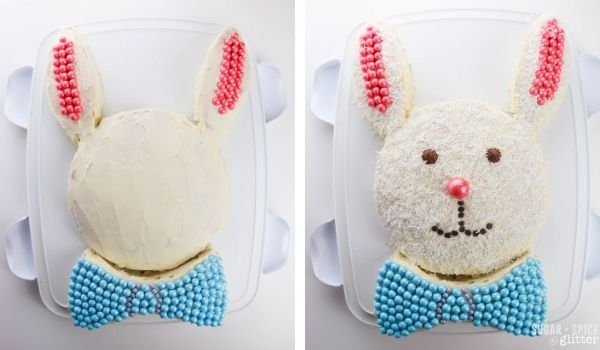
Use the pink candy sixlets to create three rows of candy in the center of each of the bunny’s ears, with the center row having one more sixlet at each end than the surrounding, outer rows.
Place the chocolate rosettes one third of the way down the circle cake to suggest the bunny’s eyes. In the center of the cake, place the pink gumball for the bunny’s nose.
Use mini chocolate chips to create the bunny’s smile. I found that pressing the top, pointed edge of the chocolate chip into the frosting helped make them more secure.
Finally, cover the frosting with shredded coconut (or white sprinkles) to suggest the bunny’s fur. Gently pat the shredded coconut down to secure it in place.
Pin this Easter Bunny Cake Tutorial for your Easter baking:
Grab your free printable recipe card for our Easy Easter Bunny Cake recipe:
Want to Save This Recipe?
Enter your email & I'll send it to your inbox. Plus, get great new recipes from me every week!
By submitting this form, you consent to receive emails from Sugar, Spice and Glitter.
Easy Easter Bunny Cake
A step-by-step tutorial for how to make this super simple Easter Bunny Cake using two round cakes. This classic Easter cake involves no fancy decorating skills or equipment and is easy enough to make with the kids.
Ingredients
- 2 baked round cakes
- 1 cup Butter, room temperature
- 3 cups Powdered Icing Sugar
- 1 teaspoon Vanilla Extract
- 2-3 Tablespoons Milk or Cream
- 1/2 cup pink sixlets
- 2/3 cups blue sixlets
- 1/4 cup gray sixlets
- Pink Gum Ball
- 2 Chocolate Rosettes
- 1/4 cup Mini Chocolate Chips
- 1 cup Shredded Coconut
Instructions
- Bake your cakes according to the boxed directions or whichever recipe you are using.
- Allow the cakes to cool completely as you prepare the vanilla frosting.
For the Vanilla Frosting:
- In a large bowl, combine the butter and powdered icing sugar.
- Beat for 1 minute, then add in the vanilla extract and milk or cream.
- Beat the frosting for 2 minutes, then taste and adjust.
- If the frosting seems too stiff, add a tablespoon more milk, if it seems too soft, add a half cup more of powdered icing sugar.
To Assemble the Cake:
- Place one round cake on a cutting board and use a cake pan and sharp kitchen knife to carefully trace the shapes of the ears, as shown.
- Don't worry if the ears or bow shape seem uneven, you can trim them down a bit further but small differences won't be noticeable in the finished cake.
- Arrange your cake shapes into a bunny head, as shown, with the two oblong ears placed at the top of the uncut circle cake and the bow tie shape at the bottom.
To Decorate the Cake:
- Use an offset spatula to apply a generous coating of the frosting all over the cake. Don't worry about smoothing it out or imperfections, as they will be covered up by the decorating candy and sprinkles. Just ensure there are no bare spots without frosting.
- Decorate the bow tie with sixlets (or sprinkles). If the bow tie is uneven, you can create a visual trick by just ensuring that each corresponding row on either side of the bow tie has the same number of sixlet candies. Create the illusion of a knot by using the gray sixlets to create two rounded rows at the midway point of the bow, as shown.
- Use the pink candy sixlets to create three rows of candy in the center of each of the bunny's ears, with the center row having one more sixlet at each end than the surrounding, outer rows.
- Place the chocolate rosettes one third of the way down the circle cake to suggest the bunny's eyes. In the center of the cake, place the pink gumball for the bunny's nose.
- Use mini chocolate chips to create the bunny's smile. I found that pressing the top, pointed edge of the chocolate chip into the frosting helped make them more secure.
- Finally, cover the frosting with shredded coconut (or white sprinkles) to suggest the bunny's fur. Gently pat the shredded coconut down to secure it in place.
Recommended Products
As an Amazon Associate and member of other affiliate programs, I earn from qualifying purchases.


Nutrition Information:
Yield:
16Serving Size:
1Amount Per Serving: Calories: 266Total Fat: 16gSaturated Fat: 10gTrans Fat: 0gUnsaturated Fat: 5gCholesterol: 39mgSodium: 132mgCarbohydrates: 31gFiber: 1gSugar: 28gProtein: 1g
Sugar, Spice and Glitter uses an auto-generate nutrition calculator. Nutrition information isn’t always accurate unless analyzed in a scientific lab, so these should be considered more of a guideline than medical information.
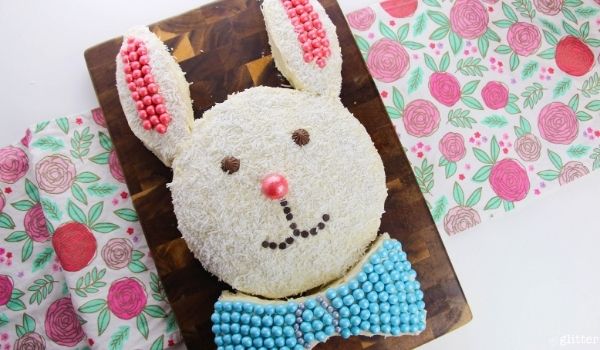
I hope your family loves this Classic Easter Bunny Cake as much as mine did!
For more delicious Easter recipes, check out our full collection here:
For more delicious and easy cake recipes, check out our full collection here:


OMG this is so cute! This must take you a lot of time to make. I’m going to use M&Ms instead of sixlets. Thanks for sharing!
OMG I remember having this cake when I was a kid. I had no idea how easy it was to make, thank you so much for sharing such a thorough tutorial. Can’t wait to make it for Easter this year.