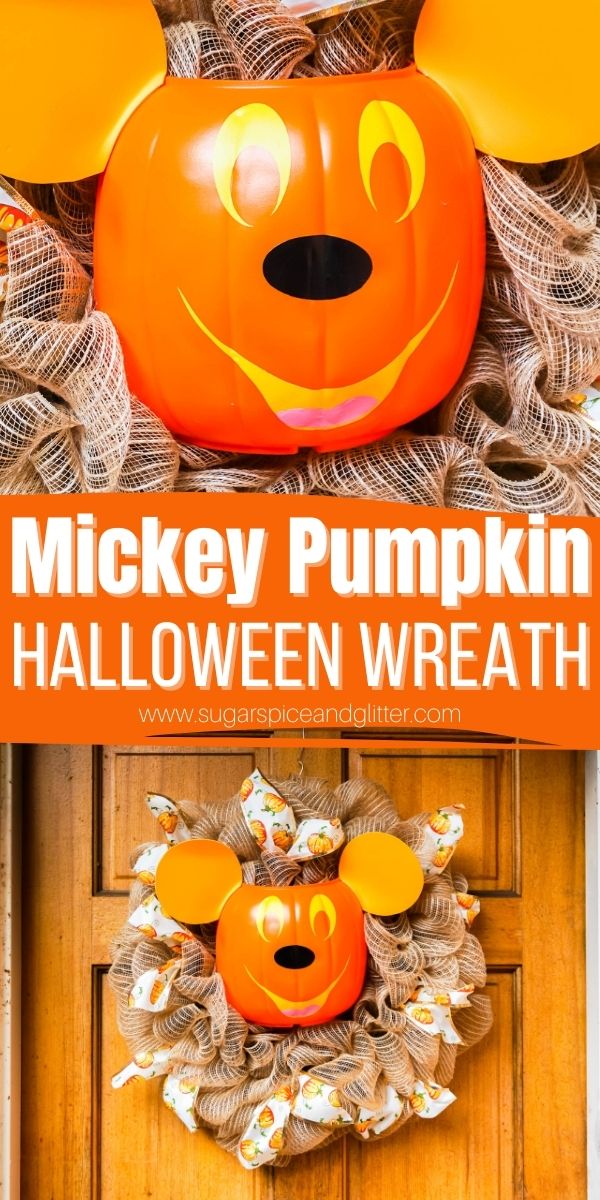
Mickey Pumpkin Wreath
Welcome to Sugar, Spice & Glitter! Please note, this post may contain affiliate links. For more details, see our Full Disclosure.
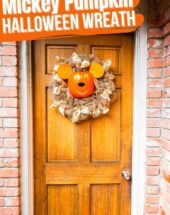
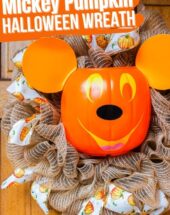


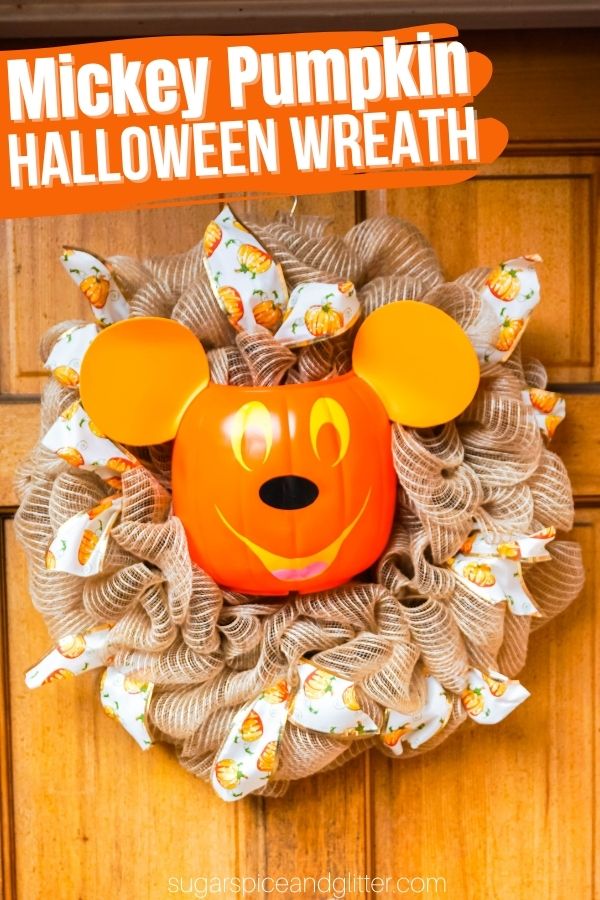
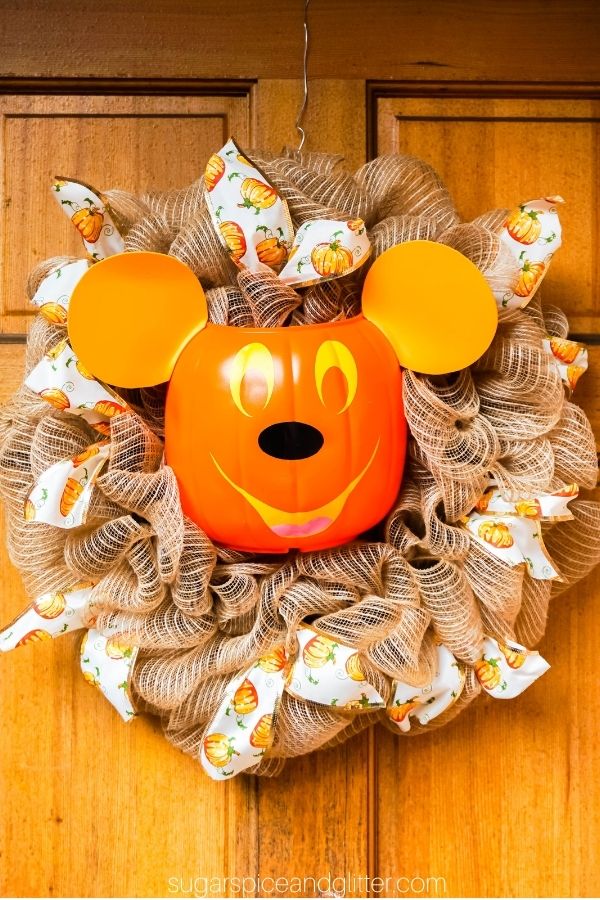
A fun Disney Halloween Wreath inspired by the Mickey Pumpkin Wreaths that pop up in the parks in fall, today’s cricut craft features a free Mickey Pumpkin SVG to make this DIY Mickey Wreath super easy to make at home!
DIY Mickey Pumpkin Wreath Craft
I love Disney World in the fall.
The weather is perfect. Seasonal treats and the Epcot Food & Wine Festival keep my foodie side satisfied. There are plenty of Halloween events, including our favorite: Mickey’s Not-So-Scary Halloween Party. And of course, they kit out the parks with cute fall-themed decor.
To bring a bit of the fall festivities home, I thought it would be fun to make our own Mickey Pumpkin Wreath inspired by the ones scattered throughout Magic Kingdom’s light posts. Other than the cricut vinyl, all supplies for this craft came from the DollarTree and cost me about $6 to make!
If I could change one thing about this wreath, I would have sprayed the plastic pumpkin bucket with some matte orange spraypaint to make it less shiny and more similar to the ceramic-look that the parks’ wreaths have. But, other than that, I’m pretty happy with it! Maybe I’ll make those changes next year.

If you’re not as comfortable or confident with ruching the burlap fabric to make a full-looking wreath, you can instead grab some leaf garlands or fall-inspired flower bouquets and cover your wreath with those.
If you can’t find orange foam for the ears, you can swap that out for two small foam pumpkins. (I would glue them so that the stems are facing forward so the circle shape is more pronounced.)
You can even swap out the colors (by spray painting the pumpkin and using different foam) to make a Mickey Pumpkin Wreath inspired by your favorite characters. A black pumpkin with purple flowers could be a nod to Ursula or the Haunted Mansion. A white pumpkin with dalmatian spots and a red wreath could be a nod to the 101 Dalmatians (or Cruella), etc etc.
More DIY Halloween Wreaths
Note: this craft uses the back half a plastic pumpkin bucket. I used the front half to make our teal pumpkin wreath craft – so we got two DIY wreaths out of one bucket!
Materials to Make a Mickey Pumpkin Wreath
Supplies
- Wire Wreath Form
- Orange Pumpkin Bucket
- 4-6 inch Burlap Ribbon
- 2-3 inch Fall Pumpkin Ribbon
- Floral Wire
- Orange Craft Foam
- Light Grip Cricut Mat
- Heat Transfer Vinyl in Black, Pale Yellow and Pink
- Mickey Pumpkin SVG
Tools
- Hot Glue Gun & Glue
- Wire Cutters
- Scissors
- Painter’s Tape
- Cricut Explore Air 2 or Cricut Maker
- EasyPress Mini
Tip: if you want a more matte appearance for your pumpkin, use a matte orange spray paint before applying the vinyl.
How to Make a Mickey Pumpkin Wreath
Download the SVG cut file and upload to Cricut Design Space.
Attach your black heat transfer vinyl to the light grip mat and cut out the nose shape. Remove from mat.
Attach your yellow heat transfer vinyl to the light grip mat and cut out the eyes and mouth shapes. Remove from mat.
Attach your pink heat transfer vinyl to the light grip mat and cut out the tongue shape. Remove from mat.
Attach your orange craft foam to the light grip mat and cut out the ear shapes (make sure to change the settings to cut the foam). Remove from mat.

Use the weeding tool to remove all shapes from the vinyl sheets.
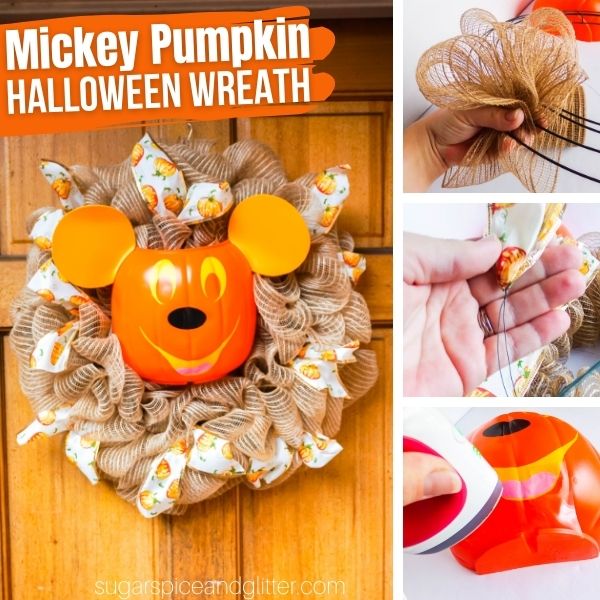
Cut your pumpkin bucket in half, top to bottom, so that you have the front half with the face and the back half. Discard the front half or save for another craft.
Place Mickey’s facial features (except for the ears) on the bucket, then use the EasyPress Mini to press and set. Set pumpkin bucket aside.
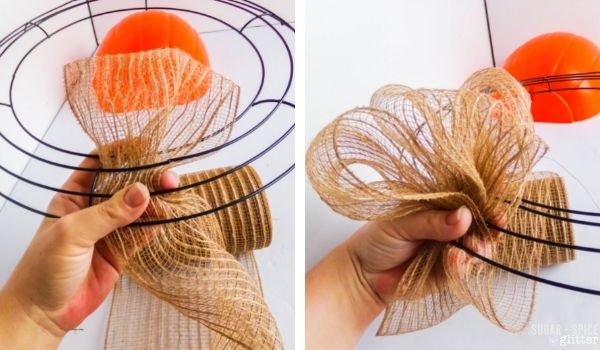
Tie one end of the burlap ribbon to the inside ring of your wire wreath and secure in place with a dab of hot glue.
Fold a loop of burlap ribbon through the inner ring, then pull up a equal-sized loop into the second (middle) ring, then pull up a third matching loop through the third (outside) ring.
Twist the burlap ribbon, then bring back to the inner ring along the back side of the wreath, then repeat the process starting with the inside ring. Continue all around the wire wreath.
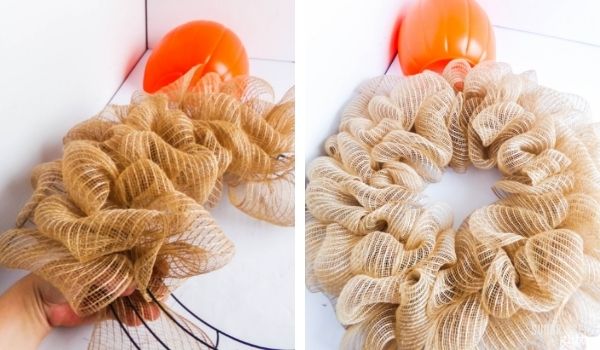
Our wire wreath had 6 sections, and each section held about 6 of these three-loop gatherings.
Tie off the burlap ribbon and hot glue the end in place.
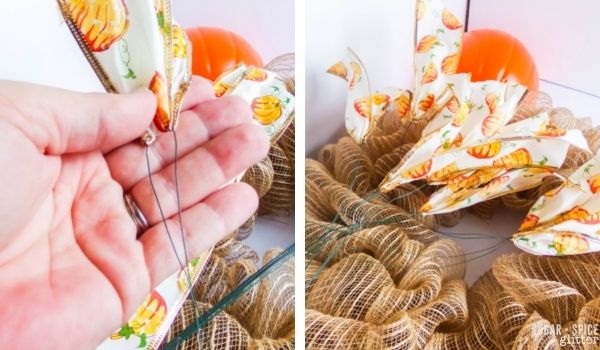
You can repeat this process with the fall-themed ribbon, or cut 8-10” lengths of the ribbon and poke a floral wire through the middle.
Form the ribbon up to form a V-shape, then tie the ends of the floral wire around the wreath, hiding the floral wire under the burlap. Distribute these ribbons throughout the wreath, as desired.
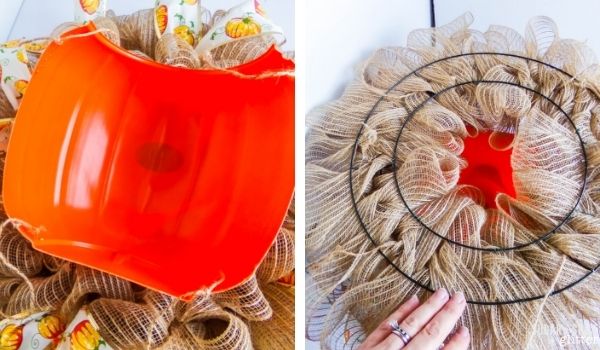
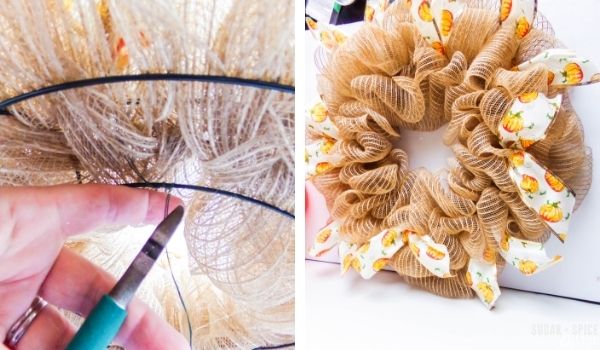
Use your wire cutters or an Exacto knife to poke a hole in each corner of the back of the bucket. Thread floral wire through the holes and use to tie the bucket securely in place to the inside of the wreath.
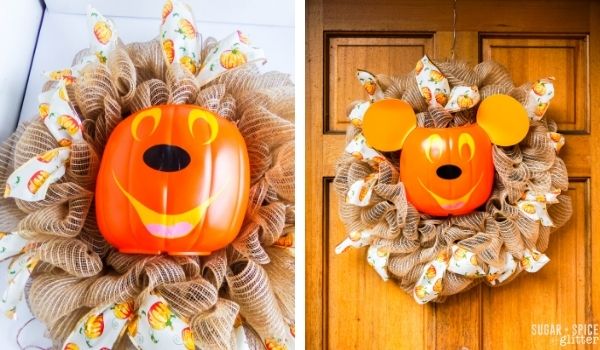
Use hot glue to attach the foam ears to the top sides of the bucket.
If you have excess ribbon left, tie both ends to the top of the wreath and glue in place to form a hanger for your wreath.
Pin this Cricut Disney Wreath for your next Cricut crafting session:
Grab your free printable instructions for our Mickey Pumpkin Wreath and don’t forget to grab your free Mickey Pumpkin SVG here:
Want to Save This Recipe?
Enter your email & I'll send it to your inbox. Plus, get great new recipes from me every week!
By submitting this form, you consent to receive emails from Sugar, Spice and Glitter.
Mickey Pumpkin Wreath
A fun DIY Mickey Pumpkin Wreath to bring a bit of the magic of the parks home with you! This super simple Cricut Wreath uses our free Mickey Pumpkin SVG to transform a plain pumpkin bucket into Mickey's expressive face. Swap out the burlap with fall florals or leaf garlands, if desired.
Materials
- Wire Wreath Form
- Orange Pumpkin Bucket
- 4-6 inch Burlap Ribbon
- 2-3 inch Fall Pumpkin Ribbon
- Floral Wire
- Orange Craft Foam
- Light Grip Cricut Mat
- Heat Transfer Vinyl in Black, Pale Yellow and Pink
- Mickey Pumpkin SVG
Tools
- Hot Glue Gun & Glue
- Wire Cutters
- Scissors
- Painter’s Tape
- Cricut Explore Air 2 or Cricut Maker
- EasyPress Mini
Instructions
- Download the SVG cut file and upload to Cricut Design Space.
- Attach your black heat transfer vinyl to the light grip mat and cut out the nose shape. Remove from mat.
- Attach your yellow heat transfer vinyl to the light grip mat and cut out the eyes and mouth shapes. Remove from mat.
- Attach your pink heat transfer vinyl to the light grip mat and cut out the tongue shape. Remove from mat.
- Attach your orange craft foam to the light grip mat and cut out the ear shapes (make sure to change the settings to cut the foam). Remove from mat.
- Use the weeding tool to remove all shapes from the vinyl sheets.
- Cut your pumpkin bucket in half, top to bottom, so that you have the front half with the face and the back half. Discard the front half or save for another craft.
- Place Mickey’s facial features (except for the ears) on the bucket, then use the EasyPress Mini to press and set. Set pumpkin bucket aside.
- Tie one end of the burlap ribbon to the inside ring of your wire wreath and secure in place with a dab of hot glue.
- Fold a loop of burlap ribbon through the inner ring, then pull up a equal-sized loop into the second (middle) ring, then pull up a third matching loop through the third (outside) ring.
- Twist the burlap ribbon, then bring back to the inner ring along the back side of the wreath, then repeat the process starting with the inside ring. Continue all around the wire wreath.
- Our wire wreath had 6 sections, and each section held about 6 of these three-loop gatherings.
- Tie off the burlap ribbon and hot glue the end in place.
- You can repeat this process with the fall-themed ribbon, or cut 8-10” lengths of the ribbon and poke a floral wire through the middle. Form the ribbon up to form a V-shape, then tie the ends of the floral wire around the wreath, hiding the floral wire under the burlap. Distribute these ribbons throughout the wreath, as desired.
- Use your wire cutters or an Exacto knife to poke a hole in each corner of the back of the bucket. Thread floral wire through the holes and use to tie the bucket securely in place to the inside of the wreath.
- Use hot glue to attach the foam ears to the top sides of the bucket.
- If you have excess ribbon left, tie both ends to the top of the wreath and glue in place to form a hanger for your wreath.
Recommended Products
As an Amazon Associate and member of other affiliate programs, I earn from qualifying purchases.


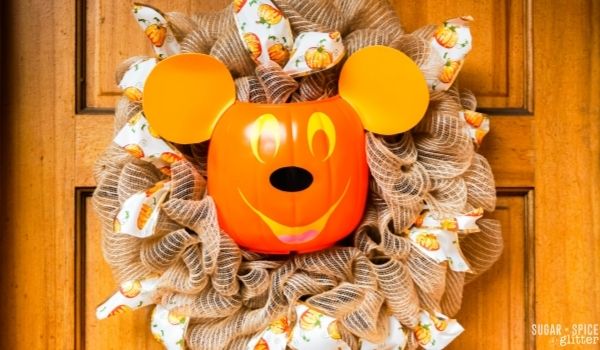
I hope your family loves this DIY Mickey Mouse Wreath to bring a bit of the magic of the parks home for fall!
Check out our full Halloween Craft collection here:

Check out our full DIY Home Decor collection here: