
How to Create Gorgeous Gallery Photo Walls
Welcome to Sugar, Spice & Glitter! Please note, this post may contain affiliate links. For more details, see our Full Disclosure.

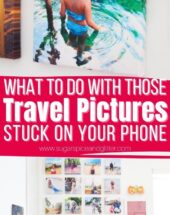
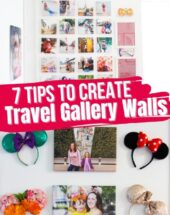
Today, we’re sharing 7 Tips to finally get those Family Photos off of your Phone along with a few of our favorite photo display ideas! I’m sharing how we created unique family photo walls plus a discount to the site I used to create all of these projects!
Disclosure: to facilitate my review of BestCanvas, I received a discount off of my initial order. Since then I’ve purchased more items from them, as you can see in this post. My thoughts and opinions shared here are authentic and 100% my own.
What to Do with Family Pictures
I am honestly the worst at getting pictures off of my phone or computer and getting them on to our walls or into albums.
I used to be great at it – I have so many framed pictures and photo books of Ella’s first two years of life… and then, well, life got increasingly crazier and all of the pictures that capture our busy, adventurous, joy-filled life have just stayed on my devices.
Not to mention, I suffer from extreme decision overwhelm. I’m that person who looks up the menu the night before because I take so much longer than everyone else if I’m just looking at the menu for the first time in a restaurant. Trying to narrow down just a few of our family’s thousands of pictures to print just a few seems like such an enormous task.
But I want the rest of my family (as well as our family and friends who visit) to get to enjoy those pictures and for us to be surrounded by those memories as we plan and create new memories in our home. So, I’ve been making an effort to go through all of those pictures and finally do something with them!
Below, I’m excited to share with you the projects that I have completed using BestCanvas/Canvas Discount and how I worked through my decision overwhelm to actually get them completed!
I also have a 25% off coupon code from BestCanvas.ca (for Canadians) and CanvasDiscount.com (for Americans) so you can finally tackle your own photo projects! Use SUGAR25OFF to get an additional 25% off (when spending $50) on top of the already discounted product range – in total savings more than 90%! (Plus you get free shipping on orders over $150.)
7 Tips to Get Started Creating Family Photo Walls
- Know the dimensions of the wall that the gallery will be displayed on – this will help you pick the dimensions of the photos and the number of pictures to display
- Pick a theme or concept to help narrow down your choices and create unity in the selected images
- Start by picking your favorite pictures, then reduce them down to fit the number you need for the project. Don’t pressure yourself into picking the best image right off the bat.
- Check to see how the images will crop to fit the canvas prints or frame sizes you’ve selected
- Create a mock-up of the images in a grid to see how they look together before you order
- Incorporate other decor items – art or souvenirs that complement your theme can help round out the photo wall
- Accept that things might not be perfect. I know, I hate the idea of that as well – but using an affordable printing option will make it less daunting if you decide to swap out a canvas later on – this was especially helpful for me in creating the travel wall!
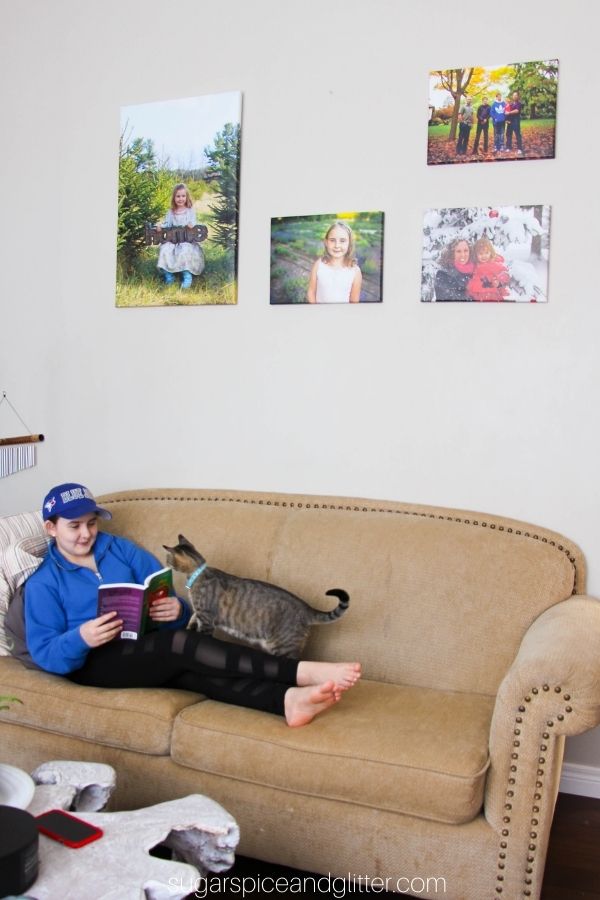
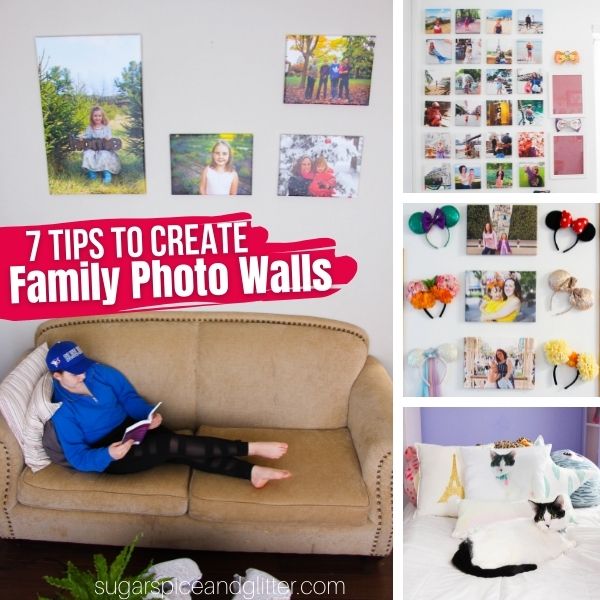
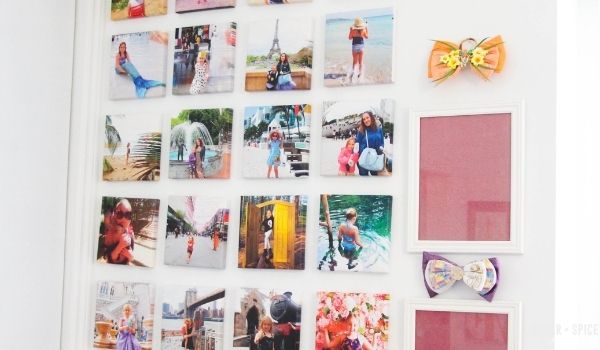
Family Seasons Wall
I decided to start with one simple project: a small collage of canvases from family photo shoots to go in our living room.
(It’s a little embarrassing that I’ve spent sooo much money on these photoshoots over the years yet have never even printed any of these pictures!)
To make my decisions easier, I set some “guidelines” to help narrow down my picture selections:
- one picture from each season (spring, summer, fall, winter)
- pictures from a variety of stages of our family’s life (from when Ella was a toddler to our most recent shoot)
- also a “bonus” picture from when we bought our home – something that reminded us that family is home. (If we hadn’t had that photoshoot, I would have picked just a great family shot in it’s place.)
Using those guiding rules, I was able to narrow down my photo choices easier. That gallery collection came together quickly and I felt so satisfied at how it turned out that it gave me some motivation for the next project.
Total Cost for this Project with Discount: $80 CAD / $107 USD
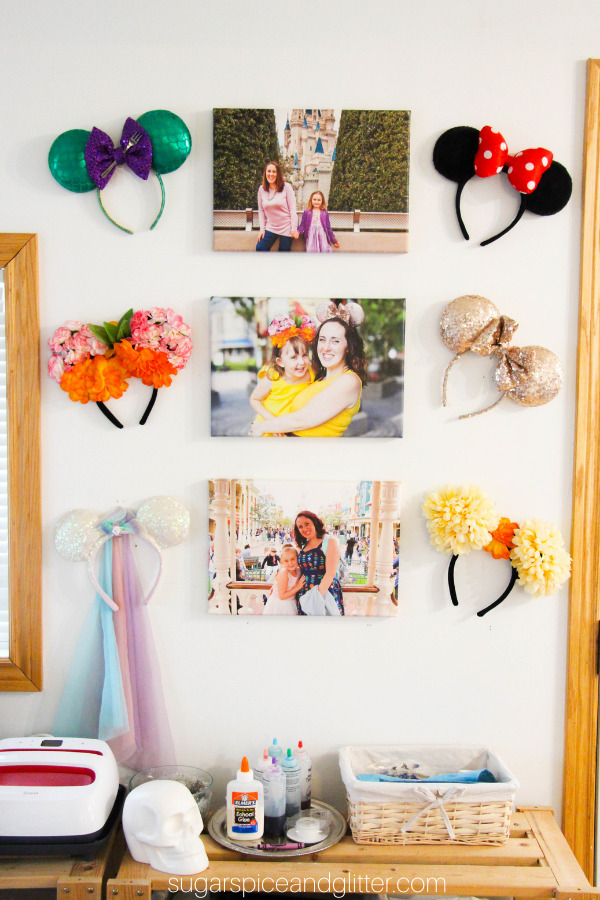
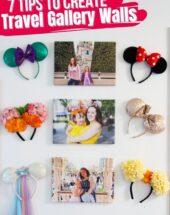
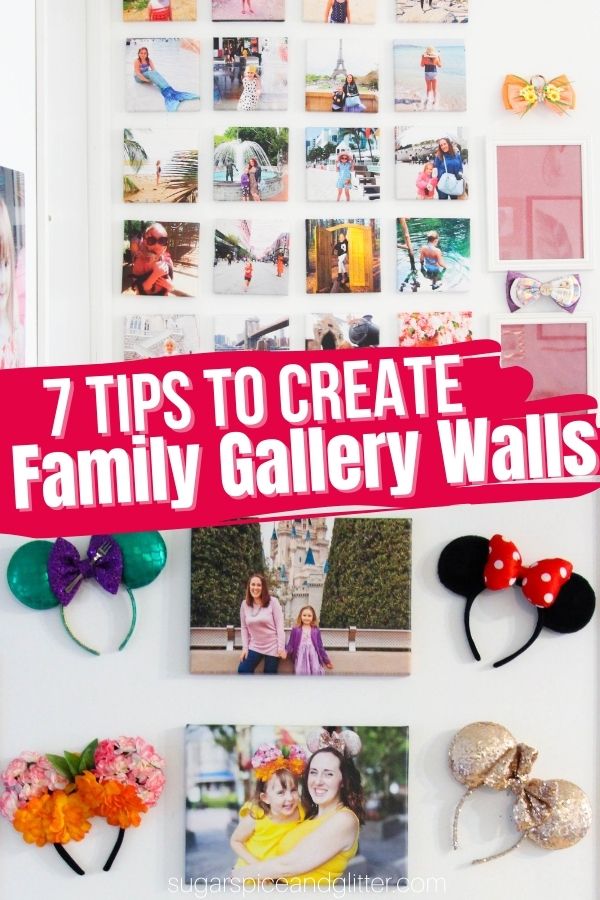
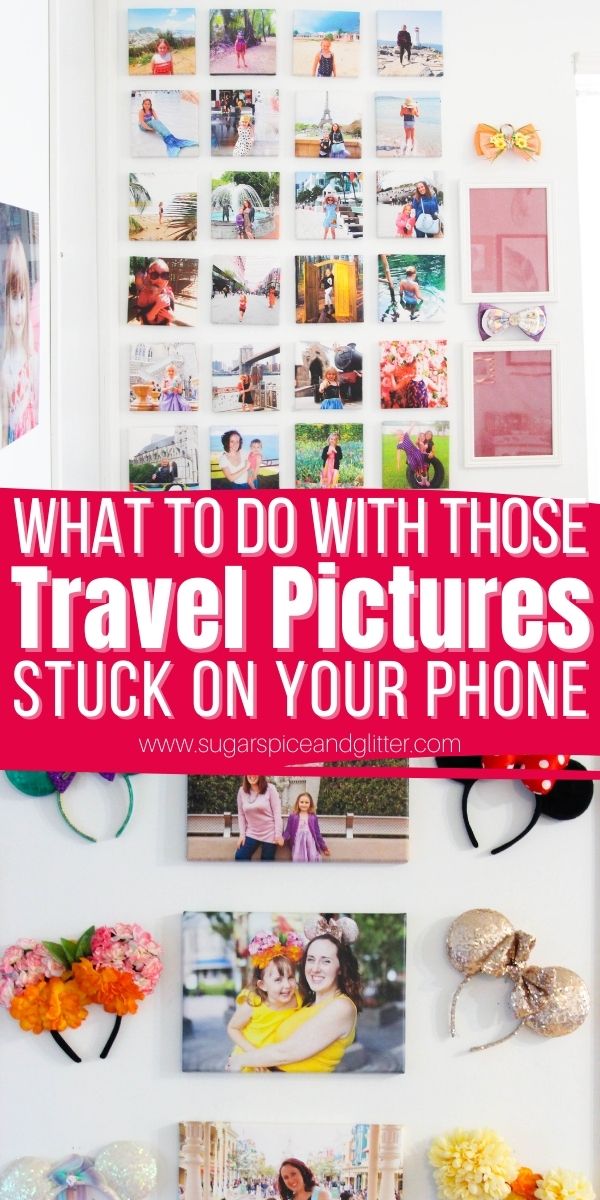
Disney Mickey Ears Wall
This was another easy project – we have so many great shots from our visits to different Disney Parks (including Disneyland Paris) but I wanted to create a unique touch using our collection of Mickey Ears.
Since we had 6 sets of Mickey Ears, that made it easy to settle on printing 3 photo canvases so I could display each canvas with a set of Ears on either side. I went with three favorite shots from three different parks, but you could pick a different scheme – like coordinating the images to match the ears, etc.
I went with 11″ x 14″ canvases because those dimensions made the most sense with the dimensions of the Mickey Ears.
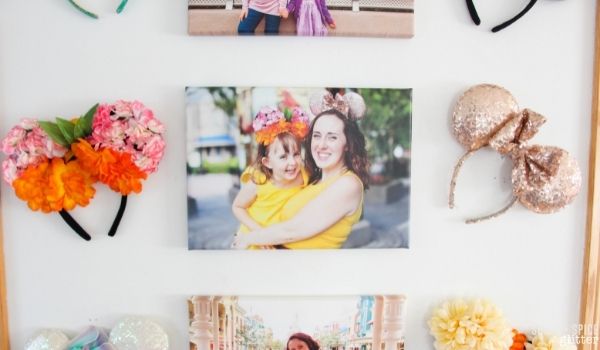
I set up this wall in my photography studio which also serves as our craft room on most days. I love how it adds a touch of whimsy and reminds us of all of the fun memories we’ve had at the parks, as we’re busy creating new memories crafting together as a family.
This concept of using souvenirs or mementos from a trip alongside images could be used in so many different ways – you don’t have to stick to Mickey Ears!
Total Cost for this Project with Discount: $30 CAD / $50 USD (not including the cost of the Mickey Ears)
PS – if you like this concept but don’t have enough Mickey Ears, check out some of our Mickey Ear DIYs like our UP-themed Mickey Ears or our Marie Mickey Ears.
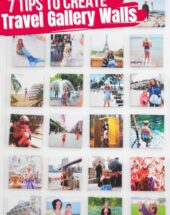
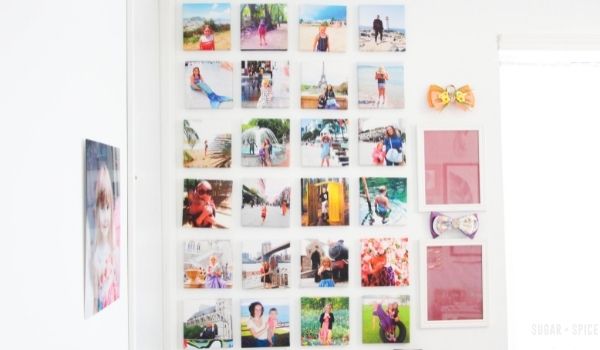
Gallery Travel Wall
Okay, so this project was a bit more ambitious – but tackling those smaller, easier projects first made it less daunting.
Travel is such an important part of our family’s culture and the source of some of our favorite memories. By 8 years old, Ella had been to 15 countries, 7 American states/territories and 3 Canadians provinces.
While I have so many pieces of art and souvenirs around our home from our travels, I only had one picture up – from Ella’s first trip to Bermuda at one year old – so it was time for an update.
Again, I gave myself some strict parameters for photo selection:
- one picture per country or state/province
- the picture had to have Ella in it
- the picture needed to be of a special memory on the trip – not just something pretty
- all images needed to look good cropped to square since square canvases worked best for the gallery layout
To narrow down picture selection, I made a main folder in my computer for the project and then several subfolders – each labeled for every country/state/province that would be included in the travel wall.
I went through our pictures from each trip and copied my favorites into the folders. Then, I imported each image into Best Canvas to see how the image looked cropped to fit their 8″x8″ square canvas – this helped eliminate a lot of images that didn’t look great as squares.
Lastly, I imported the images into Canva and played around with the images on a grid. This helped me see how the images would look together – did I have too much of one color if I selected certain images? Were there too many images of just Ella and not enough of us as a family? Etc, etc.
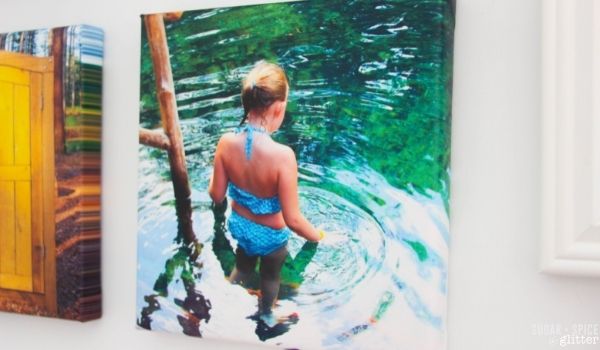
While I love all of the gallery walls I created – this travel wall has to be my favorite! I placed it in our dining room and it’s been a fun source of conversation to look over at the gallery wall and discuss memories from our different vacations.
It would also be a wonderful addition to a child’s bedroom to remind them of all of the wonderful trips they have taken and inspire them to dream big!
With the discount, each canvas in our travel wall ended up being less than $6 – so it was easy to move past the overwhelm of “what if I pick the wrong image” – I could easily and affordably swap out the images if I wasn’t super happy with the end result.
Total Cost for this Project with Discount: $131 CAD / $90 USD
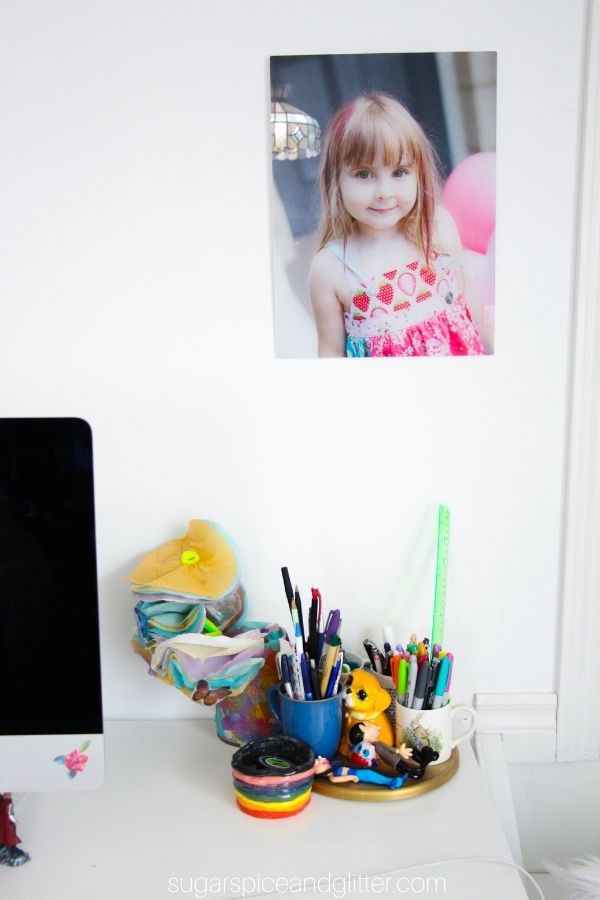
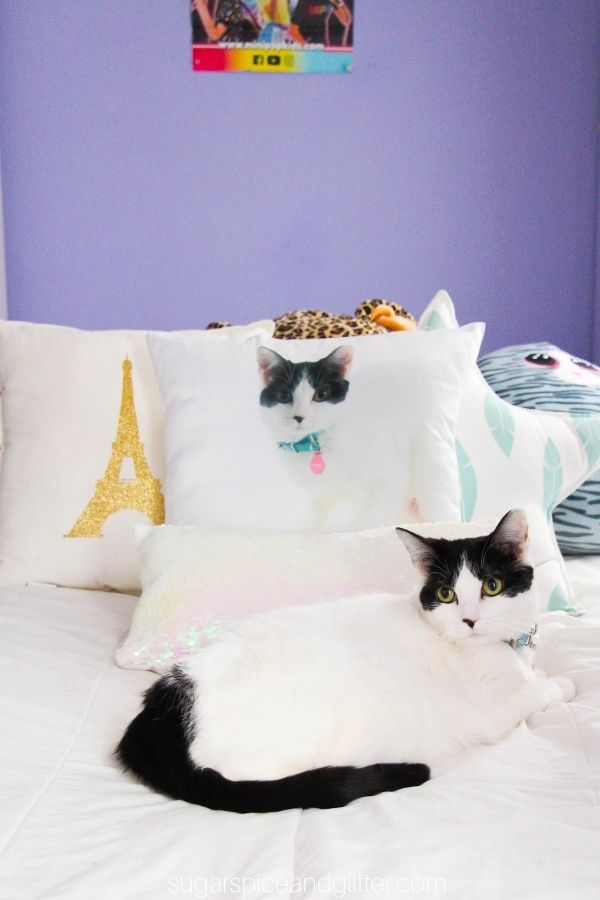
Since I was already placing a large order, I also decided to add a photo on acrylic to place over my work desk and a photo cushion to surprise Ella!
The glossy and chic finish of the photo on acrylic is the perfect frame-free way to display a favorite picture – especially if frames would break up the look of your gallery wall but you still want the polished feel of a photo under glass.
I picked a pretty picture of Ella taken on her birthday at Disney and I love that it serves as a reminder while I’m working of all of the wonderful opportunities that my work has provided for my family and why I’m working so hard (or who I’m working so hard for). The acrylic finish works wonderfully on images that have clear backgrounds and foregrounds – it gives the photo almost a 3D effect.
Ella loved her photo cushion but did complain that I only printed one instead of one for each of her three cat babies, so I guess I’ll be ordering a couple more or I’ll see if a picture with all three cats will fit on one of their custom blankets. The silky feel of the pillow and the great quality of the photo print is even more amazing when you consider how inexpensive the pillow was – $20 and that included the pillow insert!
Best Canvas/Canvas Discount Review
Since this post is already pretty long, I’ve posted a separate review of Best Canvas/Canvas Discount here – however (spoiler alert) I will say that I was extremely happy with all of my purchases and will definitely be ordering more from them in the future.
I take my partnerships seriously and refuse to recommend any service or product that I don’t love – and I will unequivocally say that I love having all of Best Canvas’ products in our home, displaying some of our favorite memories!
The quality and price of the products I received is incomparable. I checked around to compare the prices of the canvases and photo products I ordered from Best Canvas to other sellers (from big box sellers to smaller, boutique companies) and Best Canvas’ prices beat them out – even if I was ordering a single product and had to pay shipping on my order (which I didn’t – since I ordered enough to get frees shipping on all of my products).
If you have pictures that you need to get off of your phone and onto the wall, use SUGAR25OFF to get an additional 25% off of your order from BestCanvas.ca or CanvasDiscount.com
If you order (or have ordered) from Best Canvas or Canvas Discount – I would love to see your projects and hear about your experience! Feel free to leave me a comment or tag me on social media to show off your photo displays.
If you’re not ready to order yet – be sure to pin this post to save the discount code!


Hi all! I really enjoyed reading this article about decorating the walls in the house with family photos. Some home improvement projects, such as painting, can be time-consuming and challenging for homeowners
Thank you – I love decorating but it’s definitely still a challenge to feel confidence during the process.
Hello there. I really love the idea to decorate your home with canvases from your travel photos and mix them with souvenirs. Better than art imo.
I just had an amazing lunch experience at this awesome restaurant in Hoboken! The atmosphere was lively, and the decor was modern and inviting. I went with the classic cheesesteak, and it was absolutely delicious—loaded with flavor and served with crispy fries. My partner chose the fish tacos, and she couldn’t stop talking about how fresh and tasty they were. We also tried their buffalo cauliflower bites, which were a great appetizer to start our meal. Everything was cooked to perfection! The service was attentive and friendly, which made the experience even more enjoyable. It’s a great spot for a casual lunch, whether you’re out with friends or looking for a nice place to unwind on your own. If you’re in the area, definitely stop by and check out their extensive menu. Trust me, you’ll find something you love! Check it out here: hoboken lunch—you won’t regret it!
Storage is another area where improvements can make a significant impact. Built-in shelving, customized closets, and creative furniture solutions can help homeowners make the most of their space. Decluttering and organizing the home often reveals the need for better storage options, prompting the addition of cabinets, hooks, and other organizational tools. Functional storage solutions ensure that every item has its place, contributing to a tidy and efficient living environment. For more visit concrete driveways Hobart
Such great tips for getting family photos off your phone and into your home! At Jacana Wellness, we believe in surrounding yourself with things that bring you joy and peace, whether it’s through beautiful family memories or natural, organic products. Just like you create a space filled with love and memories, we focus on bringing the natural beauty of Jamaica to your wellness routine. If you’re looking to add a touch of nature to your home or skincare routine, check out our collection of organic wellness products. It’s all about creating harmony in every part of your life!
https://jacanawellness.com/
I just had the best lunch at this fantastic restaurant in downtown! The vibe was so lively, and the decor gave off such a cool, modern feel. I went for the classic cheeseburger, and it was absolutely mouthwatering—juicy, perfectly cooked, and served with crispy fries. My friend opted for the grilled chicken sandwich, and she kept raving about how tender and flavorful it was. We also shared some crispy fried pickles as an appetizer, and they were the perfect start to the meal. Everything was spot on! The service was top-notch—friendly and attentive. This is definitely a great place for a laid-back lunch, whether you’re with a group or just hanging out solo. Highly recommend it! Wood Carved Shop
Wow, I like your photo wall ideas! I also work in construction and see many people forget planning before building. Using a home construction estimator can help to organize budget and materials before starting projects like this, so everything stays on track and costs don’t go high. Thanks for sharing your tips!
I loved the tips on creating travel gallery walls! The idea of mixing photos with postcards is brilliant. It adds such a personal touch to the space. Do you have any other creative suggestions for displaying travel memories?
Love this guide on creating gallery photo walls! Using a CANON Maroc camera makes capturing crisp, vibrant images so much easier, which really elevates the wall. Mixing frame sizes and styles, then arranging thoughtfully, transforms any space. Definitely trying these tips with my CANON shots!
Photo walls look amazing when everything is clean and consistent, but older pictures can sometimes throw that off. I had that issue when trying to mix new prints with family photos that were already faded or scratched. At first I thought I’d just leave them as they are, but it didn’t really fit the overall look. While figuring out what to do, I checkedhttps://skylum.com/blog/types-of-old-photo-damage-that-can-be-restored-with-ai and it helped me understand what kinds of damage can actually be fixed. After that, I managed to restore a few photos and they blended in way better with the rest.
Photo walls look amazing when everything is clean and consistent, but older pictures can sometimes throw that off. I had that issue when trying to mix new prints with family photos that were already faded or scratched. At first I thought I’d just leave them as they are, but it didn’t really fit the overall look. While figuring out what to do, I checked https://skylum.com/blog/types-of-old-photo-damage-that-can-be-restored-with-ai and it helped me understand what kinds of damage can actually be fixed. After that, I managed to restore a few photos and they blended in way better with the rest.
I was surprised that using a simple coupon code like SUGAR25OFF could save more than 90%! Choosing themes for the photo wall, like Disney Mickey Ears, adds such a personal touch. Who knew getting those photos off my phone and onto the wall could be so rewarding?