
Duck Tape Art Display Quilt (with Video)
Welcome to Sugar, Spice & Glitter! Please note, this post may contain affiliate links. For more details, see our Full Disclosure.
This is a sponsored post written by me on behalf of Duck Brand® for IZEA. All opinions are 100% mine.
A fun and inexpensive way to display art in your classroom or home, this DIY Duck Tape Art Quilt takes minutes to make and uses just two classroom staples to make!
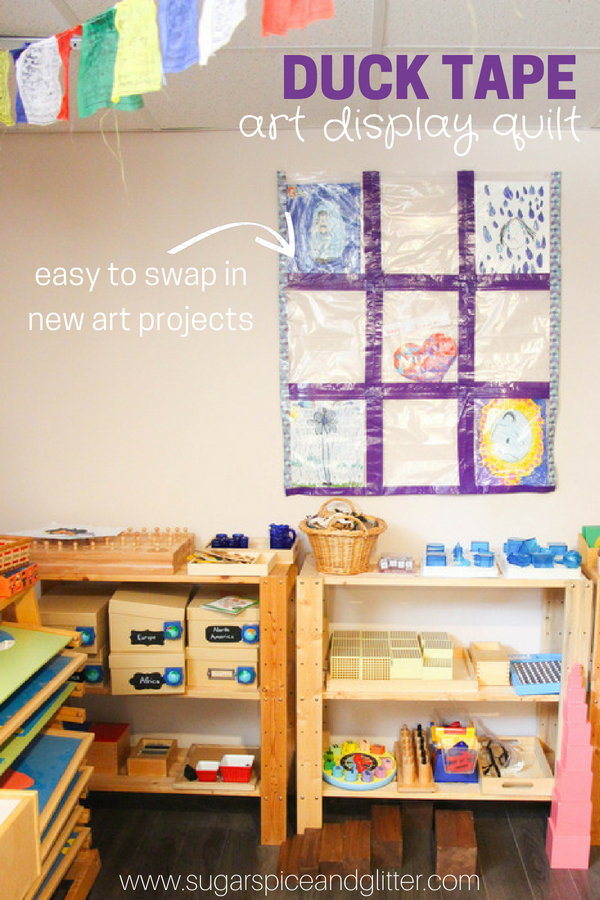
Duck Tape Classroom Art Quilt
Displaying art has to be one of the trickiest issues for parents and teachers.
First is the issue of “where to put it?” You want the art to be in a place where it will be seen, but also where you have enough space. Creating a dedicated “spot” for the art makes it easy, so something that allows the art to be changed out as new art is created is a great option.
Next is “how to hang it?” I always think it’s such a shame to add tape or use thumbtacks to display children’s art. It damages the project and is just tricky for 3D projects, too.
Classrooms can also be messy, so putting the art in something protective can help ensure that the art is preserved and safe.

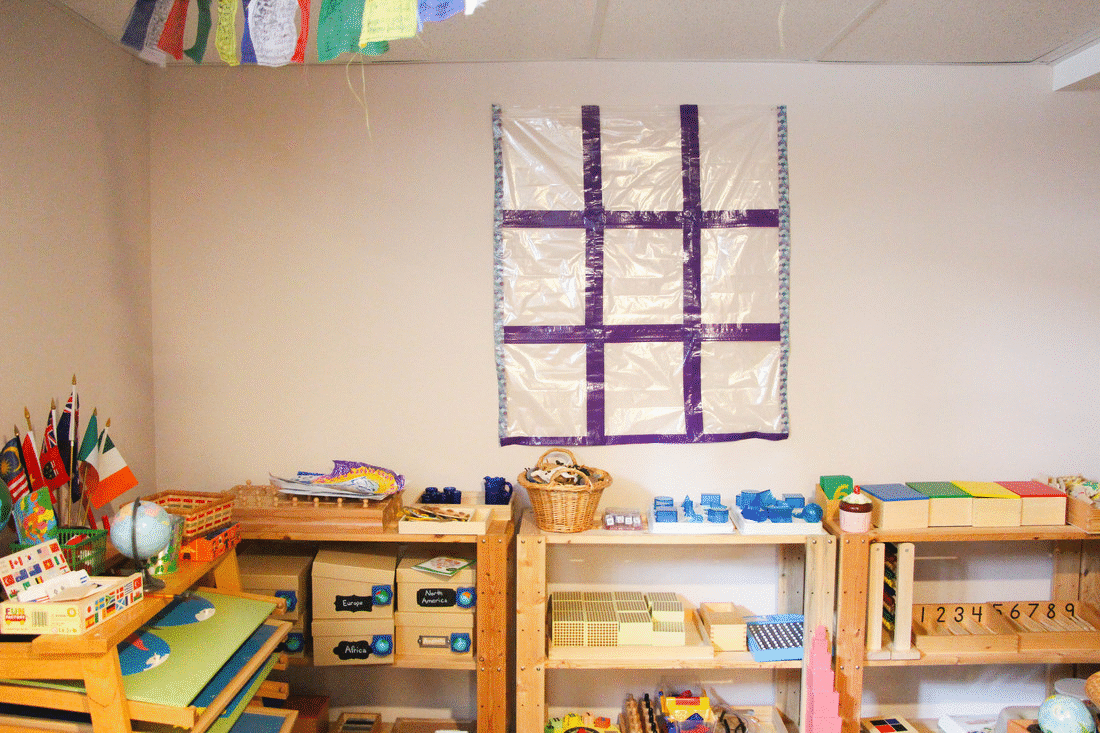
While getting my Montessori classroom ready for fall, I decided to make a quick and easy DIY Art Display Quilt out of Duck Tape and plastic zip-top baggies.
We’ve used Duck® brand duct tape in a couple of decor projects before – they have Glitter Duck Tape, Printed Duck Tape® with lots of pretty patterns available, and Color Duck Tape® which is great on it’s own or coordinates nicely with the Printed Duck Tape. I love how durable it is, and how I can tear it with my fingers while doing my projects, so I’m not fumbling with scissors or getting them all mucky from tape residue.
This easy art display costs less than $5 to make and took me less than 10 minutes to make and hang on the wall. I cannot wait until we have it filled up with all my kids’ projects! (For now, it’s full of some of my daughter’s recent drawings.)
This quilt would also be good for displaying projects or forms, like those All About Me forms that most classes fill out in the first week of school.
Watch my quick video to see how to make this Easy DIY Duck Tape Quilt and then don’t forget to scroll down below to grab your free printable instructions:

Materials to Make an Art Display Quilt
- Duck Tape (preferably 2 types)
- Zip Top Bags, gallon sized
- Scissors
- Hole punch
- String or ribbon, optional
- Hook hangers
Tip: Duck Tape has several pretty patterns available for their tape, I would pick one solid color and one coordinating pattern for this project.
How to Make a Duck Tape Art Quilt
Arrange your zip top bags in a grid form to ensure that you like the lay-out. Measure the grid and double check the measurement against where you plan to hang your quilt to ensure you have enough room.
Cut the Duck Tape to the length of the sides of the bags.
Connect the bags by placing the seams of one bag halfway across one strip of tape, and then placing a second bag seam right beside it, seams touching, both on half of the tape. (As shown.)
Lay a second piece of tape on the other side of the bags, folding the edge over the bottom.

*Ensure that you don’t tape over the bag openings.*
Repeat this “connecting bags” step for each row, until all bags are in rows.
To attach the rows and form the quilt, lay a longer length of tape along the front top-and-bottom seams of two rows of bags. (As shown.)
Depending on whether or not your zip top bags have a shorter opening side or not, you may or may not choose to add a reinforcement strip along the backside of the quilt.

When all rows are connected, add a “framing” length of tape to each side, preferably in a patterned Duck Tape.
For the top, be careful not to tape over the openings of the bags.
Make holes in the top of the quilt for hanging.
Hang the quilt on your classroom wall using wall hooks.
Add art, and change out as needed. (You may find it easier to take the quilt off the wall when you need to change out the work, so be sure to hang it in a way that is easy to remove and put back up.)
Pin this Easy DIY Duck Tape Art Display Project:

Grab your free printable instructions for this DIY Duck Tape Classroom project:
Want to Save This Recipe?
Enter your email & I'll send it to your inbox. Plus, get great new recipes from me every week!
By submitting this form, you consent to receive emails from Sugar, Spice and Glitter.
Duct Tape Art Quilt
Materials
- Duck Tape (preferably 2 types)
- Zip Top Bags, gallon sized
- String or ribbon, optional
- Hook hangers
Tools
- Scissors
- Hole punch
Instructions
- Arrange your zip top bags in a grid form to ensure that you like the lay-out. Measure the grid and double check the measurement against where you plan to hang your quilt to ensure you have enough room.
- Cut the Duck Tape to the length of the sides of the bags.
- Connect the bags by placing the seams of one bag halfway across one strip of tape, and then placing a second bag seam right beside it, seams touching, both on half of the tape. (As shown.)
- Lay a second piece of tape on the other side of the bags, folding the edge over the bottom.
Ensure that you don't tape over the bag openings.
- Repeat this "connecting bags" step for each row, until all bags are in rows.
- To attach the rows and form the quilt, lay a longer length of tape along the front top-and-bottom seams of two rows of bags. (As shown.)
- Depending on whether or not your zip top bags have a shorter opening side or not, you may or may not choose to add a reinforcement strip along the backside of the quilt.
- When all rows are connected, add a "framing" length of tape to each side, preferably in a patterned Duck Tape.
- For the top, be careful not to tape over the openings of the bags.
- Make holes in the top of the quilt for hanging.
- Hang the quilt on your classroom wall using wall hooks.
- Add art, and change out as needed. (You may find it easier to take the quilt off the wall when you need to change out the work, so be sure to hang it in a way that is easy to remove and put back up.)

This simple and easy Duck Tape Art Display Quilt is a quick classroom project that you can use all year long! Kids will love seeing their artwork and projects on display, and you’ll love how easy it is to swap out the contents of your quilt and avoiding the hassle of hanging up artwork with thumbtacks or small rolls of tape.
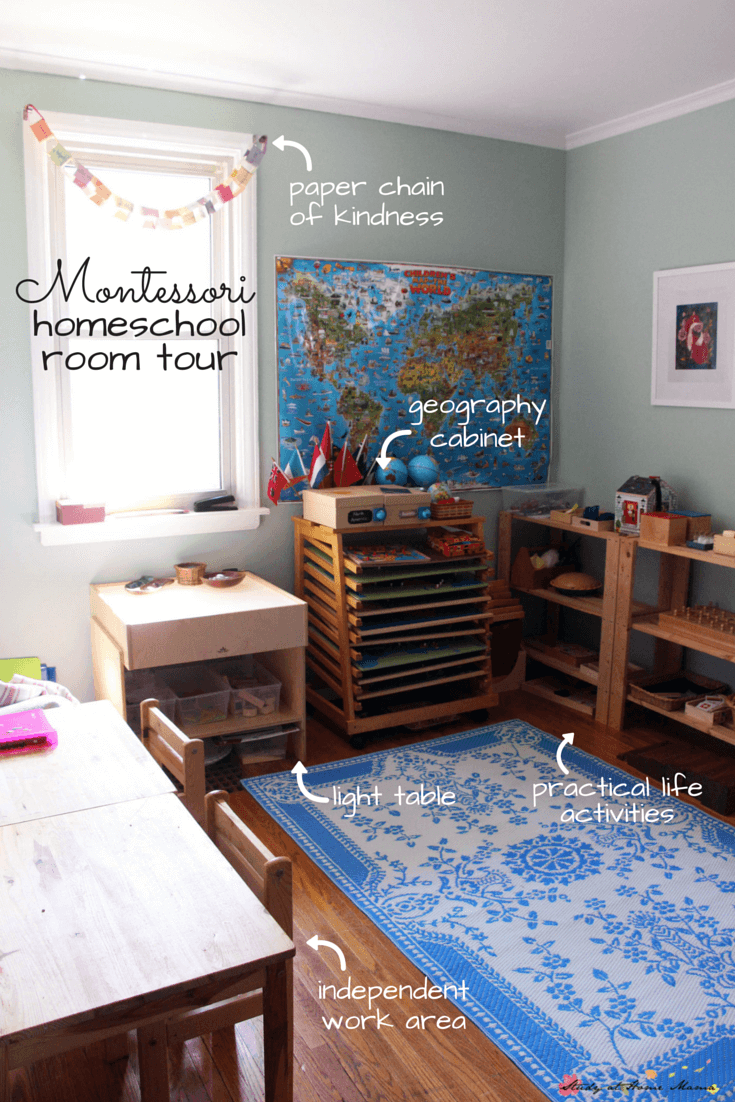
For more awesome classroom management ideas, check out our Montessori Homeschool Classroom Tour or our A Paper Chain of Kindness.


It is not ‘duck tape’. It is duct tape – tape used primarily for duct work relative the HVAC systems in homes. Sorry.
The brand that we used is called “Duck Tape” 🙂