
DIY Yarn Pom Pom Bunnies (with Video)
Welcome to Sugar, Spice & Glitter! Please note, this post may contain affiliate links. For more details, see our Full Disclosure.
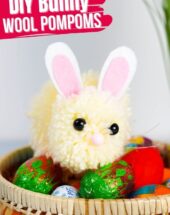
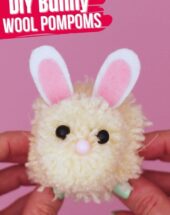

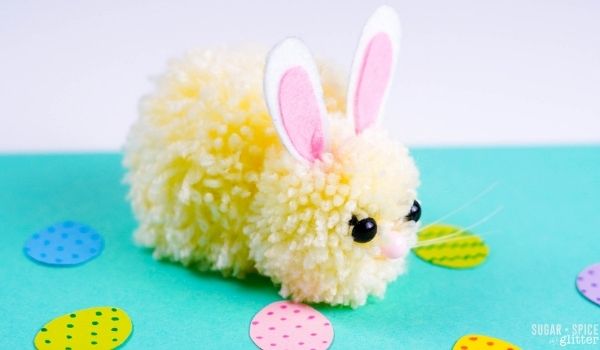
A super simple DIY Easter craft that you can make with craft supplies you probably already have on hand, this DIY Pom Pom Bunny is an adorable Easter craft that can be displayed in so many different ways and once you get the hang of making them, you’ll have a whole colony of bunnies taking over your Easter decor!
Pom Pom Bunny Craft
My daughter, Ella, is going through a big “DIY Pom Pom” phase… complete with little cut up scraps of yarn littered all over the house.
Although the “yarn glitter” throughout my house is driving me a bit crazy, I thought I’d embrace her newfound craft obsession and make pom pom bunnies for Easter!
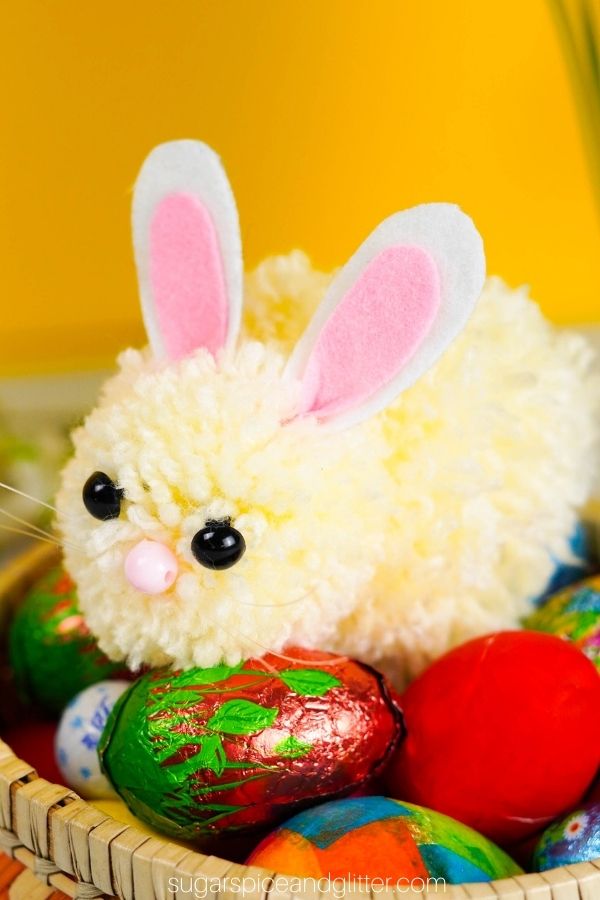
These cute little bunnies would make an adorable addition to an Easter basket, they can be strung together to make an Easter garland, or just tuck them into different spots around the house to add a bit of whimsy to your Easter decor.
If you’re new to making pom poms, the first bunny will probably take you about 30-45 minutes, but once you get the hang of it, it can take you less than 10 minutes a bunny. (My tip if you want to make a whole little colony of bunnies is to make all of the pom poms first, then trim them, then assemble your bunnies. Assembly line-style.)
You can make your yarn pompoms in a variety of ways. My preference is to use a pom pom maker or a sturdy square of cardboard (as shown in the video below), but you can use a large fork or even your hands to make pompoms, if desired.
Once you master how to make your own yarn pom poms, there are so many fun ways to craft with them:
- Pom Pom Love Bugs
- DIY Pom Pom Chalkboard
- Pom Pom Bald Eagle from my friend Stacey over at the Soccer Mom Blog
- Thanksgiving Turkey Craft from my friend Menucha over at Moms and Crafters
- Reindeer Pom Poms from Designs by Miss Mandee
Check out our quick video to see how to make your own Easter Bunny Pom Pom craft – and then don’t forget to scroll down to grab your free printable instructions below:
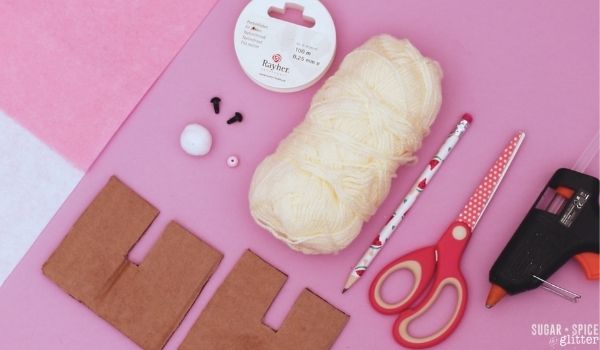
Materials to Make an Easter Bunny Pom Pom
- White Yarn
- Cardboard or Pom Pom Maker
- Pencil
- Hot Glue
- Black Beads or Dolls Eye Beads
- Pink Bead
- White and Pink Felt
- Scissors
- Small White Pom Pom, optional
- Wire

How to Make Pom Pom Bunnies
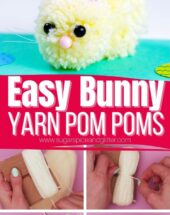
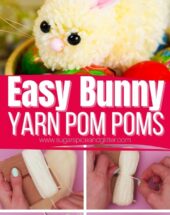
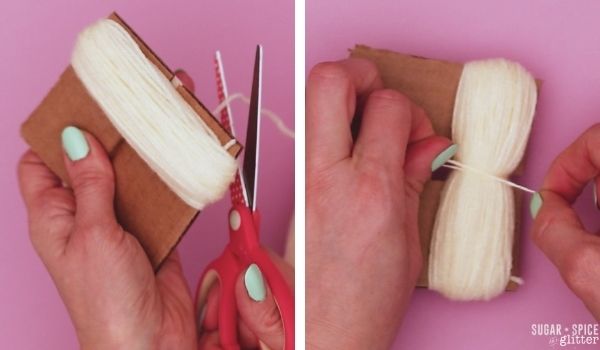
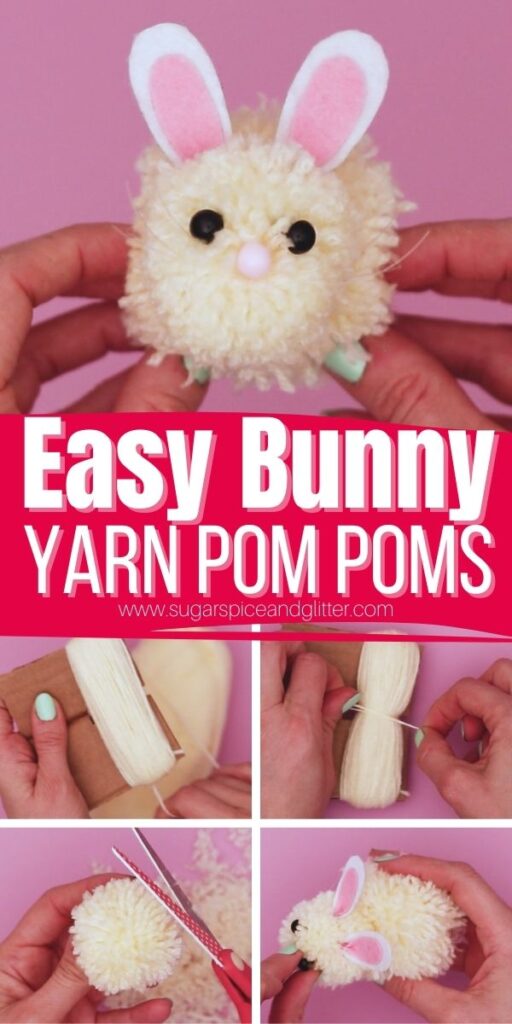
If using cardboard instead of a pom pom maker, take a thick piece of cardboard (like the kind from a packing box, not the kind from a cereal box) and cut into a square shape. Cut out a 1/2″ notch in the center to make a “U-shape.”
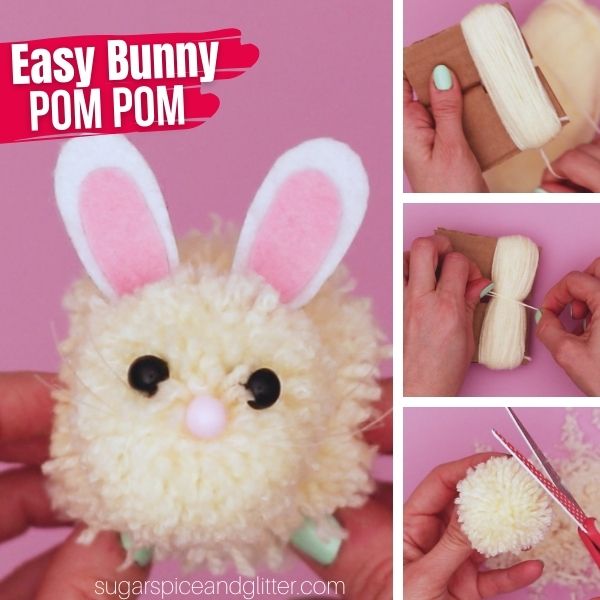
Wrap your white yarn around your pom pom maker (or cardboard square) until the yarn is very thick. Cut the yarn string, but keep the wrapped yarn on the pom pom maker.
Take a small length of yarn and thread it through the center of the pom pom maker/yarn loop. You can use a yarn needle to help easily maneuver the yarn into place. Tie the length of yarn securely in the center of the yarn loop and then pull the yarn loop off of the cardboard.
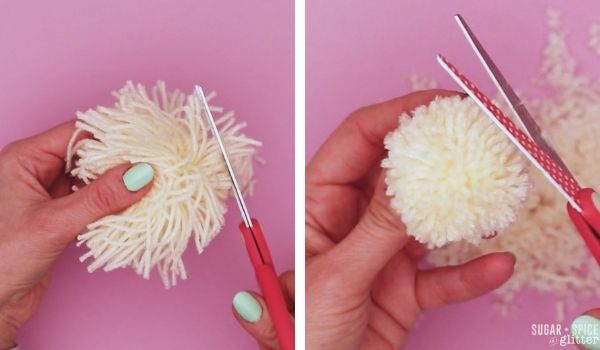
The yarn should now be in a “8” shape, so cut the top and bottom loops of the 8. Trim the pom pom down until it is fluffy and well-rounded.
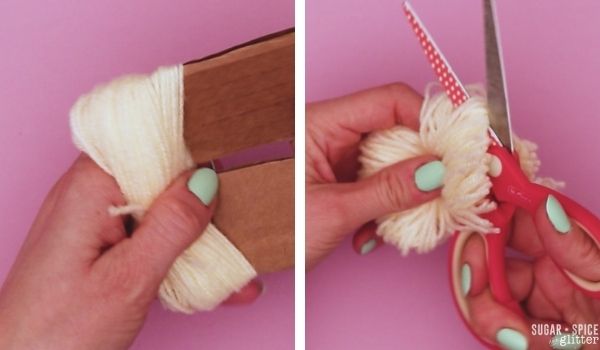
Repeat this process, creating a smaller pom pom for the bunny’s head. (You can use a smaller pom pom maker or cardboard square for this step.)
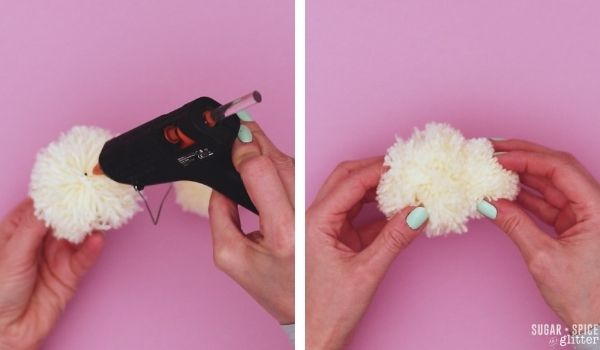
Once both the big and small pom poms are trimmed, glue them together to form the bunny’s body. (You can tie them together by leaving the string used to tie the centers long, but this can be tricky so plan to glue them in case you accidentally cut those strings or if you can’t get them to tie together tight enough.)
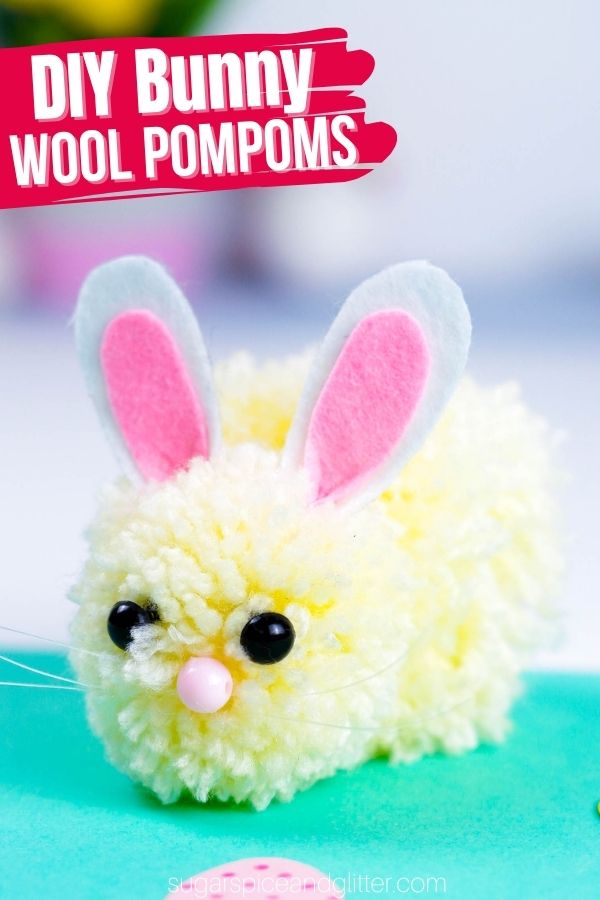
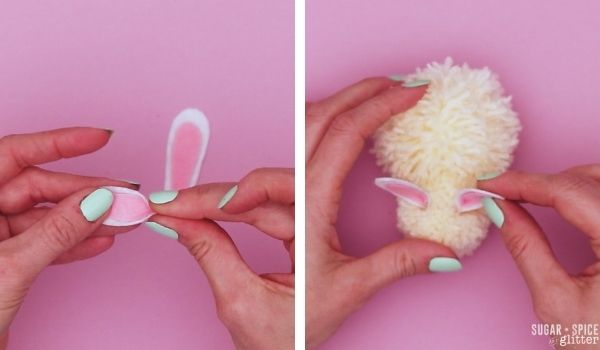
Cut out two ears for your bunny out of the white felt, and then two inner ears from the pink felt. Glue the inner ears onto the outer ears, then place a dab of glue at the bottom of the bunny’s ears to press the two sides together, forming a small “cup” at the base of the ears.
Cut three small lengths of wire/string and string them through the pink bead to form the bunny’s nose and whiskers. (Add a dab of glue to keep the whiskers securely in place.)
Glue the black beads or dolls’ eyes onto the bunny’s head where the eyes should go., and then place the pink bead where the nose and whiskers should be.
Glue the ears on the top of the bunny’s head and then, if desired, add a small pom pom at the back for it’s tail.
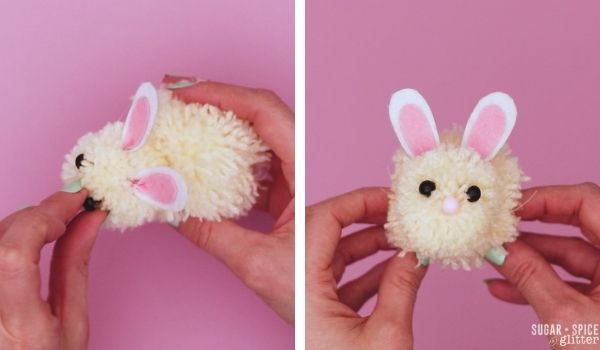
Allow the glue to set/dry completely before decorating with your bunny.
Pin this Step-by-Step Tutorial for How to Make a Pom Pom Bunny for your next craft session:
Grab your free printable instructions for our DIY Pom Pom Bunnies tutorial:
Want to Save This Recipe?
Enter your email & I'll send it to your inbox. Plus, get great new recipes from me every week!
By submitting this form, you consent to receive emails from Sugar, Spice and Glitter.
DIY Yarn Pom Pom Bunnies
How to make bunny pom poms using wool, beads and a little bit of felt. This super simple pom pom tutorial is perfect for adding some cute pom pom bunnies to your Easter decor or tucking them into your child's Easter basket.
Materials
- White Yarn
- Black Beads or Dolls Eye Beads
- Pink Bead
- White and Pink Felt
- Small White Pom Pom, optional
- Wire
Tools
- Scissors
- Pencil
- Hot Glue
- Cardboard or Pom Pom Maker
Instructions
- If using cardboard instead of a pom pom maker, take a thick piece of cardboard (like the kind from a packing box, not the kind from a cereal box) and cut into a square shape. Cut out a 1/2" notch in the center to make a "U-shape."
- Wrap your white yarn around your pom pom maker (or cardboard square) until the yarn is very thick. Cut the yarn string, but keep the wrapped yarn on the pom pom maker.
- Take a small length of yarn and thread it through the center of the pom pom maker/yarn loop. You can use a yarn needle to help easily maneuver the yarn into place. Tie the length of yarn securely in the center of the yarn loop and then pull the yarn loop off of the cardboard.
- The yarn should now be in a "8" shape, so cut the top and bottom loops of the 8. Trim the pom pom down until it is fluffy and well-rounded.
- Repeat this process, creating a smaller pom pom for the bunny's head. (You can use a smaller pom pom maker or cardboard square for this step.)
- Once both the big and small pom poms are trimmed, glue them together to form the bunny's body. (You can tie them together by leaving the string used to tie the centers long, but this can be tricky so plan to glue them in case you accidentally cut those strings or if you can't get them to tie together tight enough.)
- Cut out two ears for your bunny out of the white felt, and then two inner ears from the pink felt. Glue the inner ears onto the outer ears, then place a dab of glue at the bottom of the bunny's ears to press the two sides together, forming a small "cup" at the base of the ears.
- Cut three small lengths of wire/string and string them through the pink bead to form the bunny's nose and whiskers. (Add a dab of glue to keep the whiskers securely in place.)
- Glue the black beads or dolls' eyes onto the bunny's head where the eyes should go., and then place the pink bead where the nose and whiskers should be.
- Glue the ears on the top of the bunny's head and then, if desired, add a small pom pom at the back for it's tail.
- Allow the glue to set/dry completely before decorating with your bunny.
Recommended Products
As an Amazon Associate and member of other affiliate programs, I earn from qualifying purchases.
-
 600PCS Plastic Safety Eyes and Noses,6mm-14mm Colorful Crochet Toy Eyes and Noses with Washers for Amigurumi Craft Doll Puppet Plush Animal and Teddy Bear
 -
flic-flac 44PCS 4 x 4 inches (10 x10cm) Assorted Color Felt Fabric Sheets Patchwork Sewing DIY Craft 1mm Thick
-
Clover Set Pom Maker, Multiple 4 Count


I hope this tutorial answers any questions you have on how to make a pom pom bunny – but please don’t hesitate to let me know and I’ll try to clarify any confusion.
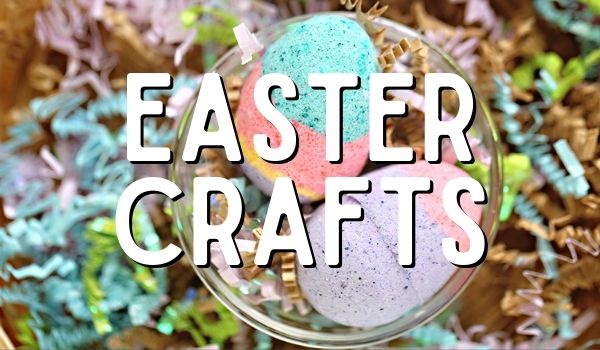
For more easy Easter crafts, check out our full Easter Crafts collection here:
Or, check out our full craft selection here:


Pom pom bunnies have been around for years and have a long history of being a craft project that is a lot of fun to make. For decades, people have made these delicate (and adorable) animals using yarn and round balls, but the thought of making one from scratch has never really crossed my mind until recently.
It’s also a good practice to add these pompoms to common items to help distinguish them from others.
Those pom pom bunnies are honestly too cute, and they’re such a fun way to play around with yarn without overthinking it. I remember starting with little projects like that, just getting used to textures and shapes. After a while, I wanted something a bit more structured, and that’s where a crochet starter kit really helped me keep going without getting stuck. If you’re in that same mood to try more, take a look at this crochet starter kit and see if it feels like your next step.