Denver Omelette (with Video)
Skip the diner and make our best ever Denver Omelette recipe at home, featuring tender, sautéed veggies and ham enclosed in a fluffy, puffy egg omelette with a golden, crunchy exterior – this is one classic that is ready for a comeback.

Denver Omelette Recipe
For the past few years, I’ve been “bringing breakfast back.”
For almost my entire life, I never ate breakfast; the earliest I would eat is lunchtime. But honestly, eating a healthy and filling breakfast makes me feel so much better than skipping it ever did – and it’s definitely necessary for kids with how active they are and how short their lunch breaks are at school.
I’ve slowly been discovering all of these breakfast foods that I’ve been missing out on, and one recent (and delicious) discovery was a classic Denver omelette.
For me, a a great Denver omelette is a folded-over omelette, caramelized and slightly crunchy on the outside, while the inside of the omelette stays light, puffy and fluffy and is stuffed full of onions, peppers and ham. If you like your omelette without the crunchy exterior, I provide a tip for how to avoid that in the recipe below.
It’s filling, delicious and chock-full of protein and vegetables, so it’s a great way to start your day! (And hey, I won’t tell anyone if you decide to enjoy this classic for lunch – or serve it as a bit of “breakfast for dinner.”)
Can you reheat an omelette? Yes, you can – making this a great meal-prep option on the weekends if you don’t have enough time on weekday mornings to whip up a fresh omelette.
To reheat an omelette in the microwave, place the omelette on a plate and cover with a damp paper towel. Microwave for 1-2 minutes.
To reheat an omelette on the stove, place a couple tablespoons of water and the omelette in a frying pan over medium heat. Cover the frying pan with a lid and heat until the water evaporates and the omelette is warm and fluffy throughout, about 5 minutes.

What’s in a Denver Omelette? A classic Denver omelette has a filling of peppers, onions and ham, with cheese being an optional but popular add-in.
The Denver omelette actually started out as a sandwich (the Denver sandwich) which many believe was inspired by Chinese railroad workers bringing egg foo young (a Chinese omelette with onions, peppers and pork covered with sauce) to work in between slices of bread.
What’s the difference between a Western Omelette vs a Denver Omelette? A lot of people use the term “Western omelette” interchangably with Denver omelette, however, a Western omelette can change drastically from region to region – or even restaurant to restaurant! (For example, in California, a Western Omelette contains avocados, tomato and mushroom.)
Be sure to check out our step-by-step video to see how to make this classic Denver omelette at home – and then don’t forget to scroll down to grab your free printable recipe card:

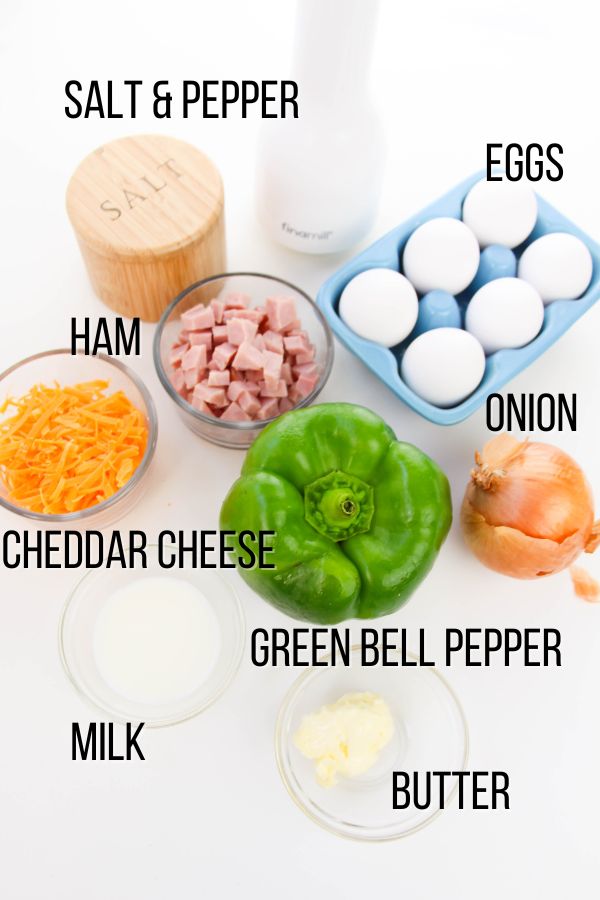
Denver Omelette Ingredients
- Butter
- Cooked Ham, diced
- Diced White Onion
- Diced Green Bell Pepper
- Salt and Pepper, to taste
- Eggs
- Milk
- Shredded Cheddar Cheese
Scroll down to the printable recipe card for full measurements.
Tip: swap out or add your favorite breakfast veggies to make this classic omelette your own. Love mushrooms? Spinach? Avocado? Sprinkle some in.
Kitchen Tools You May Find Helpful
- Cast Iron Skillet <– I love the versatility of a good cast-iron pan – you can make everything from eggs to dessert in them and they transition easily from the stove to the oven. This one is pre-seasoned and great for even heating
- Sharp Knife
- Cutting Board
- Spatula <– I like these spatulas because they are one solid piece and don’t have removable heads for bacteria to get trapped underneath. Plus they are heat-resistant and have a lifetime warranty.
- Small Bowl
- Whisk

How to Make a Denver Omelette
Place 1 Tablespoon of butter in a skillet over medium heat.
Once butter is melted, add the ham. Cook and stir occasionally until lightly browned and crispy, about 3-4 minutes.
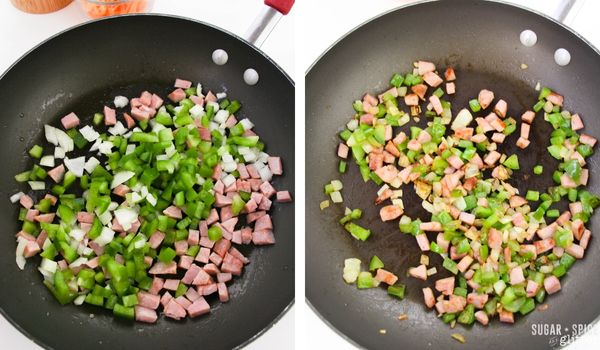
Add the diced onion and peppers and continue to stir and cook until onions are translucent, about 3 minutes.
Season the veggies and ham with salt and pepper (and any additional seasonings you’d like) before removing to a clean plate.

Wipe out the skillet and add the remaining butter.
While the butter melts, whisk together the eggs and milk in a small bowl for 1 minute until light and frothy. (Tilt the bowl and whisk in a figure 8-motion to incorporate more air to make the eggs extra-fluffy.)
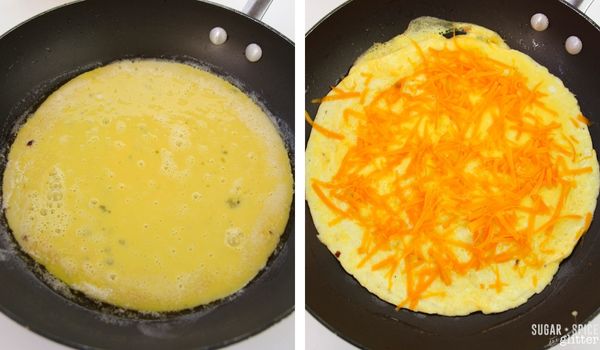
Once the butter is melted, pour in the egg mixture.
As the eggs cook, use a spatula to clean the edges of the eggs of the omelette. Jiggle the pan around to evenly distribute the eggs and ensure they cook fully. (This will ensure you get that golden, crispy exterior.)

Once the egg is no longer liquid, but still soft, sprinkle on the shredded cheese and place a large lid over the skillet to encourage the cheese to melt, about 1 minute.
Scoop the vegetables and ham mixture onto half of the omelette and then use a spatula to fold the empty half of the omlette overtop.
Continue to cook until omelette is well-browned on both sides, as desired.
Pin this Easy Recipe to Make Denver Omelettes at home:

Grab your free printable for our Denver omelette recipe:
Want to Save This Recipe?
Enter your email & I'll send it to your inbox. Plus, get great new recipes from me every week!
By submitting this form, you consent to receive emails from Sugar, Spice and Glitter.
Denver Omelette

Ingredients
- 2 Tablespoons Butter
- 1/3 cup Cooked Ham, diced
- 1/4 cup Diced White Onion
- 1/2 cup Diced Green Bell Pepper
- Salt and Pepper, to taste
- 3 Eggs
- 1 Tablespoon Milk
- 1/3 cup Shredded Cheddar Cheese
Instructions
- Place 1 Tablespoon of butter in a skillet over medium heat.
- Once butter is melted, add the ham. Cook and stir occasionally until lightly browned and crispy, about 3-4 minutes.
- Add the diced onion and peppers and continue to stir and cook until onions are translucent, about 3 minutes.
- Season the veggies and ham with salt and pepper (and any additional seasonings you'd like) before removing to a clean plate.
- Wipe out the skillet and add the remaining butter.
- While the butter melts, whisk together the eggs and milk in a small bowl for 1 minute until light and frothy. (Tilt the bowl and whisk in a figure 8-motion to incorporate more air to make the eggs extra-fluffy.)
- Once the butter is melted, pour in the egg mixture.
- As the eggs cook, use a spatula to clean the edges of the eggs of the omelette. Jiggle the pan around to evenly distribute the eggs and ensure they cook fully. (This will ensure you get that golden, crispy exterior.)
- Once the egg is no longer liquid, but still soft, sprinkle on the shredded cheese and place a large lid over the skillet to encourage the cheese to melt, about 1 minute.
- Scoop the vegetables and ham mixture onto half of the omelette and then use a spatula to fold the empty half of the omlette overtop.
- Continue to cook until omelette is well-browned on both sides, as desired.
Recommended Products
As an Amazon Associate and member of other affiliate programs, I earn from qualifying purchases.
-
HOTEC Food Grade Silicone Rubber Spatula Set Kitchen Utensils for Baking, Cooking, and Mixing High Heat Resistant Non Stick Dishwasher Safe BPA-Free Multicolor Set of 5
-
Lodge Pre-Seasoned Cast Iron Skillet With Assist Handle, 10.25", Black
-
Smithfield, Anytime Fully Cooked Diced Ham, Naturally Hickory-Smoked, 0.5 lb
Nutrition Information:
Yield:
2Serving Size:
1Amount Per Serving: Calories: 341Total Fat: 26gSaturated Fat: 13gTrans Fat: 1gUnsaturated Fat: 10gCholesterol: 343mgSodium: 688mgCarbohydrates: 7gFiber: 1gSugar: 3gProtein: 20g
Sugar, Spice and Glitter uses an auto-generate nutrition calculator. Nutrition information isn’t always accurate unless analyzed in a scientific lab, so these should be considered more of a guideline than medical information.

I hope your family loves this Denver Omelette recipe as much as mine does – my daughter is thrilled anytime I surprise her with it!
For more breakfast ideas, check out our full breakfast recipe collection here:


This is my favorite dinner order so I was skeptical but it turned out perfect.
I’m so glad you liked it – thank you for your comment!