
Garden Wind Chimes Craft for Kids
Welcome to Sugar, Spice & Glitter! Please note, this post may contain affiliate links. For more details, see our Full Disclosure.
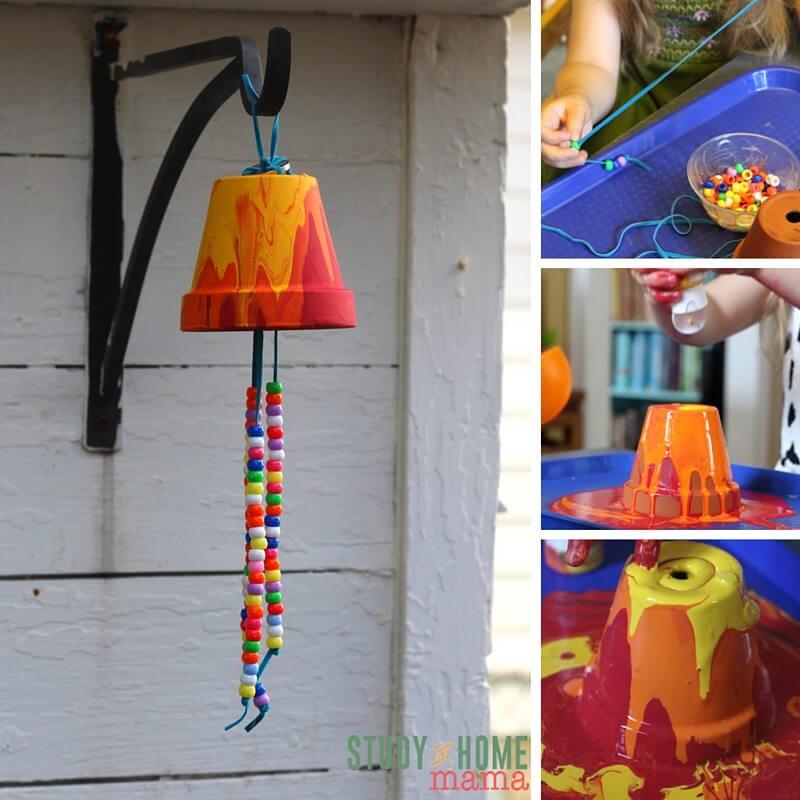
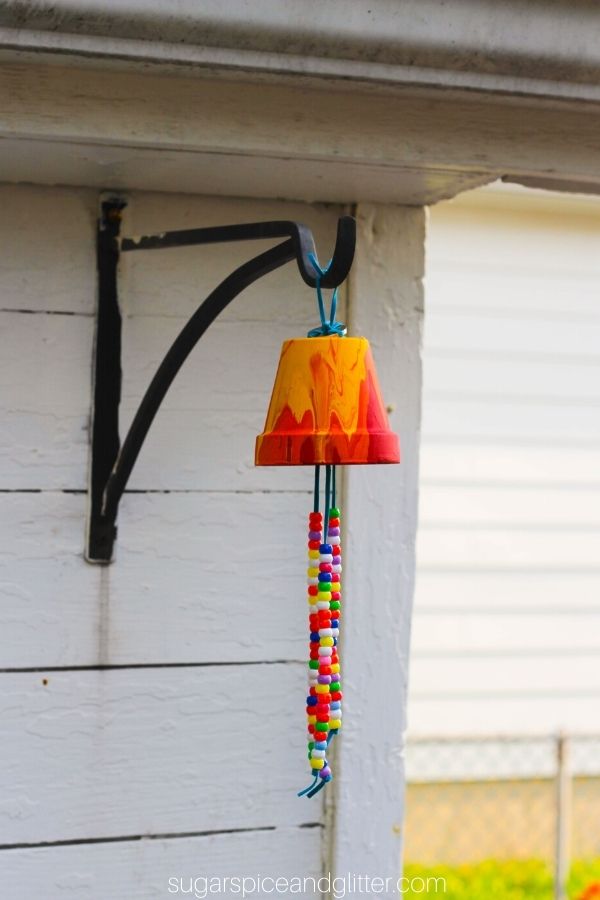
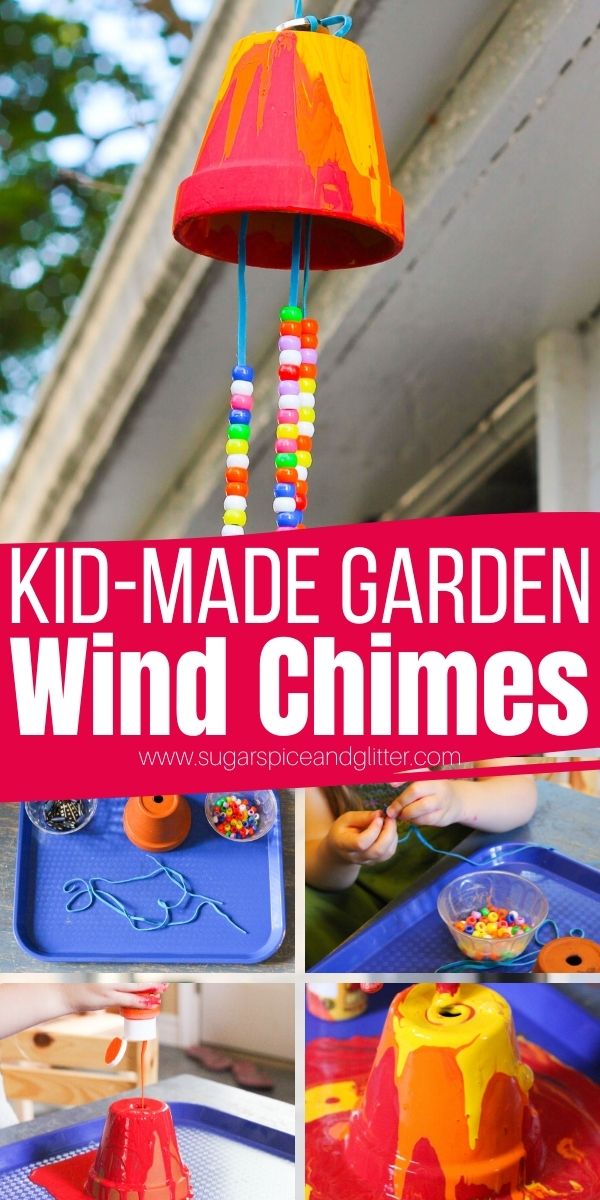
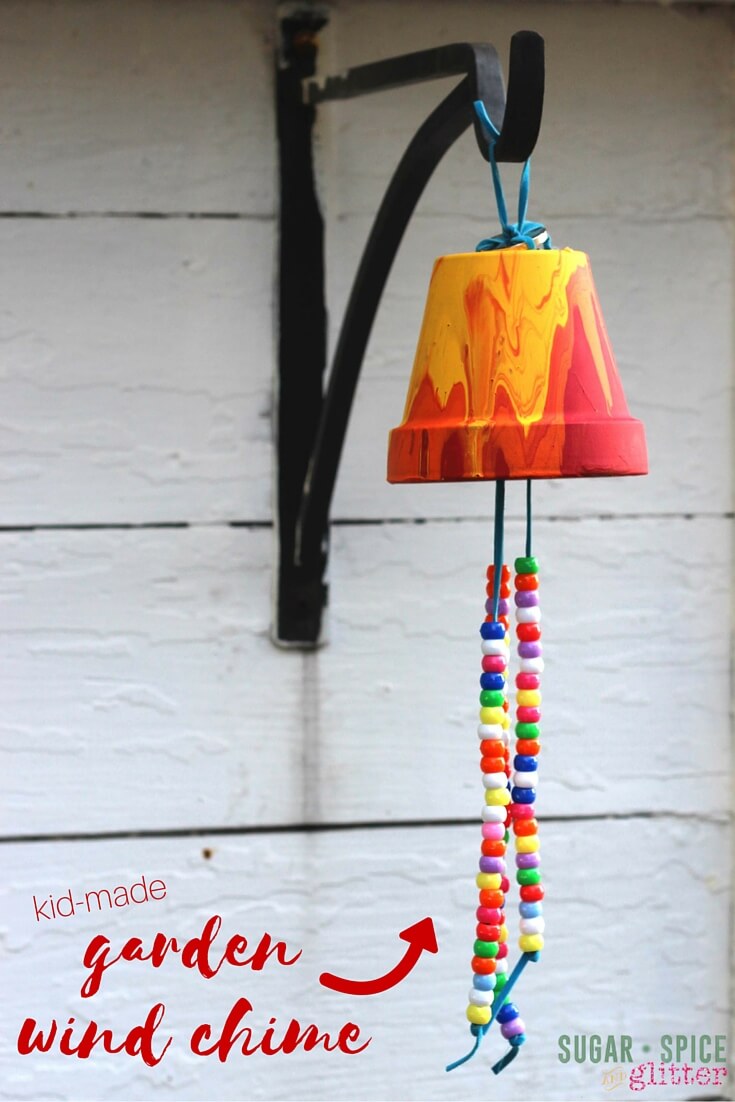
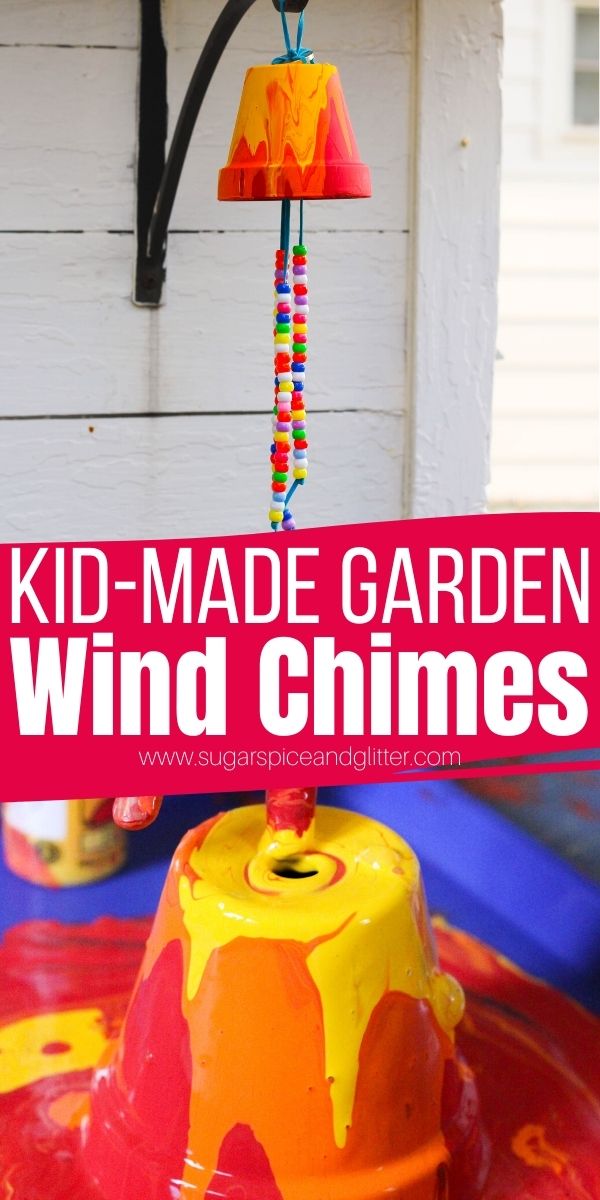
An easy kid’s craft idea, this unique wind chimes craft for kids are a sweet way to decorate your garden and explore an exciting new painting technique. Ella and I recently made these garden wind chimes as a present for her Nana’s birthday.

Unique Garden Wind Chimes Craft for Kids
Ella has developed a love of gardening which has everything to do with her grandparents and nothing to do with me! (I kill every plant… even the super sturdy ones that the people at the nursery insist that no one can kill.)
I originally thought we’d do some pour painted pots for Ella to plant some flowers in to give to my mom for her birthday, but something about the shape of the overturned flower pot made me think of making wind chimes. (And honestly, given my track record with plants that visit my home – that was probably for the best.)
Ella loved making leather lace and bead necklaces as part of our North American unit study, and it’s a great fine motor activity allowing her to practice her pincer grip and precision. Embracing your child’s interests makes crafting and creating so much more enjoyable for both of you – and it’s a great way to segue into trying something new that they may have otherwise been a bit apprehensive about.

I thought I’d provide some sweet hand-painted beads for this craft, but Ella was only interested in using her new pony bead collection. It would also be fun to provide found objects with natural holes or holes drilled into them, like washers, nuts, etc.
We had never tried pour painting before this activity, but my girl loves any opportunity to create and get messy. More mess-averse kids don’t need to use their fingers like my daughter did – they can let the paint drip naturally, or use a popsicle stick or paintbrush to help encourage the paint to swirl and drip down the sides of the flower pot.
Check out our quick video for how to make these pour pot garden wind chimes (in this video we made a TRIPLE pot version in a galaxy theme) – and then don’t forget to scroll down to grab your printable instructions:
Garden Wind Chime Materials:
- Old gardening pot
- Water-proof string (we used leather lace)
- Assorted beads
- Paint (we used up some almost-empty bottles)
- 2 washers
- Kitchen tray – we always use these to contain mess and keep clear boundaries on “project space” plus they are great for letting the craft dry on
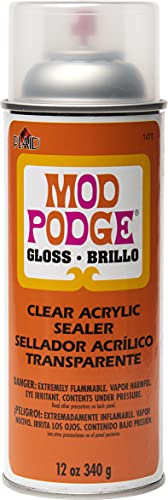
- Waterproof sealer spray, optional
Note: It would also be fun to provide found objects with natural holes or holes drilled into them, like washers, nuts, etc.
How to Make Garden Wind Chimes Using a Flower Pot
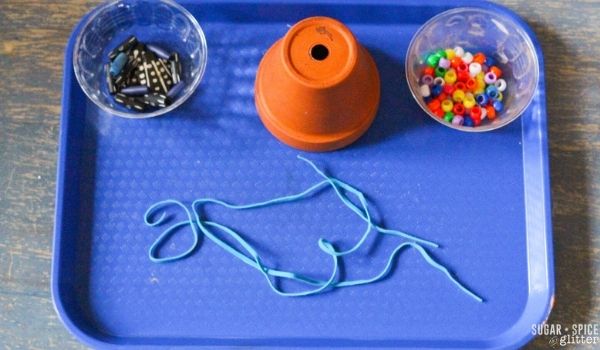
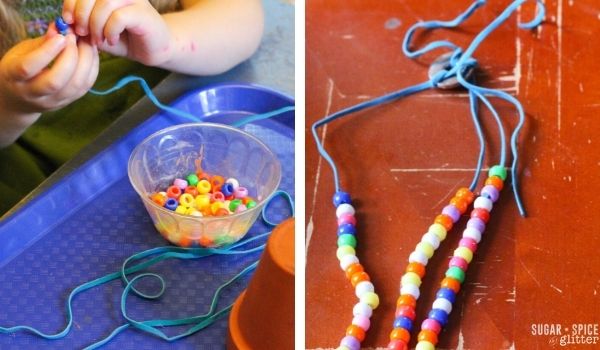
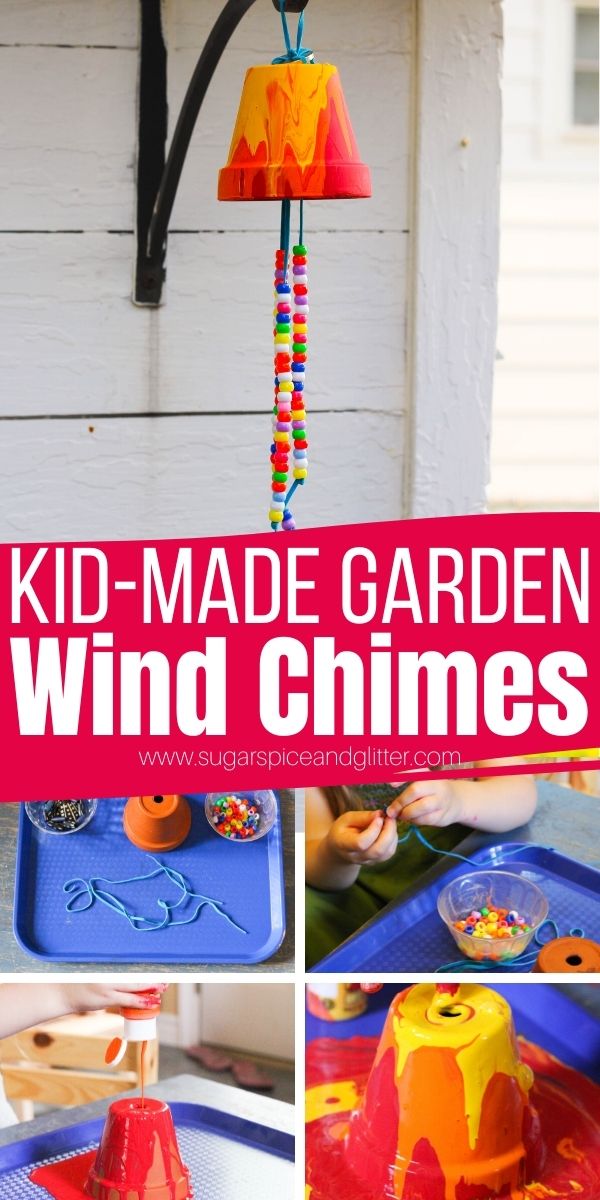
I provided three lengths of string and Ella took her time adding beads to it. As long as she put the tray up whenever she wanted to take a break (to keep the toddlers out of it), I just let her add beads to her strings whenever the mood struck.
For me, part of having an activity be truly child-directed is giving them as much freedom over the creative or inquisitive process as possible. While it wouldn’t be “wrong” to encourage a child to do an art activity all at one time, if you have the time and freedom to allow them to come and go as they please, that can make it a more positive experience and allow your child to feel more connection and ownership over their final product.
(We prefer taking this “project” approach and start our crafts well before we need them to be finished, rather than feeling pressured to complete it all in one short span of time. I’ve found that if I try to ask too much of her when we’re doing a more intense craft like this, that I end up having to finish it by myself!)
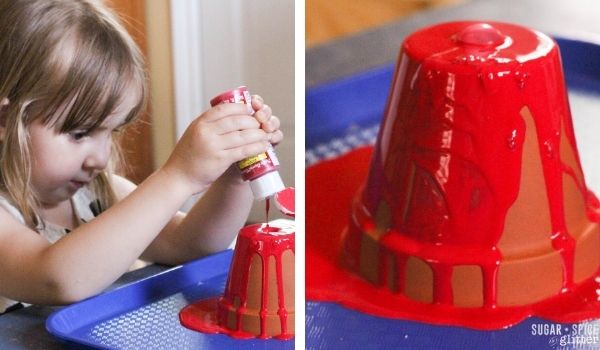
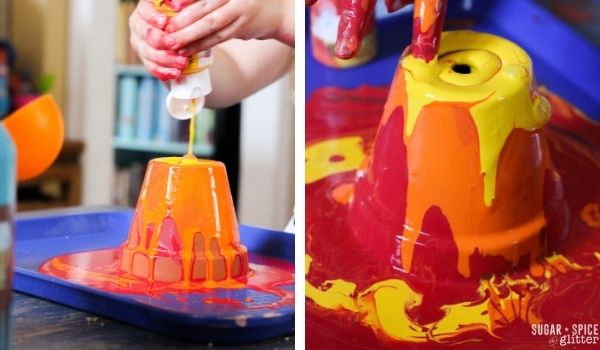
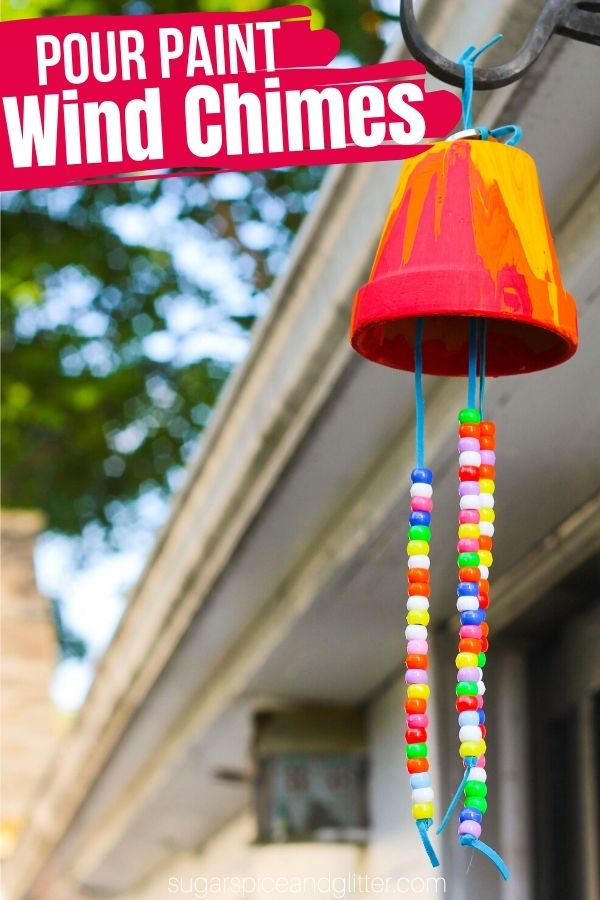
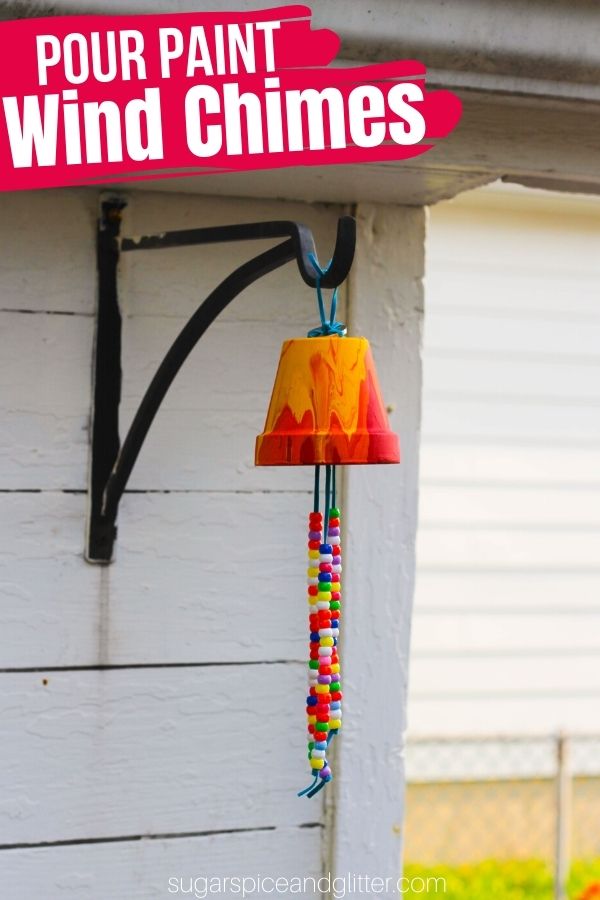
I first read about this pour painting technique on the Artful Parent, a gorgeous and inspiring arts and craft blog. You simply pour paint over top of an object, and then pour a second layer of paint right into the center of the first puddle. (It’s a technique we also use to create our gorgeous rainbow cake!)
The paint will drip down in layers, creating a wonderfully dramatic effect – just take a peek for yourself!
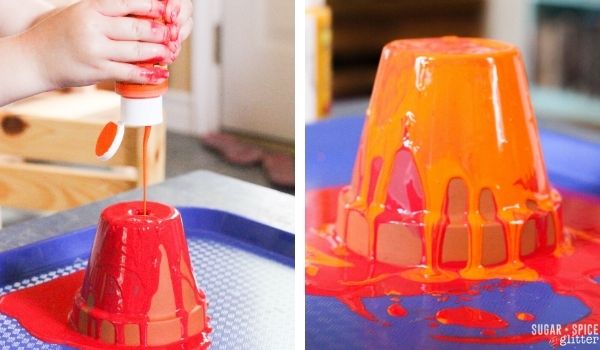
Ella is a huge sensory seeker, and always wants to get her hands into any messy activities we do, but finger painting the actual pot would take away from the cool pour effect, so I instead encouraged her to swirl her finger along the top of the pot to help the paint pour down the sides. (This is not a necessary step so don’t worry if your child doesn’t want to do it.)
(Also, I provided bottles of paint that I was okay with her using the entire bottle up of, so that I wasn’t hovering or trying to get her to stop pouring – interrupting the creative process. If you didn’t have any nearly empty bottles, you could put the paint into small bowls or containers for this pouring technique.)
After the paint has dried, you can take the flower pot outside and spray with waterproof sealant. It’s not 100% necessary but if the wind chime is going to be placed somewhere where it will be exposed to the elements, that sealant will prevent it from fading or chipping.
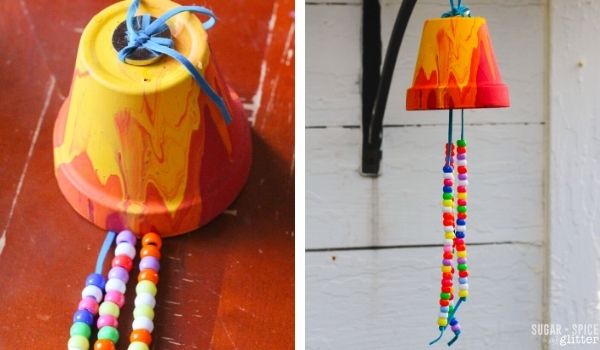
Once everything is dry, tie your bead strings securely to your first washer, leaving a few inches free at the top, and then poke the strings through the top of the garden pot and tie them securely around a second washer.
Tie all of the strings into a knot toward the end of the strings, forming a loop to hang the wind chimes.
Want to Save This Recipe?
Enter your email & I'll send it to your inbox. Plus, get great new recipes from me every week!
By submitting this form, you consent to receive emails from Sugar, Spice and Glitter.
Garden Wind Chimes Craft for Kids

A simple and fun process craft for kids to make their own clay pot garden wind chimes. A unique wind chime to add some color and whimsy to your yard.
Materials
- Old gardening pot
- Water-proof string (we used leather lace)
- Assorted beads
- Paint (we used up some almost-empty bottles)
- 2 washers
- Waterproof sealer spray, optional
Tools
- Kitchen Tray
- Scissors
Instructions
- String beads on to your string or lace.
- Pour paint over top of the overturned flower pot, and then pour a second layer of paint right into the center of the first puddle.
- The paint will drip down in layers, creating a wonderfully dramatic effect - just take a peek for yourself!
- You can also run your finger along the bottom of the pot to encourage the paint to drip down quicker.
- After the paint has dried, spray with waterproof sealant, if desired. It's not 100% necessary but if the wind chime is going to be placed somewhere where it will be exposed to the elements, that sealant will prevent it from fading or chipping.
- Once everything is dry, tie your bead strings securely to your first washer, leaving a few inches free at the top, and then poke the strings through the top of the garden pot and tie them securely around a second washer.
- Tie all of the strings into a knot toward the end of the strings, forming a loop to hang the wind chimes.
Recommended Products
As an Amazon Associate and member of other affiliate programs, I earn from qualifying purchases.
-
 Apple Barrel PROMOABI Matte Finish Acrylic Craft Paint Set Designed for Beginners and Artists, Non-Toxic Formula that works on All Surfaces, Assorted Colors 1, 18 Count
 -
One Bag of 1 Lb Darice Pony Beads 9mm Pearlized Multi
-
vensovo Terracotta Pots with Saucer - 9 Pack 3 Inch Clay Pot Ceramic Pottery Planter Cactus Flower Pots Succulent Pot Drainage Hole, Great for Plants, Crafts, Wedding Favor
-
Realeather Suede Lace, Cafe, Dark Brown
-
New Star Foodservice 28010 6-Piece Fast Food Tray, 12 by 16-Inch, Assorted Colors
-
Mod Podge Spray Acrylic Sealer that is Specifically Formulated to Seal Craft Projects, Dries Crystal Clear is Non-Yellowing No-Run and Quick Drying, 12 ounce, Gloss


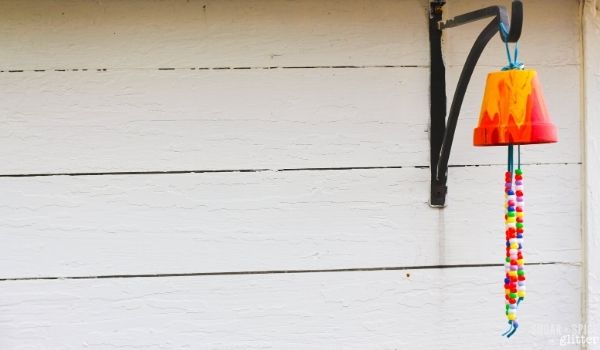
I hope you liked this easy kids craft idea for a homemade garden wind chime. I love how process-based this craft project was and Nana loved her beautiful, handmade gift!
If you’d like to stay in the loop with our other kids’ activities, recipes, and parenting inspiration posts, please subscribe to our free weekly newsletter.
For more fun process-art based kids craft ideas, check out our Starfish Canvas Art Project or our Alice in Wonderland-inspired Painting Rainbow Roses project.


Super cute idea! Thanks for sharing it!
Do You sell craft books with these different crafts in for kids
Very cute! Do the beads really make a sound when the wind blows them?
I’m curious about this too. Do the beads make a sound when the wind blows the strings around? Also, about how long were the strings you used?
Using the plastic beads pictured doesn’t result in a lot of sound – adding washers at the bottom or using glass, ceramic or metal beads will result in a better sound experience. This was more just to encourage fine motor skills in a cute craft using what we had readily available from other craft projects.
The strings should be 6-10″ in length.
I love this project but I have one suggestion. Using the free “oops” keys they screw up on at the hardware store, as well as old, bent silverware, you can use fishing line and hang both (as well as other oddball metal items…use your imagination!) to create chimes that will produce a beautiful sound and different tones! We did this project in my preschool classroom at the YMCA many years ago, using metal clothes and exremely strong test clothes hangers to hang them from tree branches. We placed pony beads of all colors in between the fishing line to separate the keys, forks, spoons, and other various metal items (they WILL tangle if placed too close together. This project looks like so much fun that I think next time I’m at the store I’ll buy a terra cotta pot and marble paint one with my acrylics, making sure to shellacc the outside of the pot to protect my paint job throughout the summer. That’s what’s great about being a retired teacher…now your art projects are solely for your enjoyment! Happy painting!
Awesome idea, you can also use these paints called patio paints that dont require sealing, they look just like acrylic paint bottles. Kid friendly, and I used to buy at Michaels beside the terra cotta paints. Have a terra cotta pot that my son painted 12 years ago still sitting on the porch (in all kinds of weather). It only cost about .50 more than the regular acrylic back then and still cleaned up easily. 🙂
do you have a picture of your finished project? I’m not clear on how to keep the fishing line from getting tangled together? I thought this might be a nice Mother’s Day gift for grandmothers in our family.
This will be perfect for me to do with my Crafty Girls Club!
Thanks so much for the share!!
Hi!
Super cute idea! Hoping to do this over the summer with my kids. Not sure if I might’ve missed this on your post. But I’m wondering what sized washers did you use?
Hi Geo, I’m sorry, I have no idea – tbh, I don’t think I even realized there were different sizes of washers LOL Maybe 1″ or just smaller?