
DIY Quilled Paper Peacock Necklace
Welcome to Sugar, Spice & Glitter! Please note, this post may contain affiliate links. For more details, see our Full Disclosure.
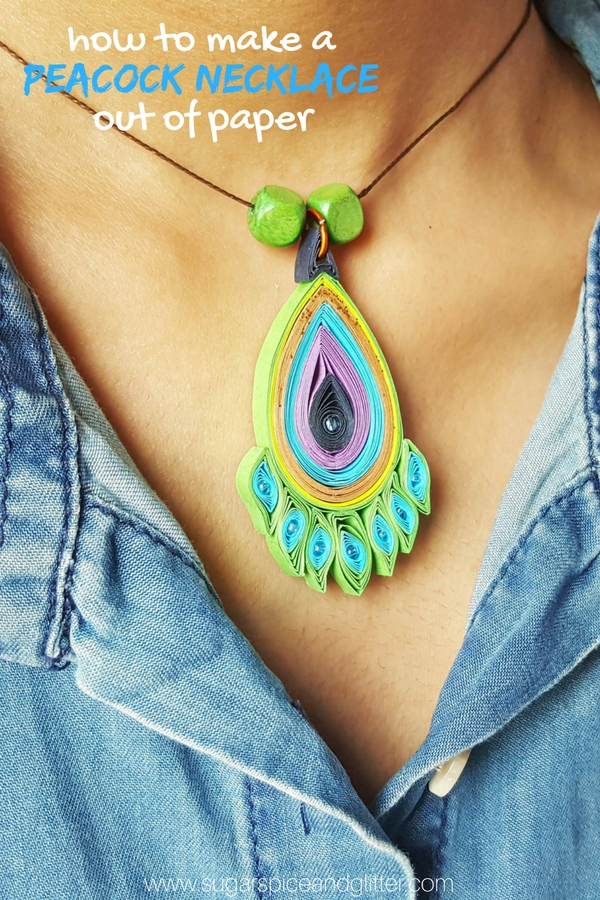
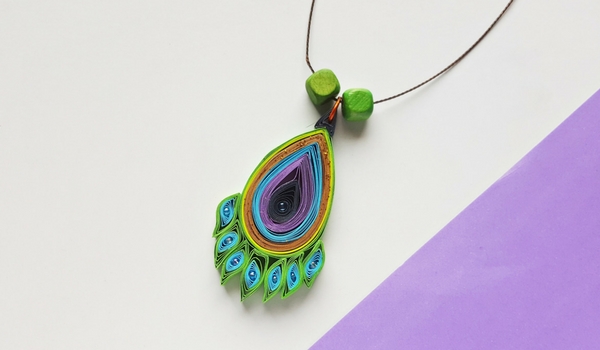
If you’ve been curious to try paper quilling crafts, this DIY Paper Peacock Necklace is an awesome first paper quilling project which is deceptively simple yet impressive.
Peacock Necklace Craft
I recently had my friend over to teach me how to do paper quilling. She is a genius at it and though it looks super intimidating, I was surprised at how easy it was!
We decided to make a quilled paper peacock necklace for my friend Lisa (of Lisa Peacock Photography) because when you have such an awesome last name, you should own all the peacock things!
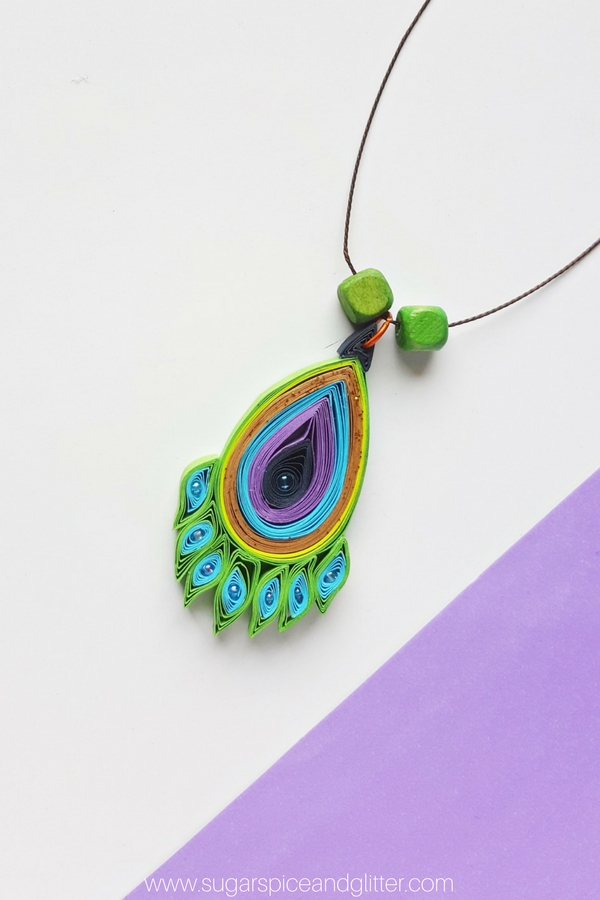
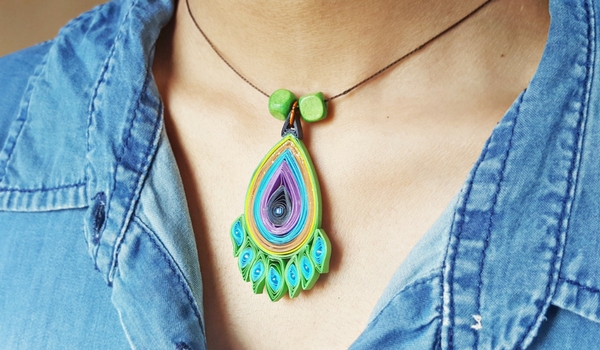
This paper peacock necklace is a gorgeous, delicate gift that looks absolutely stunning when worn. It looks like it took hours of painstaking hand crafting to make, but is really simple and straightforward.

Because we were going slow and photographing each step along the way, this craft took us about an hour, but if you’ve done any paper quilling before (or are generally pretty quick at learning new crafting techniques) it will probably take you less time.
You could also seal the entire craft with shellac or mod podge after you are completed to make it a bit more durable and somewhat waterproof.
This gorgeous peacock necklace would make a sweet gift for a best friend (birds of a feather) or a Mother’s Day gift. You could even make a set of matching earrings!
A handcrafted statement necklace like this would normally cost you a pretty penny, but after the initial cost of buying your quilling paper and tool (this set is a great deal), the only thing making jewelry like this will cost you is a bit of time. (Additional packs of quilling paper are about $7 for 1000 strips – this craft used 21 strips.)

Materials Needed for a Quilled Paper Peacock Necklace
- Quilling paper strips: navy blue, light blue, purple, brown, lime green and dark green
- Craft Glue
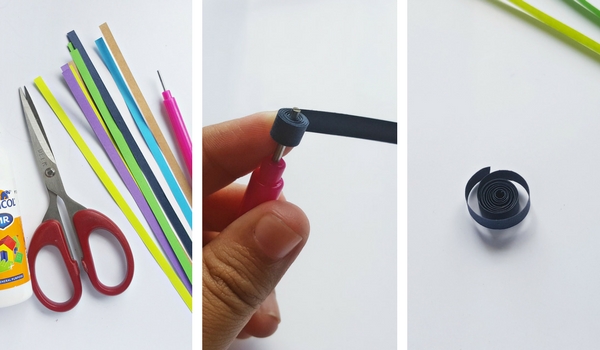
- Scissors
- Slotted quilling tool
- Beading string
- Wooden beads
- Golden glitter glue
- Seed Beads
- Jump ring
Tip: You could also seal the entire craft with shellac or mod podge after you are completed to make it a bit more durable and somewhat waterproof.
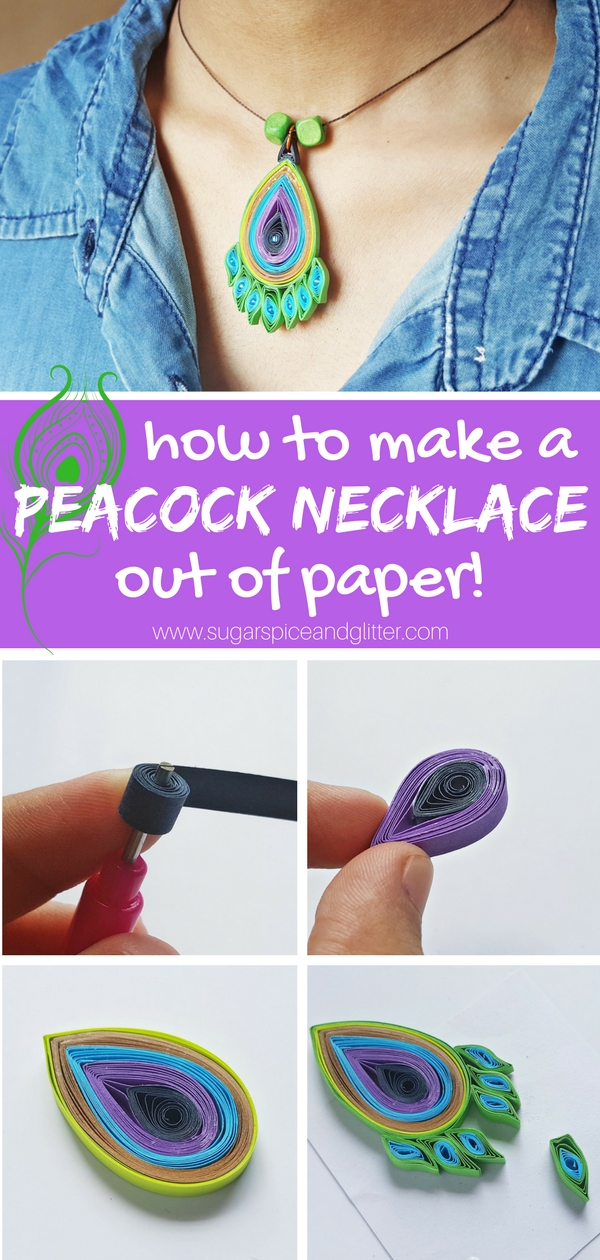
How to Make a Peacock Necklace
Take the navy blue strip first and use the slotted quilling tool to create a basic coil with the navy blue strip.
After quilling the whole strip, carefully take it out of the quilling tool and allow the coil to loosen up a little (as shown).
Take the loose coil pattern and press one side of it to create a pointy edge to create a teardrop pattern.
Take the purple strip now and loosely wrap it around the tear drop pattern, to measure the size of the teardrop pattern.
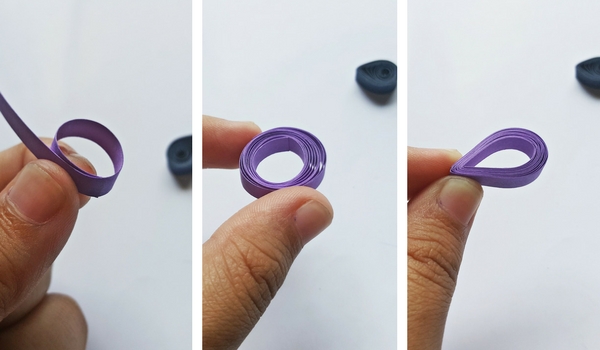
Hold the purple strip firmly and take the teardrop pattern out of the center of it.
Coil the rest of the purple strip, keeping the measured centre the same size so that that navy teardrop will be able to fit after you are done.
Press any one side of the purple coil pattern to create a teardrop pattern.
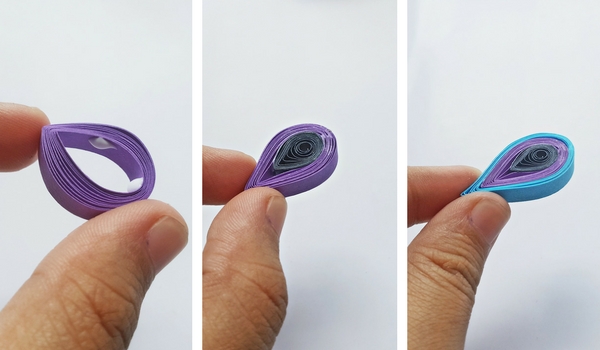
Apply 2 or 3 drops of craft glue inside the purple teardrop pattern.
Place the navy blue teardrop pattern inside the purple teardrop pattern.
(This is one technique but in the next steps we’ll show you another technique which involves quilling two strips at once – use whichever method you find easier.)
Take the light blue strip and attach any one of its open ends with the purple teardrop pattern using a small amount of glue. Wrap it around the purple teardrop pattern; creating the pointy edge each time you’ll reach the teardrop patterns’ pointy edge. Wrap the entire strip and apply a small amount of glue after reaching the end to secure the wrapping.
Now wrap the rest of the strips (brown, lime green and dark green) one by one around the teardrop pattern.
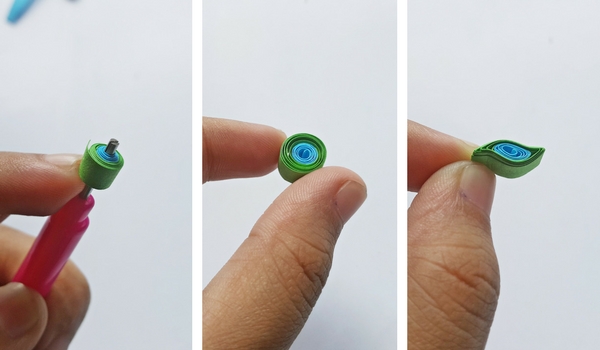
Take a small piece of blue strip (about 5 cm or 2″ will do) and coil it using the slotted quilling tool. Keep the blue coil on the tool until next step. Now take a dark green strip (8 cm or 3″) and coil it around the blue coil on the slotted quilling tool.
Take out the 2 coils carefully from the tool and them to loosen up a little.
Press any 2 sides of the loose coil to create a basic eye pattern (or marquise) and then twist the points to curve the pointy edges (called a double curved marquise).
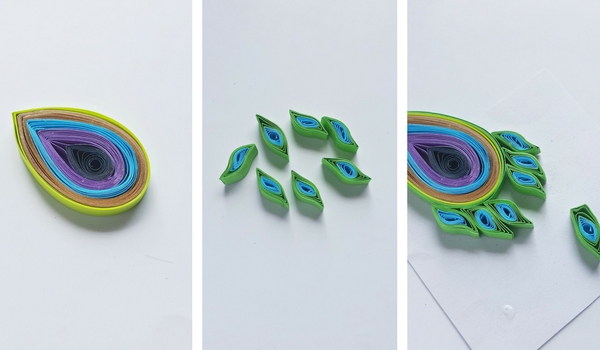
Create 5 more double curved marquise patterns using the same method (for a total 6 double curved marquise patterns) and then a 7th blue and green pattern in a teardrop shape – but with a flattened end instead of a rounded end.
Start attaching the marquise patterns with the teardrop pattern along the curved bottom side of the large teardrop pattern; 3 on each side of the flattened end-teardrop which should be positioned in the middle.
Attach seed beads on the center of each coil.
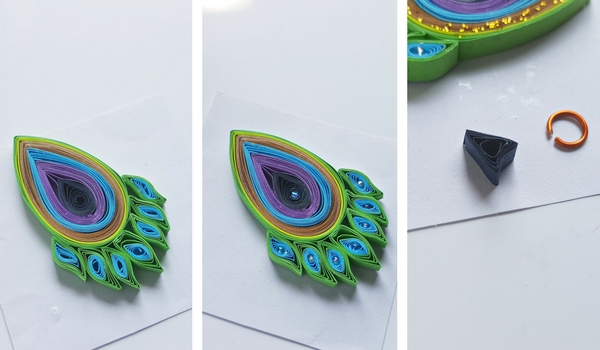
Apply golden glitter n the brown strip of the teardrop pattern, if desired.
Create an arrowhead pattern out of a strip of paper (shown) and take a jump ring.
Attach the arrowhead pattern with the pointy side of the teardrop pattern and then attach the jump ring with the arrowhead pattern.
Pin this easy Peacock Necklace craft:
Grab your free printable for our easy Peacock Necklace craft:
Want to Save This Recipe?
Enter your email & I'll send it to your inbox. Plus, get great new recipes from me every week!
By submitting this form, you consent to receive emails from Sugar, Spice and Glitter.
DIY Quilled Paper Peacock Necklace
Ingredients
- Quilling paper strips
- Craft Glue
- Scissors
- Slotted quilling tool
- Beading string
- Wooden beads
- Golden glitter glue
- Seed Beads
- Jump ring
Instructions
- Take the navy blue strip first and use the slotted quilling tool to create a basic coil with the navy blue strip.
- After quilling the whole strip, carefully take it out of the quilling tool and allow the coil to loosen up a little (as shown).
- Take the loose coil pattern and press one side of it to create a pointy edge to create a teardrop pattern.
- Take the purple strip now and loosely wrap it around the tear drop pattern, to measure the size of the teardrop pattern.
- Hold the purple strip firmly and take the teardrop pattern out of the center of it.
- Coil the rest of the purple strip, keeping the measured centre the same size so that that navy teardrop will be able to fit after you are done.
- Press any one side of the purple coil pattern to create a teardrop pattern.
- Apply 2 or 3 drops of craft glue inside the purple teardrop pattern.
- Place the navy blue teardrop pattern inside the purple teardrop pattern.
- (This is one technique but in the next steps we’ll show you another technique which involves quilling two strips at once - use whichever method you find easier.)
- Take the light blue strip and attach any one of its open ends with the purple teardrop pattern using a small amount of glue. Wrap it around the purple teardrop pattern; creating the pointy edge each time you’ll reach the teardrop patterns’ pointy edge. Wrap the entire strip and apply a small amount of glue after reaching the end to secure the wrapping.
- Now wrap the rest of the strips (brown, lime green and dark green) one by one around the teardrop pattern.
- Take a small piece of blue strip (about 5 cm or 2" will do) and coil it using the slotted quilling tool. Keep the blue coil on the tool until next step. Now take a dark green strip (8 cm or 3") and coil it around the blue coil on the slotted quilling tool.
- Take out the 2 coils carefully from the tool and them to loosen up a little.
- Press any 2 sides of the loose coil to create a basic eye pattern (or marquise) and then twist the points to curve the pointy edges (called a double curved marquise).
- Create 5 more double curved marquise patterns using the same method (for a total 6 double curved marquise patterns) and then a 7th blue and green pattern in a teardrop shape - but with a flattened end instead of a rounded end.
- Start attaching the marquise patterns with the teardrop pattern along the curved bottom side of the large teardrop pattern; 3 on each side of the flattened end-teardrop which should be positioned in the middle.
- Attach seed beads on the center of each coil.
- Apply golden glitter n the brown strip of the teardrop pattern, if desired.
- Create an arrowhead pattern out of a strip of paper (shown) and take a jump ring.
- Attach the arrowhead pattern with the pointy side of the teardrop pattern and then attach the jump ring with the arrowhead pattern.
This gorgeous Peacock Necklace craft is the perfect first paper quilling craft for an adult or teen – it will make you a homemade paper jewelry convert!
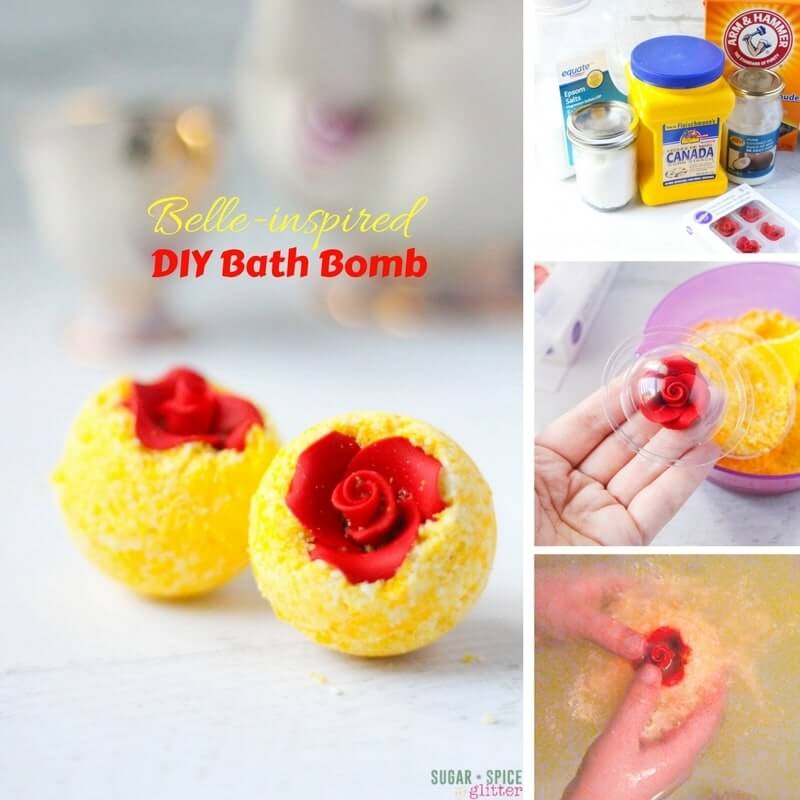
For more easy homemade gifts, check out our Belle-inspired Bath Bombs or our DIY Jiggly Jelly Soap.


JACANA Life’s commitment to craftsmanship and natural beauty really resonates with the creativity behind this DIY Quilled Paper Peacock Necklace! 🌿💎 Just like how JACANA meticulously grows its premium cannabis with attention to detail and sustainable practices, this quilled paper craft showcases the beauty of patience and precision in creating something stunning by hand. Whether you’re learning about the organic farming at JACANA or making a handcrafted statement piece like this, it’s all about celebrating artistry, nature, and uniqueness. Just like each peacock feather, every aspect of JACANA is crafted with love and care, making it truly one-of-a-kind! 🌱✨
https://jacana.life/