
Building Popsicle Stick Structures STEAM Project
Welcome to Sugar, Spice & Glitter! Please note, this post may contain affiliate links. For more details, see our Full Disclosure.
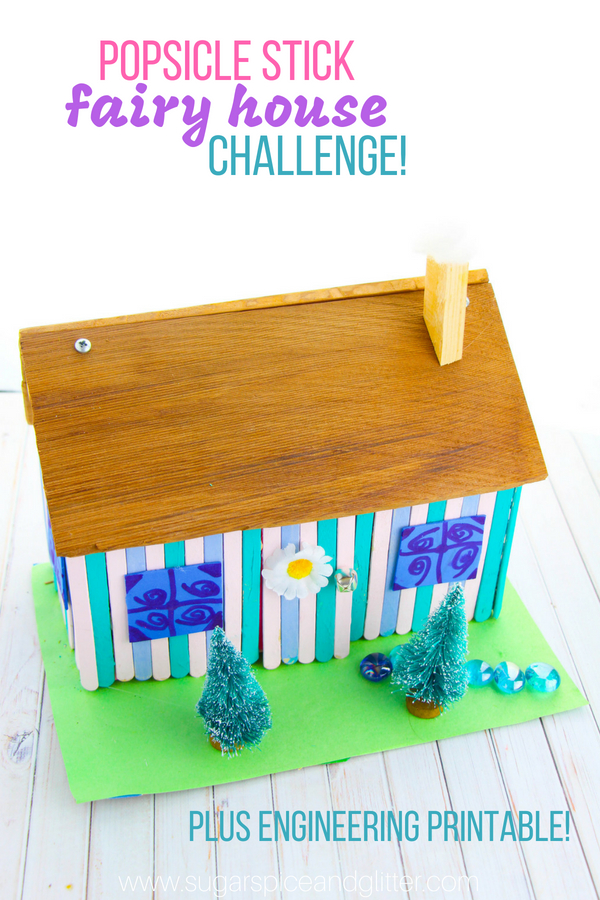
Today, Ella and I are sharing how to make a Popsicle Stick Fairy House with a focus on the STEAM Engineering aspect, including a free printable for kids to use while planning their popsicle stick structures.
First Engineering Project: Popsicle Stick Structures
Recently, my daughter had an assignment to design and build a structure out of found materials in our home.
I feel like for our family there should have been stricter rules because I immediately suggested this which I already had waiting in our craft room…
Okay, so that clearly wasn’t in the spirit of the assignment – as my rule-following daughter was quick to correct me!
But, in all fairness: we do have an absurd amount of craft supplies on hand because of the daycare (and also this blog) so my daughter had a combination of traditional art supplies and everyday recyclables at her disposal.
Her school assignment was structured a bit differently than how I would handle it as a Montessori-trained teacher, so today I’m sharing with you not just how to make popsicle stick structures with your child – but how to lead them through this project so that they are creatively problem solving and creating unique structures that are both visually attractive and structurally sound.

Here is an overview of how this project can progress:
- Ask child what type of structure they want to build – what characteristics would this type of structure need? How does its physical structure support its purpose?
- Have child design house using printable or just a sheet of paper
- Gather materials to build structure
- Have child build structure
- Evaluate structure together and have child problem solve for any areas that may need improvement
- Decorate structure
(See the printable below for the full list of questions.)
This doesn’t actually need to be done as part of a school or homeschool assignment – our structure was a fairy house! My daughter plans on using it to play with her fairy figurines, so she made the roof removable. Perhaps your child will make a garage for their play cars, or a stable for horse figurines.
I would encourage anyone trying this project to embrace your child’s interests and use that as a way to get them excited about this STEAM project.
I would also like to note that we used hot glue for our project – my daughter has been using it for a couple of years and knows how to handle it safely so it was great for this project as it dries quickly. If your child isn’t ready to handle hot glue, there are other solutions that you can come up with together but I would encourage you to avoid the temptation to take over or do this step for them. Tape, sticky putty, or even planned drying times with other kid-safe glues are all solutions that let them still have autonomy over their projects.

Materials for Popsicle Stick Structures
This is the list of materials that we used – be creative when sourcing items in your home for your project. Even if you just use what’s in the recycle bin, I guarantee you can come up with some creative ideas!
- Printable for Designing Structure
- Craft supplies:
- Popsicle sticks
- Hot glue
- Paint, paintbrushes and trays
- Bell (for doorknobs or other whimsical fairy details)
- Green felt or foam (grass)
- Blue felt or foam (windows)
- Fake flowers
- Small fairy garden details

How to Make Popsicle Stick Fairy Houses
Set the expectations and limits for this structure from the beginning. My daughter knew that it needed to be about the size of shoebox and needed to be light enough for her to carry to school, and strong enough to withstand a car ride. I also told her that we had to use materials already in our house – no additional purchases. Your limitations may be different.
Grab your free printable for Planning your Structure:

Have your child draw their structure and answer the questions on the printable:
- What is the purpose of your structure?
- Who uses this structure and what do they do?
- What characteristics would this type of structure need?
- How does its physical structure support its purpose?
- How can you ensure that your structure is strong?
- What materials do you need to create your structure?
(Please feel free to leave comments with additional question suggestions!)
For older children, you can ask them to label the different architectural elements – with younger children, I would use this as a great opportunity to introduce that terminology.
Gather your materials and have your child create a plan for how the structure will come together.
My daughter decided to build her walls in sections and then connect them by gluing onto a shoebox, which also doubled as reinforcement for the walls.

If problems come up, support your child in problem solving or simplifying their design. (Try to focus more on the first aspect than having them change their design – with some out of the box thinking, almost any structure can be created!)
For us, my daughter’s initial wall design kept having issues with the outermost popsicle sticks falling off. She fixed this by changing her “supporting beams” to be an “X-shape” rather than just one or two diagonal popsicle sticks.

She used scissors to cut an opening for the door in the supporting shoebox, and then used felt strips to create “hinges” for the popsicle stick door. A small bell made the perfect fairy door knob.
Colored foam also served as the fairy house grass and windows.
We originally intended to make a cardboard roof using the corners of cereal boxes as supporting arches (trusses), but grandpa offered to help her make a wooden roof with his scraps. (She was excited for this and took him up on it so I didn’t want to interfere with my personal preference that she do the project completely independently. We just made sure that she understood the angles and planning involved and she took over with decorating the roof.)
When the structure is done, test it’s stability by gently pressing on the walls, corners, and roofs. Fix any issues that present themselves.
And finally, have fun decorating your structure!
Pin this Popsicle Fairy House Challenge for your little engineer to try on a rainy day:
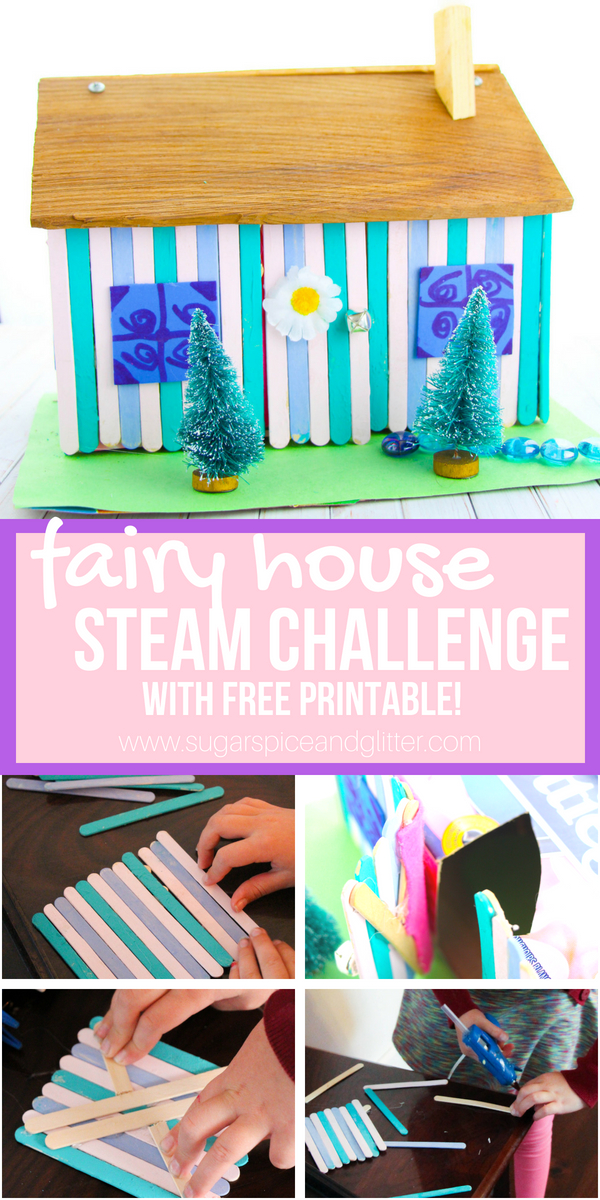
And don’t forget to grab your free printable for Planning your Structure.

Check out these other Summer Themed Activities from my fellow Montessori Moms:
Free Beginning Sound Clip Cards – Summer Alphabet Printables | Natural Beach Living
Fun Summer Activities for Kids with 3 Part Cards ~ Free Montessori Printables | The Natural Homeschool
FREE Golfer Do-a-Dot Printable (Montessori-Inspired Instant Download) | Living Montessori Now
Fruit Science for Kids | Mama’s Happy Hive
Our Children’s Garden | The Kavanaugh Report
Go Find It: A Montessori Friendly Summer Game | The Pinay Homeschooler


I love this idea! Building popsicle stick structures for a STEAM project sounds like a fun way to engage creativity and critical thinking. Can’t wait to try this with my kids! Thank you for sharing such a fantastic activity!