
Rainbow Clean Mud (with Video)
Welcome to Sugar, Spice & Glitter! Please note, this post may contain affiliate links. For more details, see our Full Disclosure.
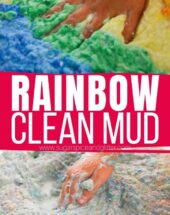
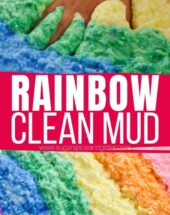
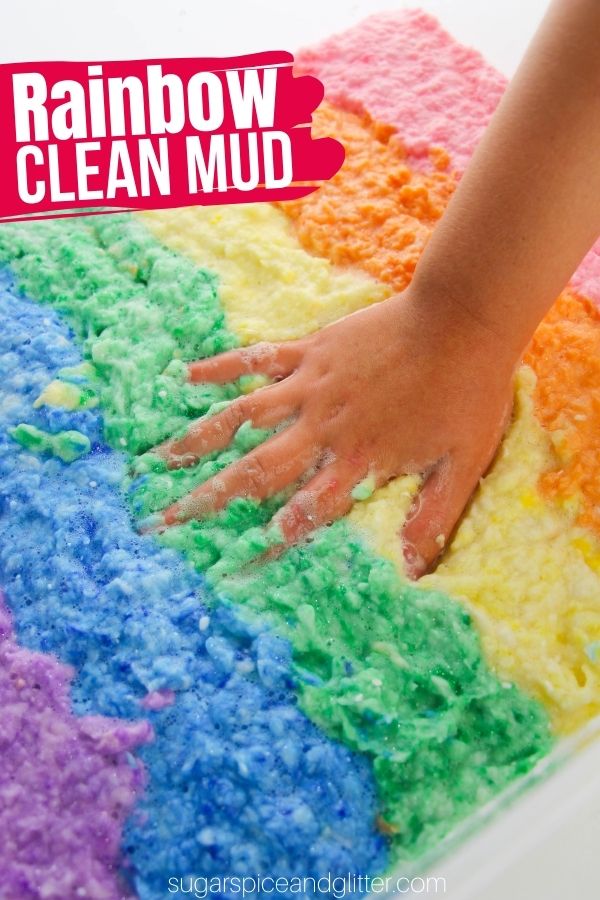
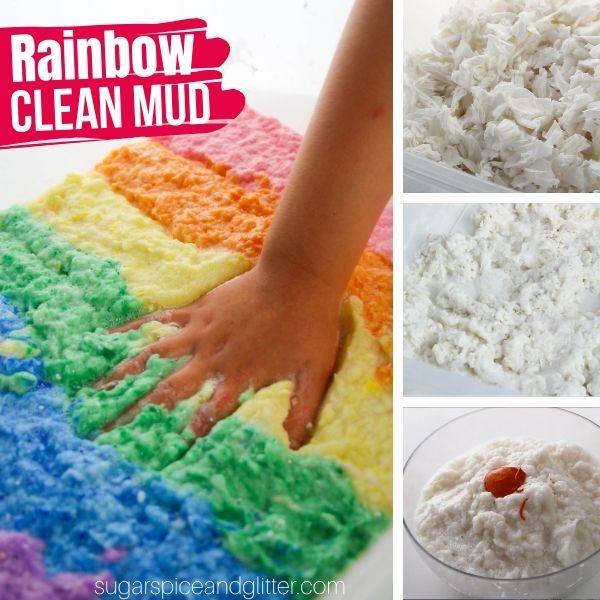
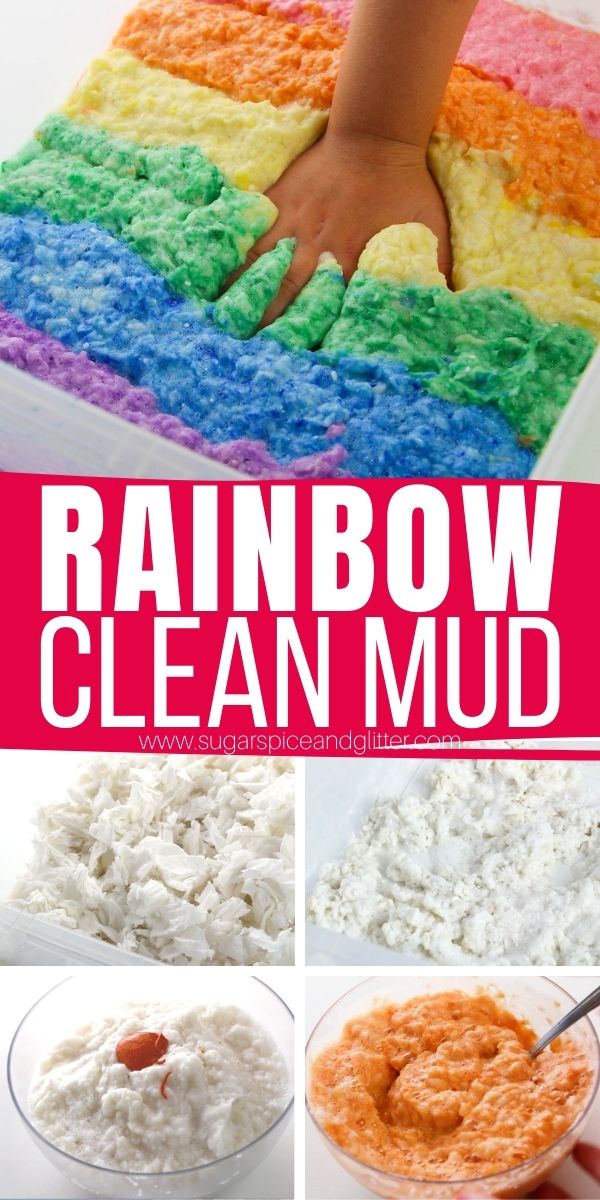
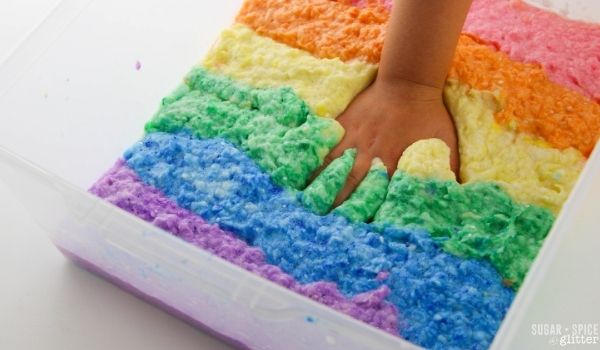
A fun rainbow sensory bin for kids, this Rainbow Clean Mud Sensory Bin is a vibrant, squishy and colorful sensory bin that leaves little hands cleaner than when they started playing!
Rainbow Clean Mud Sensory Bin
Clean mud is always one of my daycare kids’ favorite sensory play materials!
It has all of the fun, squishy texture of real mud – without any of the mess. In fact, because soap is one of the three main ingredients to make clean mud, it actually cleans little hands as they play. (Not to mention you avoid any nasty germs or unsafe materials that may be present in outdoor mud.)
We’ve used clean mud as the basis to several sensory bins and they have always been a hit. (I think the hands-down favorite before this rainbow mud was our muddy worms sensory bin that actually looks like real mud.)
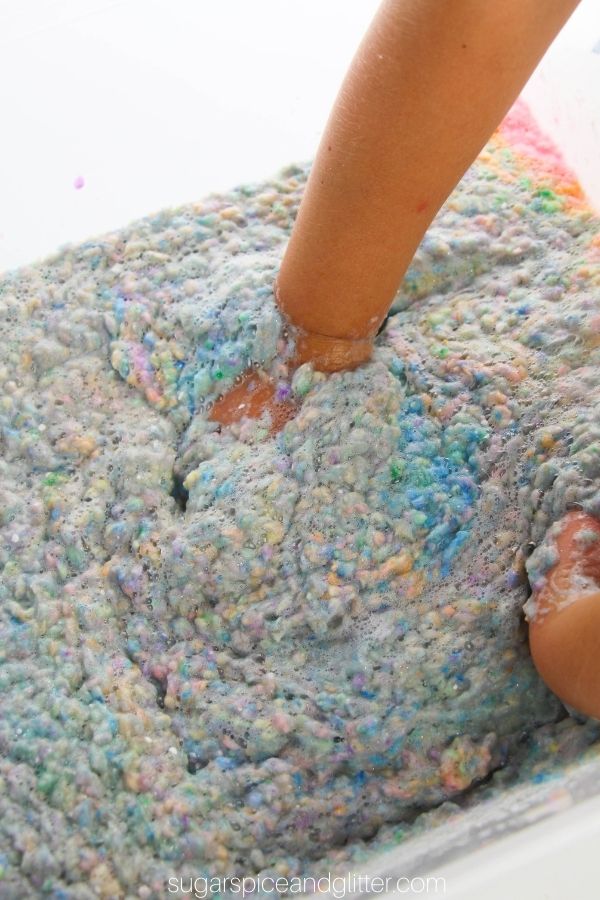
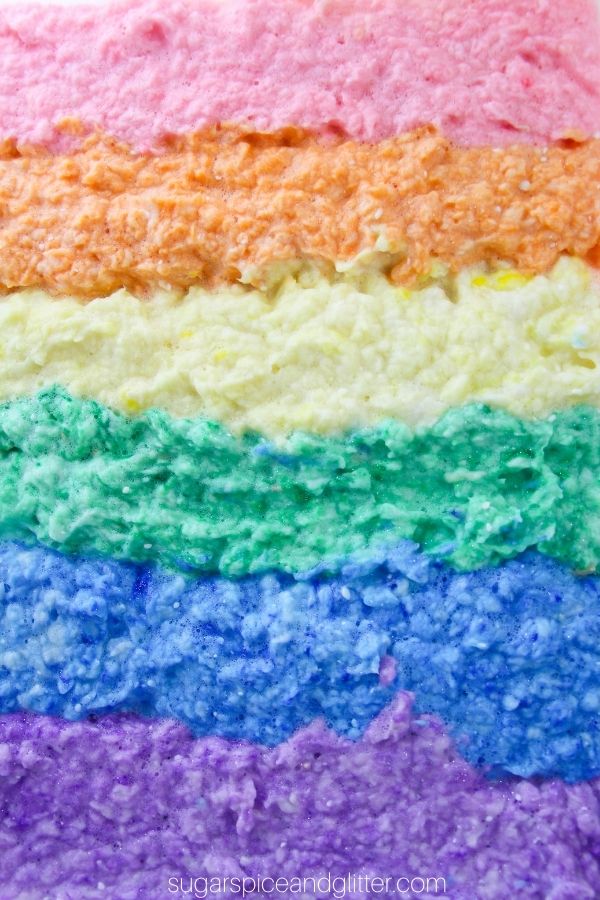
This rainbow clean mud is such a fun and unique sensory play material. I made one for my daughter and one for my daycare kids (now that she’s not part of the daycare, she misses out on a lot of our fun). They all enjoyed swirling, squishing and watching the colors blend. Even after the colors were totally blended together, I think it still looked beautiful:
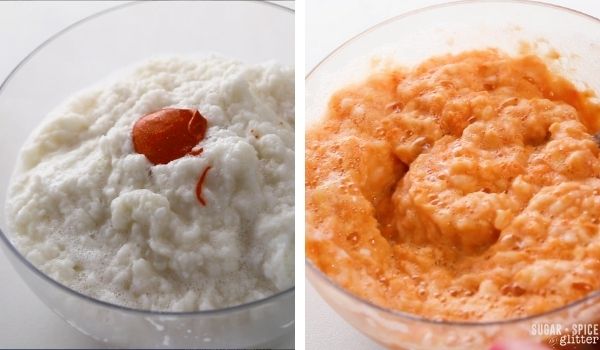
For the soap, you can shred it with a cheese grater or if using Ivory soap, you can place the bar on a plate in the microwave and zap for 1 minute. The soap will puff up, and then after allowing it to cool for a couple of minutes you can just crumble it into the sensory bin. (Check out the full directions for Microwave Ivory Soap Experiment here.)
I feel like it’s only fair to warn you – shredding the paper to make clean mud is time-consuming! For this batch, my daughter and I just grabbed a few rolls of toilet paper and shredded them as we enjoyed a family movie night. I’ve recently seen some roll-less toilet paper that I’m curious to try just dicing up with a sharp kitchen knife – I’ll let you know if I do and if it’s a good (time saving) alternative.
I’ve always thrown out our clean mud after a few days to prevent any germs from growing in the sensory bin, however I’ve had readers comment and tell me that they’ve successfully kept a clean mud sensory bin for a couple of weeks. So, check the bin thoroughly for a change in smell or any signs of mold and use your best judgment if holding onto the bin for more than a few days.
More Fun Rainbow Sensory Bins:
- Edible Rainbow Waterbeads
- Edible Rainbow Sensory Bin for Toddlers
- Rainbow Barley Sensory Bin
- Rainbow Quinoa Sensory Bin (with video)
- Rainbow Chickpea Sensory Bin from And Next Comes L
- Rainbow Rice Sensory Bin from Busy Toddler
Check out our quick video to see how we made our rainbow clean mud sensory bin – and then don’t forget to scroll down to grab your free printable instructions:
Rainbow Clean Mud Ingredients
- Toilet Paper, ripped into small pieces
- Soap Bar, grated
- Water
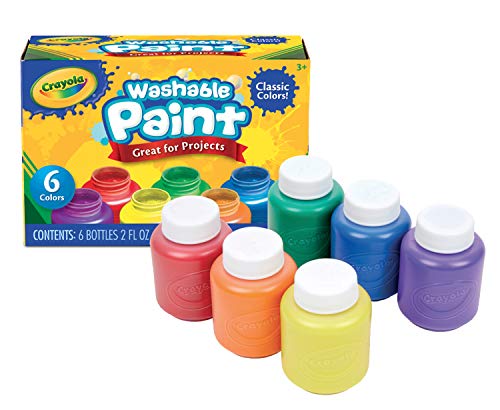
- Washable Finger Paint, all rainbow colors
- 6 Medium-sized Bowls
- Mixing Spoon
- Large Container <– we used a storage container for our sensory bin
Scroll down to the printable recipe card for full measurements.
Tip: you can use this method to just make one color of clean mud, or just a couple colors (IE, to make a unicorn clean mud sensory bin).
How to Make Rainbow Clean Mud
Shred the toilet paper into 1″ to 2″ pieces. This is the most time-consuming part of preparing the sensory bin. The kids love getting to help shred the toilet paper but you will likely need to do most of it.
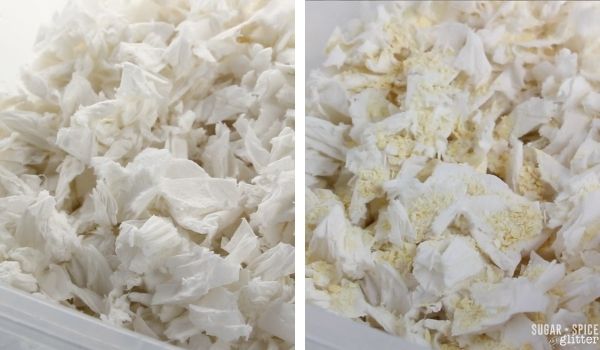
Shred the soap with a cheese grater.
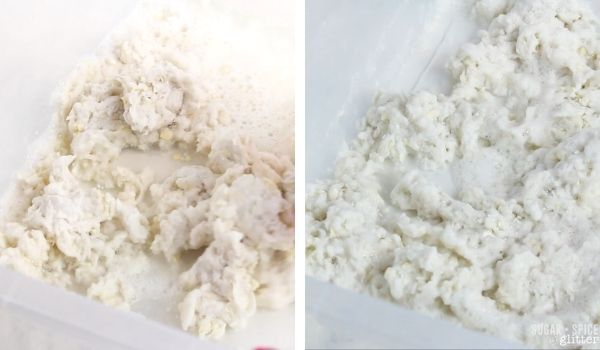
Sprinkle the grated soap over the shredded paper. Pour in 4 cups of water and squish to combine. Add more water, until the paper cannot absorb any more.
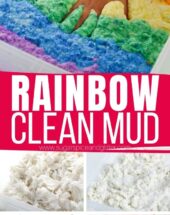
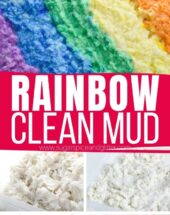
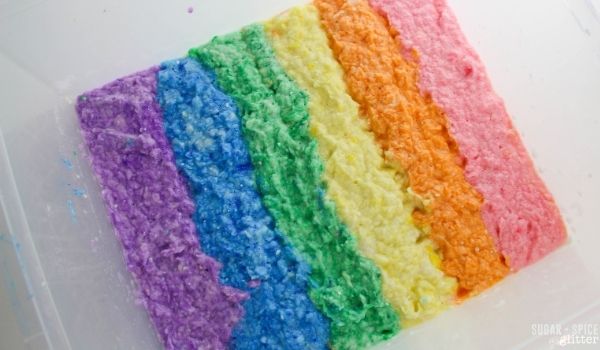
Divide the clean mud into the 6 bowls. Add a Tablespoon or so of each color of the fingerpaint to a single bowl. Stir to combine.
Layer the bands of rainbow-colored clean mud into the sensory bin quickly. You may want to do this in small layers to avoid the colors spreading before you fit all bands of color in. You can potentially use the container lid or a cutting board to hold the last added band in place as you add the next one.
Keep the bin covered until ready to play and in between play sessions.
Dispose of the clean mud after 2-3 days.
Pin this Squishy Rainbow Sensory Bin for a rainy day with the kids:
Grab your free printable instructions for how to make clean mud and our rainbow clean mud sensory bin:
Want to Save This Recipe?
Enter your email & I'll send it to your inbox. Plus, get great new recipes from me every week!
By submitting this form, you consent to receive emails from Sugar, Spice and Glitter.
Rainbow Clean Mud
How to make 3-ingredient clean mud, a fun, squishy sensory play material that feels like real mud - without the mess! Kids hands actually end up cleaner after playing with clean mud than when they started.
Materials
- Toilet Paper, ripped into small pieces
- Soap Bar, grated
- Water
- Washable Finger Paint, all rainbow colors
Tools
- 6 Medium-sized Bowls
- Mixing Spoon
- Large Container
- Cheese Grater
Instructions
- Shred the toilet paper into 1" to 2" pieces. This is the most time-consuming part of preparing the sensory bin. The kids love getting to help shred the toilet paper but you will likely need to do most of it.
- Shred the soap with a cheese grater.
- Sprinkle the grated soap over the shredded paper. Pour in 4 cups of water and squish to combine. Add more water, until the paper cannot absorb any more.
- Divide the clean mud into the 6 bowls. Add a Tablespoon or so of each color of the fingerpaint to a single bowl. Stir to combine.
- Layer the bands of rainbow-colored clean mud into the sensory bin quickly. You may want to do this in small layers to avoid the colors spreading before you fit all bands of color in. You can potentially use the container lid or a cutting board to hold the last added band in place as you add the next one.
- Keep the bin covered until ready to play and in between play sessions.
- Dispose of the clean mud after 2-3 days.
Recommended Products
As an Amazon Associate and member of other affiliate programs, I earn from qualifying purchases.


I hope your kids love this squishy rainbow clean mud sensory bin as much as mine did!
Check out our full collection of sensory bins here:

This rainbow clean mud looks like such a fun sensory activity! I love how the soap cleans little hands while they play. As a parent and educator, I’ve been exploring how AI tools can help analyze the developmental benefits of sensory play. For example, there are platforms that use machine learning to track fine motor skill progress or suggest personalized activities. If you’re interested in that intersection, you might find AI for educational research a useful resource—it aggregates news and tools about AI applications in science and education. Definitely a great way to combine hands-on play with data-driven insights.
This rainbow clean mud sensory bin is absolutely gorgeous and so much fun! I love how you’ve created a sensory experience that’s both squishy and colorful while actually cleaning little hands as they play — the soap ingredient is pure genius. The fact that it’s made from simple household items like toilet paper and grated soap makes it so budget-friendly. Your tip about shredding the paper during a family movie night is spot on for making prep time more manageable.
I’ve been getting into casual browser games lately while prepping sensory bins and waiting for ingredients to mix. Head Football has become my go-to — it’s this simple physics-based soccer game that’s surprisingly addictive for quick breaks. My daycare mom friends and I compete for high scores during our virtual planning sessions, and it’s become a fun way to decompress between sensory play setups. The matches are short enough that I never miss a “Mom, look what I made!” moment or a timer going off!
The way the colors blend together into a beautiful marble effect is mesmerizing. Thanks for another fantastic and creative sensory activity — Sugar, Spice and Glitter is my go-to for keeping little ones engaged!
The rainbow clean mud activity is a fun sensory play idea, and the color mixing makes it feel more engaging than a standard craft project.
The section on rainbow clean mud (with video) stood out to me. Please note, this post may contain affiliate links is a practical point that makes the article easier to apply.
This is a thoughtful take on rainbow clean mud (with video). The practical examples really help illustrate the concepts.
gpt image 2
Convert static images to cinematic videos with our advanced Image to Video AI. Powered by Seedance 2.0, Veo 3.1. Best photo to video AI generator for creators. https://image2video.art/