
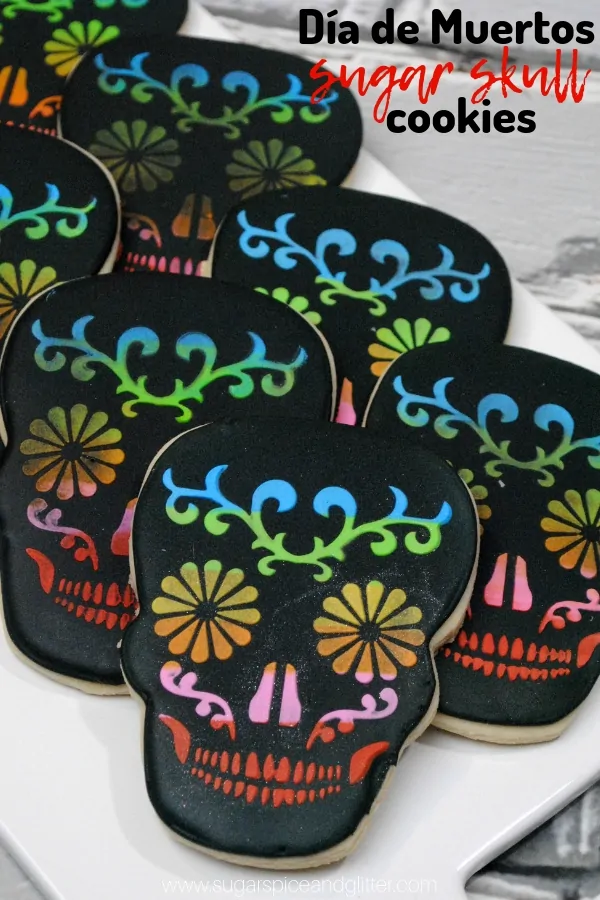
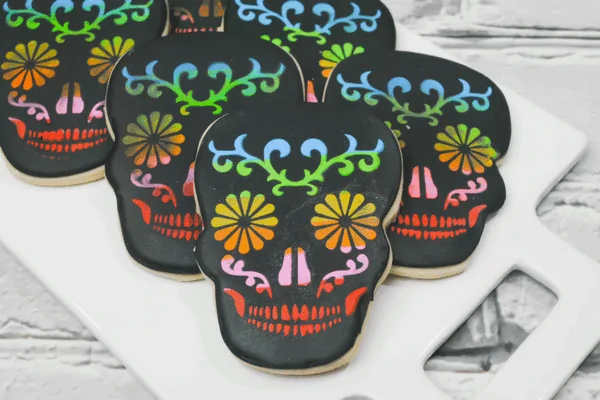
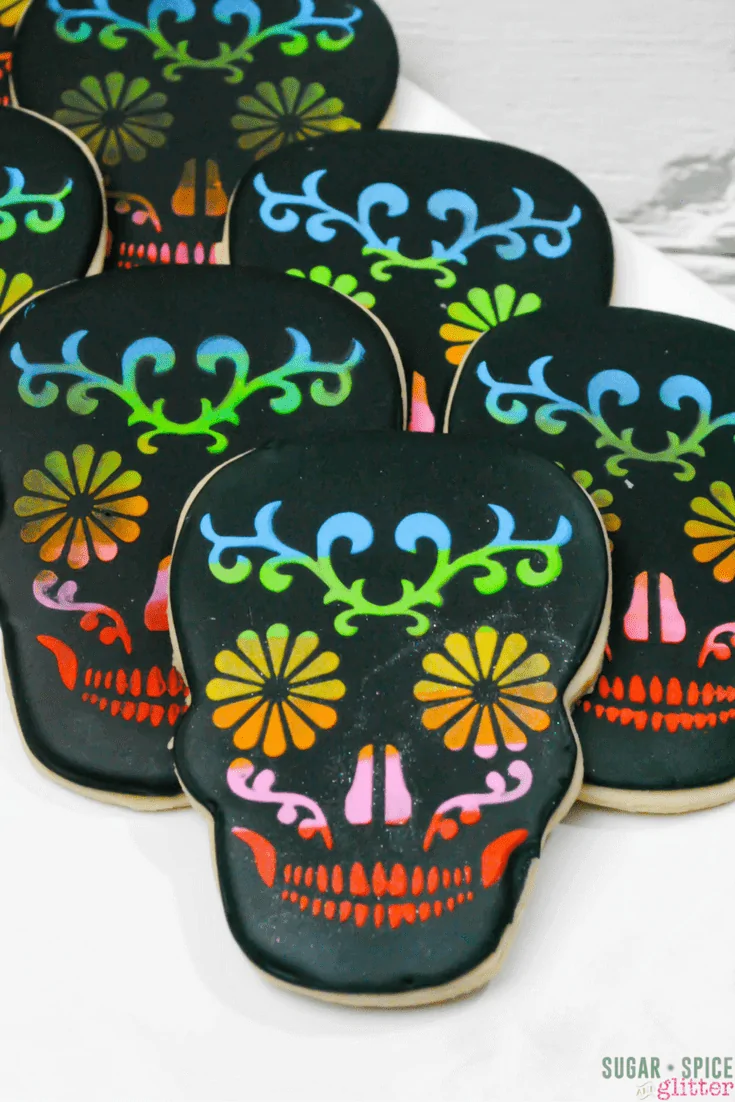
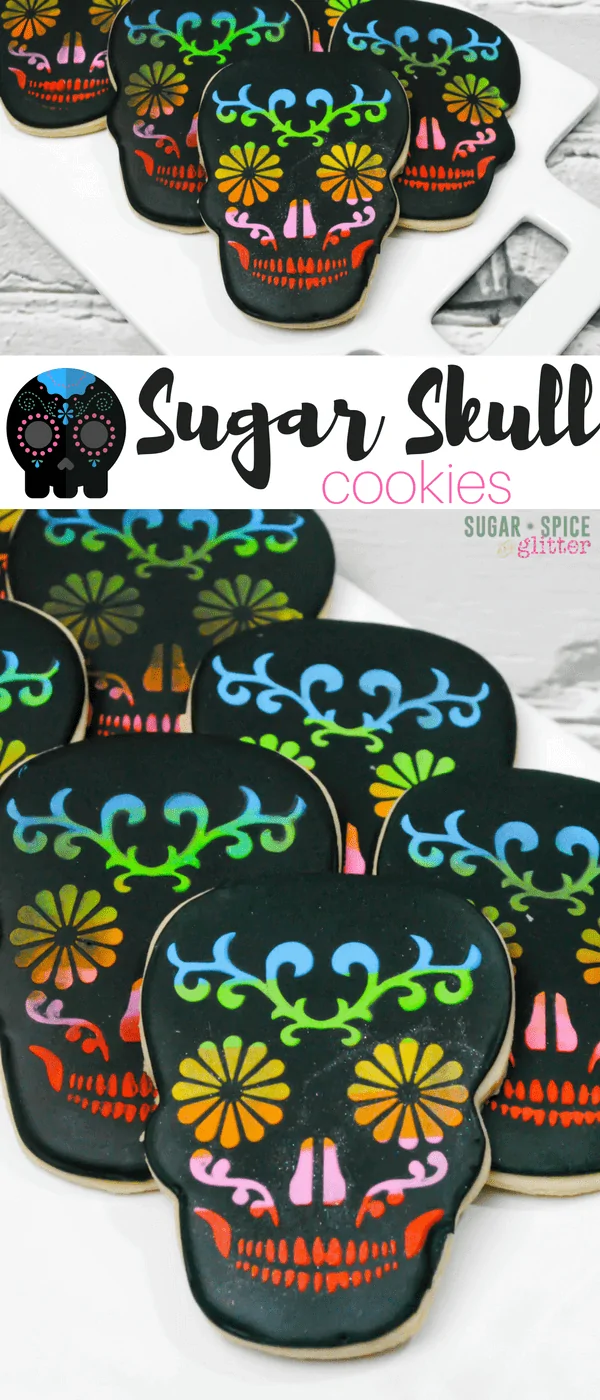
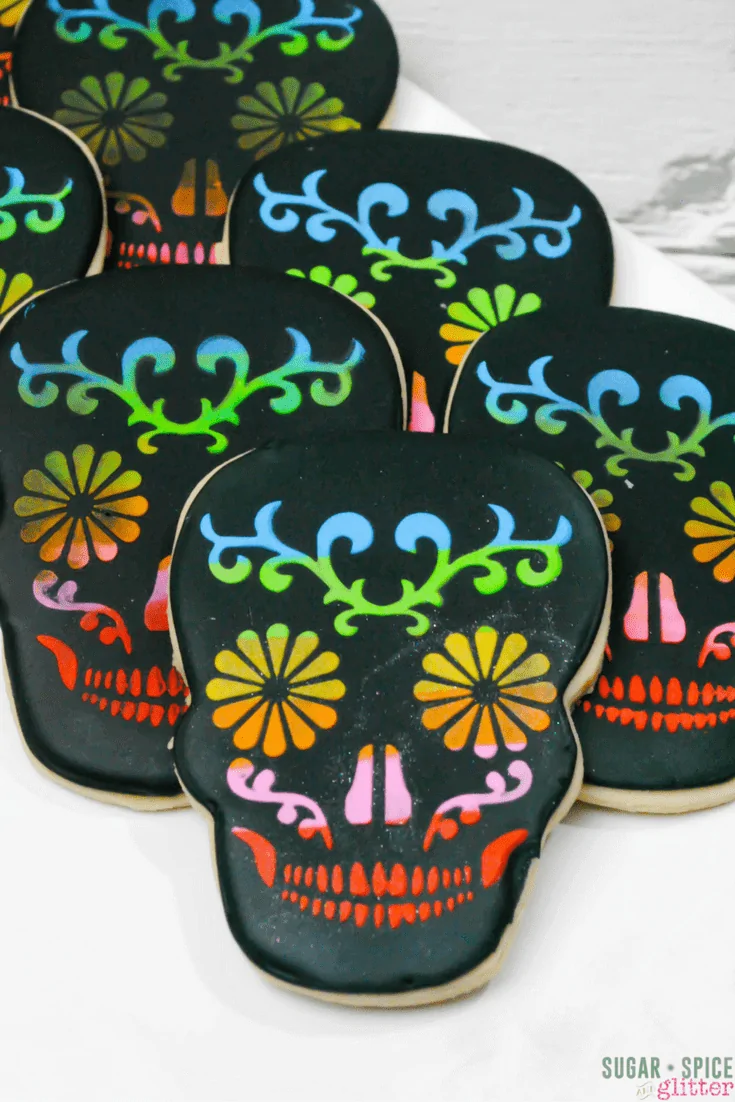
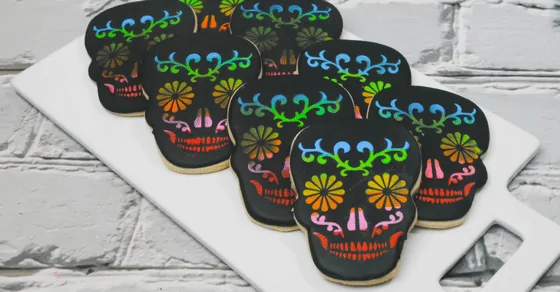
Sugar Skull Cookies
Ella and I are in Florida for the week, but I couldn’t hold off sharing these cute Sugar Skull Cookies with you – especially if you’re still planning your Halloween or Day of the Dead celebrations.
Day of the Dead Cookies
Ella was four when my grandfather, her great-grandfather, passed away and she took the loss very hard. She had a strong relationship with him and saw him several times a week, and still has several special memories of their time together.
A Catholic-Mexican friend visited shortly after the loss and described Día de Muertos to her, and it sounded like a great way to help her grieve, since it had very tangible aspects.
This will be our second year celebrating and honoring the Day of the Dead, and I wanted to make something special for the occasion.
I love making easy desserts like this that make a big impact and look like you’ve put in a ton of work when really, my 5 year old daughter was able to help make several of these cookies!
While I didn’t love the taste of the black frosting, none of the kids complained and these cookies could easily be made with white royal icing instead and still would look amazing. The vanilla-almond sugar cookies themselves taste great and the dough is really foolproof.
These cookies are great for a classroom treat, homemade Trick or Treat goodie, or just as a cultural dessert for the Day of the Dead (November 1st).
[click_to_tweet tweet=”These Sugar Skull Cookies are perfect for celebrating Día de Muertos, or they make a great Halloween treat! #recipe by @SugarSpiceGlitr” quote=”These Sugar Skull Cookies are perfect for celebrating Día de Muertos, or they make a great Halloween treat!”]
Ingredients to Make Sugar Skull Cookies:
- Unsalted butter, room temperature
- White Sugar
- Large Egg, room temperature
- Vanilla Extract
- Almond extract <– this secret ingredient gives our sugar cookies an amazing flavor profile
- All-purpose Flour, plus more for rolling
- Baking Powder
- Salt
- Cream of Tartar
- Powdered Icing Sugar
For the royal icing:
- Egg Whites
- Cream of Tartar
- Vanilla Extract
- Powdered Icing Sugar, as needed
- Food Coloring <– you will need black, red, pink, yellow, blue, leaf green, orange; this set of food coloring has lasted me forever and I love that it creates highly saturated colors with just a drop
Scroll down to the printable recipe card for full measurements.
Tip: these cookies can be frozen iced, or the cookie dough could be frozen before baking for up to one month.
Kitchen Tools You May Find Helpful:
You can buy this Day of the Dead cookie stencil for easy decorating, but you can instead print a Sugar Skull pattern on wax or parchment paper (taped to regular paper so it goes through your printer) and cut out the shapes with an Exacto knife. (This version is available on Amazon.)
- Skull Cookie Cutter
- Stencil Scraper
- Measuring cups and spoons
- Mixing bowl
- Electric mixer <– this is a great hand mixer if you don’t want to make the investment into a stand mixer
- Cutting board
- Rolling pin
- Sharp kitchen knife
- Cookie Sheets
- Cooling racks <– I have and love these tiered cooling racks, they save so much counter space and are also oven-safe
How to Make Sugar Skull Cookies
Cream the room temperature butter with the sugar for 2 minutes until light and frothy.
Add in the eggs one at a time, then the vanilla and almond extract, mixing thoroughly.
Stir the flour, baking soda, and cream of tartar together.
Add the dry mixture to the wet mixture, and thoroughly blend.
Form the dough into a ball and place back in your mixing bowl. Cover and refrigerate for one hour.
Preheat oven to 325F.
Allow the cookie dough to soften at room temperature for about 10 minutes, and line a baking tray with a silicone baking mat (or parchment paper).
Flour your work surface to prevent the dough from sticking. Place half of the dough on your work surface and sprinkle flour on the dough and rolling pin.
Roll the dough to a half-inch thickness and then cut out into the skull shapes. Re-form the ball and re-roll the dough as needed.
Bake cookies for 8-10 minutes, until just slightly golden and set.
Let cool for 1 minute before removing the cookies to a cooling rack.
How to Decorate Sugar Skull Cookies
In a stand mixer, combine all ingredients except for food dye and mix on medium-high speed for a few minutes until stiff peaks form. (Add an additional half cup of powdered sugar if needed.)
Divide the icing into 7 bowls and add in a few drops of each food colouring into separate bowls (one bowl black, one bowl light blue, etc.)
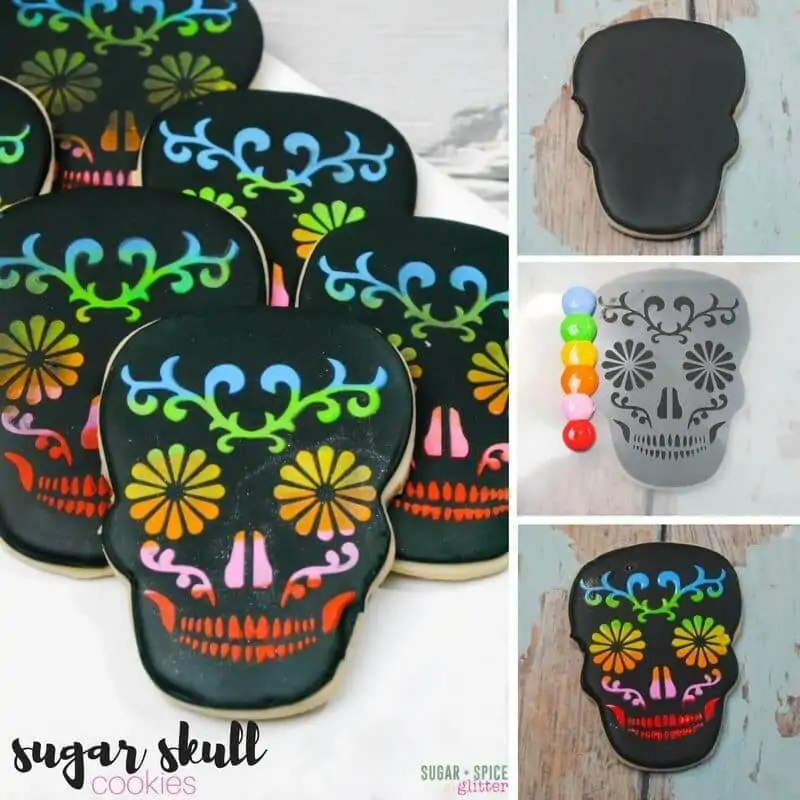
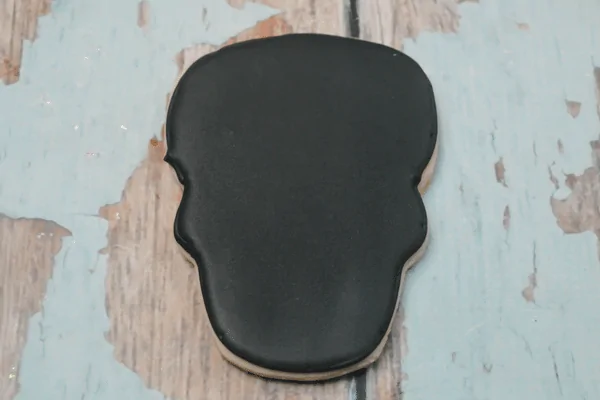
Scoop some of the black icing into a piping bag fitted with a Wilton #2 tip and outline each of the skull cookies.
Thin the remaining black icing with 1 tablespoon of water and pour into a squeeze bottle. Fill in the skull cookies with the thinner icing. Let dry for up to 8 hours (I just let it dry overnight).
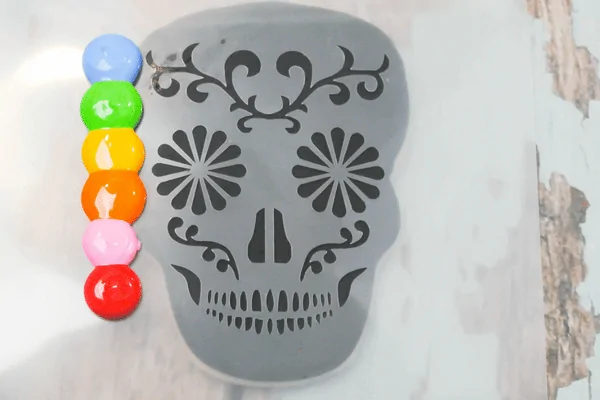
Scoop the remaining colours of icing into individual bags – you can use #3 tips but I would just take a small snippet off of each bag’s tip to make a small hole.
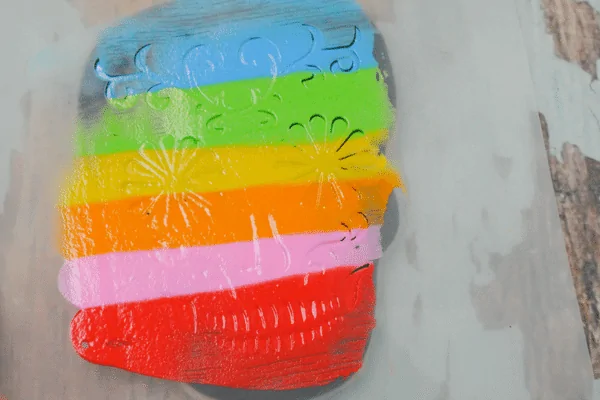
Take the stencil and place it on top of the cookie. You can choose to stencil on colours or take another approach but what I did was pipe on large dots of colour in a vertical row to the side of the stencil – and then slowly scraped it across to the other side of the stencil using a stencil scraper.
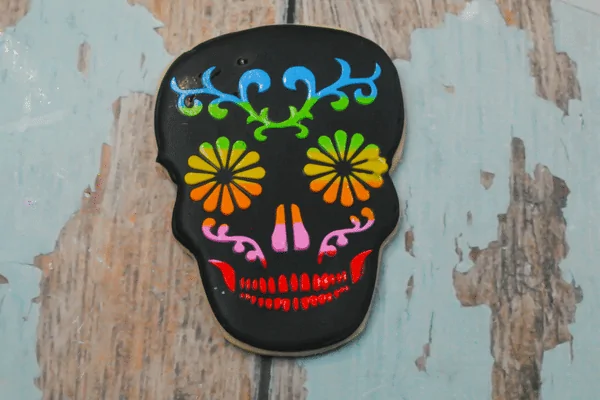
Slowly lift the stencil off the cookie and repeat with remaining cookies. (I cleaned it every two or three cookies to prevent smudges.
Let the decorated sugar skull cookies dry for at least 4 hours before bagging or enjoying.
Pin this fun Sugar Skull Cookies recipe:
Grab your free printable for our Sugar Skull Sugar Cookies here:
Want to Save This Recipe?
Enter your email & I'll send it to your inbox. Plus, get great new recipes from me every week!
By submitting this form, you consent to receive emails from Sugar, Spice and Glitter.
Sugar Skull Cookies
A super simple sugar skull cookie recipe that uses a printable template, this Day of the Dead cookie is great for Día de Muertos or watching Disney's Coco
Ingredients
- 2 1/2 cups flour
- 1 tsp baking soda
- 1 tsp cream of tarter
- 1 C soft unsalted butter
- 1 C powder sugar sugar
- 1 eggs
- 1 tsp almond extract
- 1 tsp vanilla extract
For the royal icing:
- 4 egg whites
- 2 cups powder sugar
- 1/2 tsp cream of tartar
- 1 tsp vanilla
- Food dye in colors: Black, red, pink, yellow, blue, leaf green, orange
Instructions
- Cream the room temperature butter with the sugar for 2 minutes until light and frothy.
- Add in the eggs one at a time, then the vanilla and almond extract, mixing thoroughly.
- Stir the flour, baking soda, and cream of tartar together.
- Add the dry mixture to the wet mixture, and thoroughly blend.
- Form the dough into a ball and place back in your mixing bowl. Cover and refrigerate for one hour.
- Preheat oven to 325F.
- Allow the cookie dough to soften at room temperature for about 10 minutes, and line a baking tray with a silicone baking mat (or parchment paper).
- Flour your work surface to prevent the dough from sticking. Place half of the dough on your work surface and sprinkle flour on the dough and rolling pin.
- Roll the dough to a half-inch thickness and then cut out into the skull shapes. Re-form the ball and re-roll the dough as needed.
- Bake cookies for 8-10 minutes, until just slightly golden and set.
- Let cool for 1 minute before removing the cookies to a cooling rack.
For the decoration:
- In a stand mixer, combine all ingredients except for food dye and mix on medium-high speed for a few minutes until stiff peaks form. (Add an additional half cup of powdered sugar if needed.)
- Divide the icing into 7 bowls and add in a few drops of each food colouring into separate bowls (one bowl black, one bowl light blue, etc.)
- Scoop some of the black icing into a piping bag fitted with a Wilton #2 tip and outline each of the skull cookies.
- Thin the remaining black icing with 1 tablespoon of water and pour into a squeeze bottle. Fill in the skull cookies with the thinner icing. Let dry for up to 8 hours (I just let it dry overnight).
- Scoop the remaining colours of icing into individual bags - you can use #3 tips but I would just take a small snippet off of each bag's tip to make a small hole.
- Take the stencil and place it on top of the cookie. You can choose to stencil on colours or take another approach but what I did was pipe on large dots of colour in a vertical row to the side of the stencil - and then slowly scraped it across to the other side of the stencil using a stencil scraper.
- Slowly lift the stencil off the cookie and repeat with remaining cookies. (I cleaned it every two or three cookies to prevent smudges.
- Let the decorated sugar skull cookies dry for at least 4 hours before bagging or enjoying.
Recommended Products
As an Amazon Associate and member of other affiliate programs, I earn from qualifying purchases.


Nutrition Information:
Yield:
30Serving Size:
1Amount Per Serving: Calories: 177Total Fat: 6gSaturated Fat: 4gTrans Fat: 0gUnsaturated Fat: 2gCholesterol: 22mgSodium: 53mgCarbohydrates: 28gFiber: 0gSugar: 20gProtein: 2g
Sugar, Spice and Glitter uses an auto-generate nutrition calculator. Nutrition information isn’t always accurate unless analyzed in a scientific lab, so these should be considered more of a guideline than medical information.
If you’re planning a Halloween party or just love sugar skulls, be sure to pin this recipe for later!
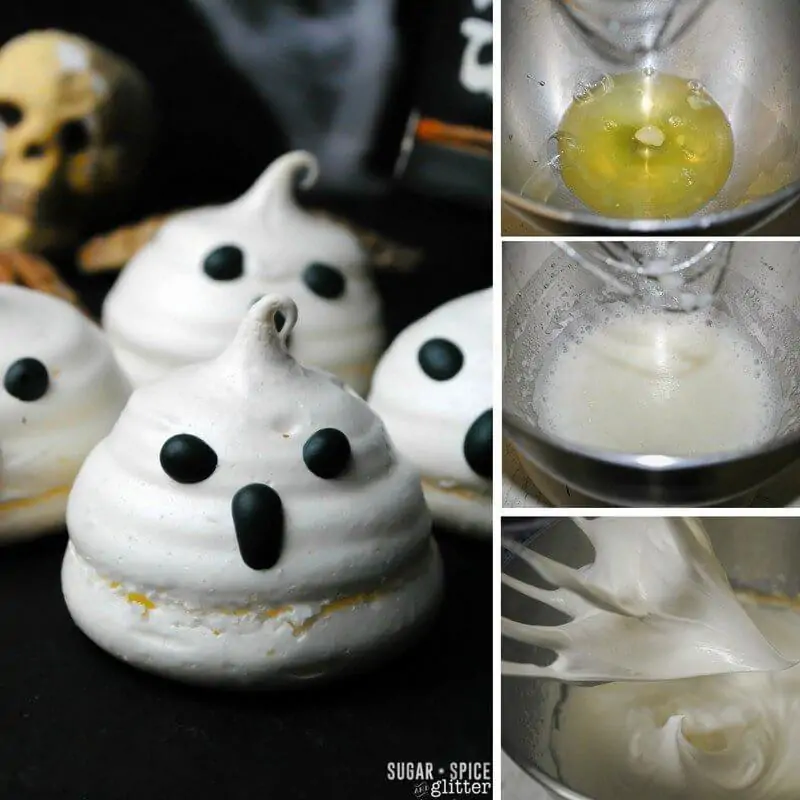
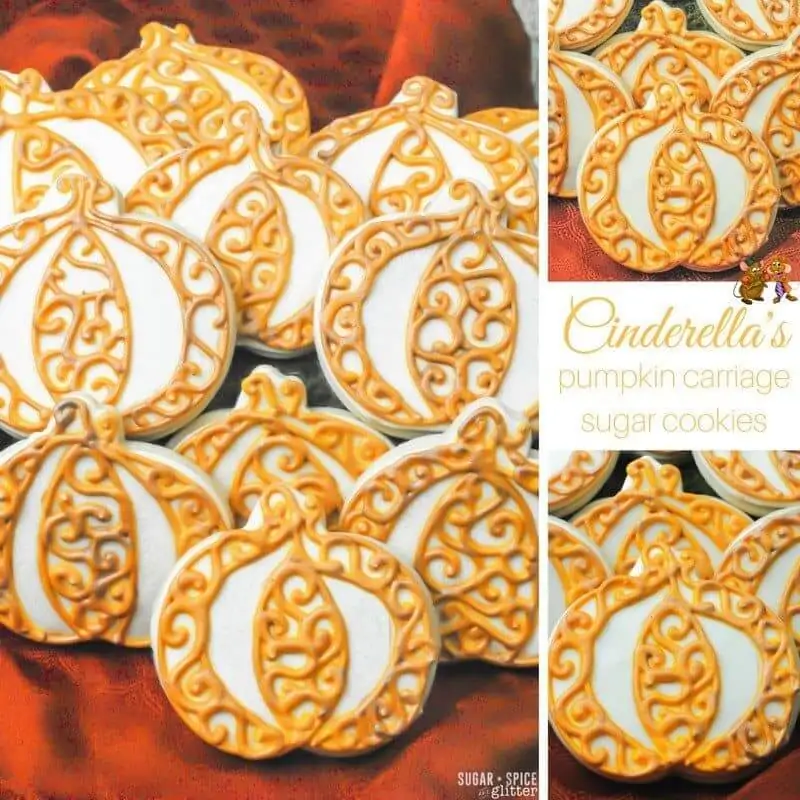
And while you’re here, check out some of our other fun cookie recipes such as our Easy Ghost Meringues or Cinderella’s Pumpkin Carriage cookies.
Check out our other delicious Cookie Recipes:

Awesome recipe… kids loved the not only the look, they enjoyed the taste. I will definitely utilize your site.
These are stunning and such a fun way celebrate Day of the Dead and Halloween!
Beautiful cookies! You are way more talented than I am in the cookie decorating department 🙂 I love the sentiment behind the tradition with your daughter!
These are absolutely incredible! I would never have thought of using a stencil to achieve such a perfect design but it’s a genius idea – and I love that this gives your daughter a tangible way to remember her loved ones!
I can’t get the stencil is this suppose to be a download?
No, it’s not a printable download. I do give a suggestion on how to DIY your own stencil, but this is a mailed product.
I only got a dozen sugar skull cookies when I rolled them 1/2 inch thick. Recipe show the recipe should yield 30. How is that possible?
It really just depends on the size of your cookie cutter. I’m sorry for the frustration – I’m going to amend the recipe card to show 12 large cookies or 30 medium-sized skull cookies.
Recipe calls for powder sugar sugar in the cookie. is that supposed to be regular sugar?
Hi Sarah – I usually use white granulated sugar but for this recipe we went with powdered sugar for a softer cookie (to balance it out with the royal icing).
The colors are so vibrant…these are amazing!
I’m curious though…how thin did you make the icing for the colors? So many times I’ve seen people stenciling with a thick paste consistency RI.
Hi Trisha,
I’m sorry I missed your question until now. The icing was not as thick as a buttercream but not runny because I wanted it to stay within the lines of the stencil. If you’ve ever used those little piping bags of pre-made Betty Crocker frosting (not the jars) it’s slightly runnier/thinner than that.