Flower Melted Crayon Art (with Video)
Welcome to Sugar, Spice & Glitter! Please note, this post may contain affiliate links. For more details, see our Full Disclosure.
A fun and easy Melted Crayon Art project for Kids, today’s Garden Melted Crayon Art is super simple to make with everyday craft materials and makes the perfect homemade gift for the gardener in your child’s life.

Garden Melted Crayon Art Project
A few days ago, Ella was feeling a bit of nostalgia and brought up this Crayon Drip Rain Cloud art project that we had done years ago on a lazy, rainy day.
Crayon drip paintings are one of those classic kids’ art projects that I tend to forget about, but then whenever we make a new one I’m reminded of how fun and easy they are to make.
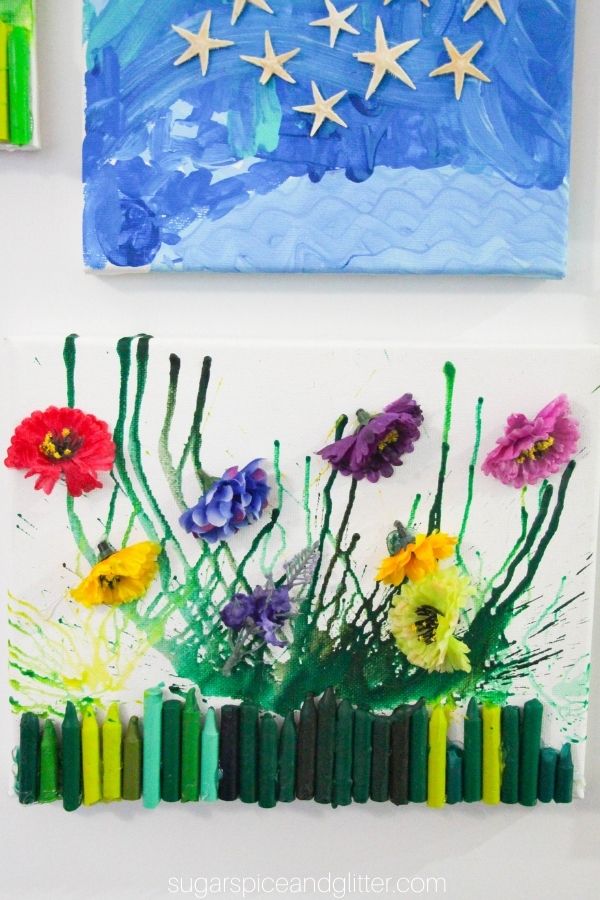
I wanted to come up with a different twist and we had plenty of extra craft flowers in our craft room, so a melted crayon garden was the perfect option. We did one with poppies (we’re big on poppy crafts) and one with multi-colored wildflowers. I really love how different both of them came out – despite using the same materials and being created by the same kid.
We left the crayons glued onto the canvas but you can use metal binder clips to hold the crayons in place for the drip melting portion of the craft, and then remove them after you’re done. Removing them would probably be best if you are doing several of these paintings so you can get the most use out of your green crayons.

If you don’t have acrylic flowers on hand but want to make a similar flower-themed melted crayon art, you can create little swirls of yarn at the end of the crayon drips that suggest flowers, use craft pom poms, draw paper flowers, etc. Just have fun, be creative and make it your own!
Check out our quick video to see how Ella made her garden-themed melted crayon art – and then don’t forget to scroll down to grab your free printable instructions:
More Melted Crayon Art Projects:
- Crayon Drip Rain Cloud
- Melted Crayon Pendant Banner from the Pretty Bee
- Melted Crayon Art Jewelry from Color Made Happy
- Melted Crayon Dot Art from Pieces by Polly
- Melted Crayon Butterflies from Art Bar Blog

Materials to Make Melted Crayon Art
- Green Crayons
- Hot Glue or Strong Craft Glue
- Large Binder Clips, optional
- Canvas
- Acrylic Flowers
- Hair Dryer
Scroll down to the printable recipe card for full measurements.
Tip: we used an old cookie sheet as a “drip tray” for this activity. The melted crayon wax can get messy, so be sure to protect your surfaces or do this craft outside to avoid having drips of hardened wax everywhere.
How to Make a Garden Melted Crayon Canvas
Assemble all of your materials and remove the paper wrappers from the crayons.

Break the crayons in pieces. You can try to keep them uniform in size or break them in a variety of sizes, whichever you prefer.

Use hot glue or strong craft glue to attach the broken green crayons along one side of the canvas.
Or, if you want to re-use your green crayons, use large binder clips to hold the crayons in place.

Allow the glue to dry completely, then place the canvas on a protected surface (we used an old cookie sheet).
Use your hair dryer to melt the crayons and aim the direction of their drips wherever you’d like.

You can hold the hair dryer straight-on or at a downward angle. Experiment to see what angles and temperature settings give you the best results.
Try to avoid aiming the hot air at where the crayons are glued down, as that may loosen the glue and cause the crayons to fall off.

Once you have melted the crayons to your personal preference, allow the wax to dry completely.
Use a strong craft glue or hot glue to attach the fake flowers to the crayon drips.

Allow the glue to dry completely before hanging canvas.
If you plan to remove the green crayons (by using the binder clip method), you can add an embellishment like ribbon or felt along the bottom of the canvas to cover where the green crayons had been.

Pin this Easy Melted Crayon Art Project for a Rainy Day activity:

Grab your free printable instructions for our garden melted crayon art project:
Want to Save This Recipe?
Enter your email & I'll send it to your inbox. Plus, get great new recipes from me every week!
By submitting this form, you consent to receive emails from Sugar, Spice and Glitter.
Flower Melted Crayon Art
How to make a garden-themed melted crayon art piece - the perfect homemade gift for the gardener in your life. Kids will love getting to make and customize their own garden painting using different fake flowers.
Materials
- Green Crayons
- Canvas
- Acrylic Flowers
Tools
- Hot Glue or Strong Craft Glue
- Large Binder Clips, optional
- Hair Dryer
Instructions
- Assemble all of your materials and remove the paper wrappers from the crayons.
- Break the crayons in pieces. You can try to keep them uniform in size or break them in a variety of sizes, whichever you prefer.
- Use hot glue or strong craft glue to attach the broken green crayons along one side of the canvas. Or, if you want to re-use your green crayons, use large binder clips to hold the crayons in place.
- Allow the glue to dry completely, then place the canvas on a protected surface (we used an old cookie sheet).
- Use your hair dryer to melt the crayons and aim the direction of their drips wherever you'd like. You can hold the hair dryer straight-on or at a downward angle. Experiment to see what angles and temperature settings give you the best results. Try to avoid aiming the hot air at where the crayons are glued down, as that may loosen the glue and cause the crayons to fall off.
- Once you have melted the crayons to your personal preference, allow the wax to dry completely.
- Use a strong craft glue or hot glue to attach the fake flowers to the crayon drips.
- Allow the glue to dry completely before hanging canvas.
- If you plan to remove the green crayons (by using the binder clip method), you can add an embellishment like ribbon or felt along the bottom of the canvas to cover where the green crayons had been.
Recommended Products
As an Amazon Associate and member of other affiliate programs, I earn from qualifying purchases.


I hope your kids love getting to make their own melted crayon gardens!
For more easy crafts for kids, check out our full kids’ craft collection here:
For more Spring-inspired projects, check out our full Spring Craft collection here:
For more Summer-inspired projects, check out our full Summer Craft collection here: