
Montessori Practical Life Lesson: Cutting Carrots
Welcome to Sugar, Spice & Glitter! Please note, this post may contain affiliate links. For more details, see our Full Disclosure.
After the basic Montessori Practical Life Lessons have been completed, encouraging children to be careful and orderly in their work, you can start introducing fun & exciting practical life lessons like this carrot cutting activity.
Trusting children with real tools is a huge hurdle for many parents, so following your child’s pace and providing child-sized tools can help take some of the fear out of the process of teaching how to use knives, or other intimidating kitchen tools.
Beth Holley explains:
Today’s Montessori practical life lesson demonstrates another kitchen activity: cutting and serving carrots as a healthy snack.
I would like to say a few words about the social aspects of the Montessori practical life lessons. Because these activities are individual, done by one child at a time, people often get the impression that there is no social component. As with everything Montessori, though, we need to look a little more carefully.
First, in a Montessori classroom, there is only one of each practical life material available on the shelves. This means that every child must wait her turn, if the material is already in use by another. Waiting a turn helps children to develop impulse control and delaying gratification.
While one child is using a material, another may not touch it without the first child’s permission. This rule establishes boundaries and respect for one another’s work. To join a friend in her work, a child must ask. This asking of permission develops communication skills, as the child must express what it is that she would like–and learn to take no for an answer when given: a coping skill.
When finished with a work, the child must return it to the shelf clean, complete, and ready to use for the next person–another demonstration of respect for others.
Once the child reaches a certain skill level, the practical life activities should be real activities that are part of the child’s culture. In polishing a decor item, watering the plants, or cutting and serving snack, the child perceives that she is making a direct contribution to the care of the environment, and thus to the whole community who lives within the environment.
Finally, food preparation and “bread-breaking” can be an opportunity for social bonding and fellowship. The child learns to be gracious when she prepares a snack and offers it to others. And sharing a snack together at the snack table is a wonderful opportunity to practice the art of talking to one’s friend.
As you can see, the social aspects of the practical life activities may not be immediately obvious, but they are numerous all the same. You might think about the principles outlined above and how they might work in a home environment.
Now let’s get back to the food and cut some carrots!
How to Present Cutting Carrots
Purpose:
- Direct: To learn the steps and to develop the strength and dexterity needed to cut carrots.
- Indirect: Sequencing, completion of task, independence, concentration, and development of social graces in offering snack to others.
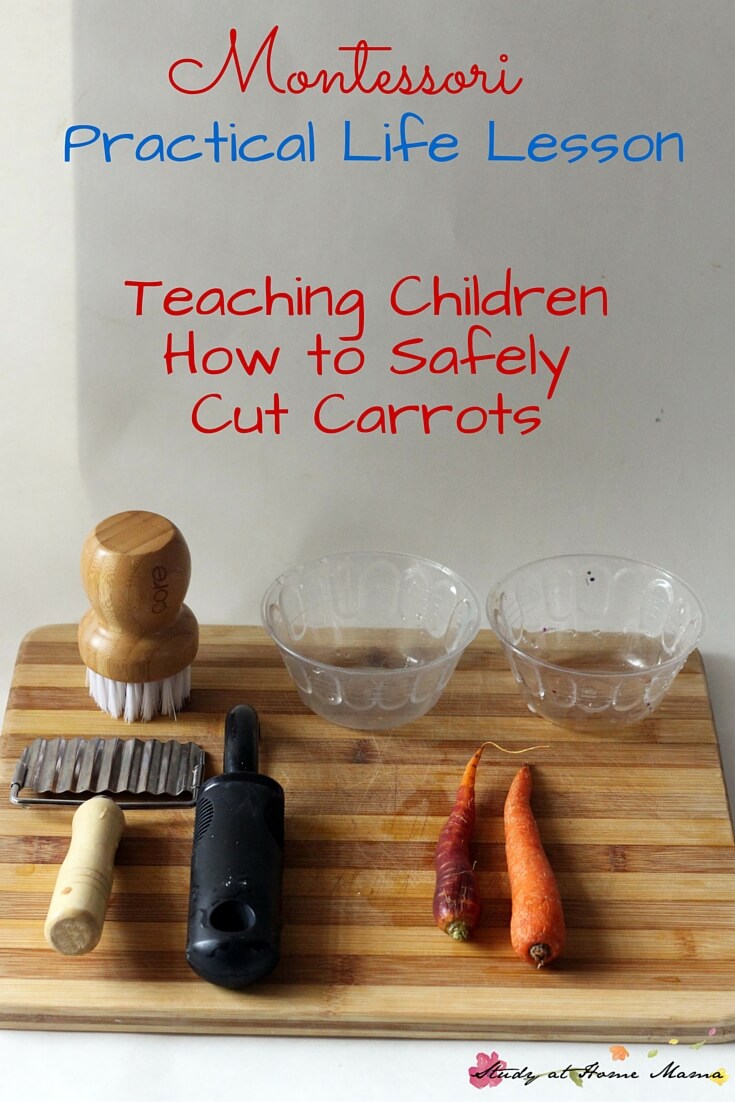
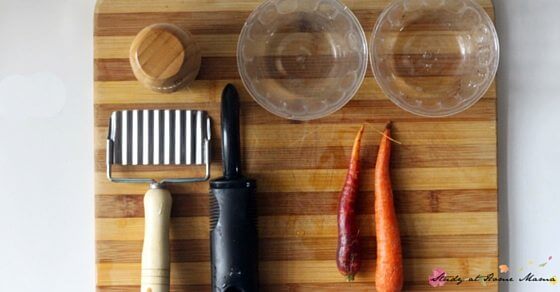
Material:
- small tray
- small cutting board
- vegetable peeler
- wavy vegetable cutter
- serving dish
- bowl or wastebasket for carrot shavings
- non-slip placemat
- child-sized apron
- pre-washed, full-sized carrots
You can purchase a complete carrot cutting set from Montessori Services.
Age: 3 1/2+

Presentation:
1. Bring materials to the table.
2. Invite the child to put on the apron (teacher puts on her own apron).
3. Spread out the placemat and put the cutting board in the center.
4. Put the vegetable peeler and wavy cutter to one side of the cutting board; put the serving dish to the other. If you’re using a bowl to catch the carrot shavings, place it on the mat, as well. If using a wastebasket, place it just below you.
5. Set the tray aside.
6. Retrieve a carrot.
7. Demonstrate peeling the carrot with the vegetable peeler: over a large bowl or wastebasket, hold the carrot firmly with one hand and use quick downward strokes to scrape the carrot, rotating the carrot as needed. Flip the carrot and peel the other end.
8. Set aside the shavings. Place the carrot in the center of the cutting board.
9. Demonstrate cutting the carrot with the wavy cutter: while standing, steady the carrot with one hand; firmly grip the wavy cutter by the handle in the other, and apply downward pressure until the carrot slices.
10. Continue with the whole carrot. If needed, in the thicker part of the carrot, you may show using two hands on the wavy cutter: one holding the handle, and the other, open palmed, applying pressure from above.
11. Place the pieces on the serving dish.
12. When the whole carrot is sliced and place on the serving dish, demonstrate offering carrot slices to others in the room, saying “Would you care for some carrot?”
13. Invite the child to slice and serve her own carrot.
14. Demonstrate washing and putting away all the materials.

Points of Interest:
- Does the child rotate the carrot as she peels/scrapes it?
- Does she steady the carrot with one hand, while she cuts with the other?
- Does she exercise enough downward pressure to cut through the carrot with the wavy cutter?
- Does she keep her fingers safely away from the peeler and cutter blades?
- Does she determine when she needs to use two hands on the wavy cutter, if necessary?
Note: The cutting board should go directly on top of a non-slip placemat. Some tray surfaces are slick, and using the cutting board on top of a tray, may result in the board and carrot slipping away from the child.
If you would like to prepare a simplified version of this lesson for a child who may not be ready for so many steps, you can pre-scrape the carrots, and show only slicing with the wavy cutter.
To learn more about Montessori theory, please visit Beth’s blog A Montessori Lexicon, and you can also find her on Teachers Pay Teachers.
The non-slip mat is absolutely essential to avoid the child’s frustration. Also, for younger kids like mine who still needs his strength to cut the carrot, I slice it in half length-wise so that it doesn’t move around. It helps him to concentrate on cutting. Great post!